我想知道如何使用RelativeLayout在两个其他视图之间(或在视图和父边缘之间)居中一个视图。
例如,如果我有以下内容...
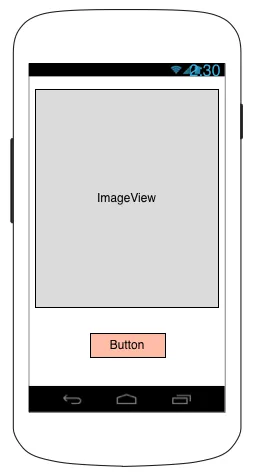
如何使用RelativeLayout在ImageView和屏幕底部之间垂直居中Button?
我正在寻找以下解决方案:
- Button不会在任何方式下伸展
- 没有嵌套布局
并且我尝试在XML布局中完成此操作(而不是以编程方式)。
我想知道如何使用RelativeLayout在两个其他视图之间(或在视图和父边缘之间)居中一个视图。
例如,如果我有以下内容...
如何使用RelativeLayout在ImageView和屏幕底部之间垂直居中Button?
我正在寻找以下解决方案:
并且我尝试在XML布局中完成此操作(而不是以编程方式)。
你可以使用以下代码:
<RelativeLayout
        android:layout_below="@id/theImageView"
        android:align_parentBottom="true"
        android:layout_width="match_parent"
        android:layout_height="200dp" >


        <Button
            android:id="@+id/btn"
            android:layout_width="wrap_content"
            android:layout_height="wrap_content"
            android:layout_centerHorizontal="true"
            android:layout_centerVertical="true"
            android:onClick="onClickButton"
            android:textSize="20sp"
            android:text="Go"/>

    </RelativeLayout>
<LinearLayout
    android:width="match_parent"
    android:height="match_parent"
    android:orientation="vertical">
    <ImageView
        android:layout_width="wrap_content"
        android:layout_height="wrap_content"
        android:src="@drawable/my_top_image"/>
    <RelativeLayout
        android:layout_width="fill_parent"
        android:layout_height="0dip"
        android:layout_weight="1">
        <Button
            android:layout_width="wrap_content"
            android:layout_height="wrap_content"
            android:layout_centerInParent="true"
            android:text="@string/my_button_label"/>
    </RelativeLayout>
</LinearLayout>
这将把图片放在顶部。在此之下,RelativeLayout 上的 layout_height=0 和 layout_weight=1 属性会使其占用所有剩余空间。然后你可以将按钮居中在 RelativeLayout 中。你可以通过调整按钮的内边距来达到所需的大小。
<RelativeLayout xmlns:android="http://schemas.android.com/apk/res/android"
    xmlns:tools="http://schemas.android.com/tools"
    android:layout_width="fill_parent"
    android:layout_height="fill_parent" >

    <LinearLayout
        android:id="@+id/mLlayout1"
        android:layout_width="fill_parent"
        android:layout_height="fill_parent"
        android:orientation="vertical" >

        <ImageView
            android:id="@+id/mImgView1"
            android:layout_width="fill_parent"
            android:layout_height="match_parent"
            android:layout_weight="1"
            android:src="@drawable/ic_launcher" />

        <RelativeLayout
            android:layout_width="fill_parent"
            android:layout_height="match_parent"
            android:layout_weight="2" >

            <Button
                android:id="@+id/Btn1"
                android:layout_width="wrap_content"
                android:layout_height="wrap_content"
                android:layout_centerInParent="true"
                android:text="Dipak" />
        </RelativeLayout>
    </LinearLayout>

</RelativeLayout>
在XML文件中使用android:layout_centerInParent="true"。
<LinearLayout xmlns:android="http://schemas.android.com/apk/res/android"
    android:layout_width="match_parent"
    android:layout_height="match_parent"
    android:orientation="vertical"
    android:weightSum="1.0" >

    <RelativeLayout
        android:layout_width="match_parent"
        android:layout_height="0dip"
        android:layout_weight="0.8"
        android:background="#00ff00" >

        <ImageView
            android:layout_width="wrap_content"
            android:layout_height="wrap_content"
            android:layout_centerInParent="true" />
    </RelativeLayout>

    <RelativeLayout
        android:layout_width="match_parent"
        android:layout_height="0dip"
        android:layout_weight="0.2" >

        <Button
            android:layout_width="wrap_content"
            android:layout_height="wrap_content"
            android:layout_centerInParent="true"
            android:text="Button" />
    </RelativeLayout>

</LinearLayout>
<?xml version="1.0" encoding="utf-8"?>
<RelativeLayout xmlns:android="http://schemas.android.com/apk/res/android"
    android:layout_width="wrap_content"
    android:layout_height="wrap_content" >

    <LinearLayout
        android:id="@+id/linearLayout1"
        android:layout_width="120dp"
        android:layout_height="120dp"
        android:layout_alignParentBottom="true"
        android:layout_alignParentLeft="true"
        android:background="#00ccFF"
        android:orientation="horizontal" >
    </LinearLayout>

    <LinearLayout
        android:layout_width="59dp"
        android:layout_height="59dp"
        android:layout_alignRight="@+id/linearLayout1"
        android:layout_alignTop="@+id/linearLayout1"
        android:layout_marginRight="-21dp"
        android:layout_marginTop="-21dp"
        android:background="#FFccFF"
        android:orientation="vertical" >
    </LinearLayout>

</RelativeLayout>
类似的,如果你想要一个带有垂直条形的信号级别可绘制对象,并且在它们之间包括一些不可见的空格,可以使用以下代码:
<item android:top="35dp" android:left="0dp" android:right="110dp">
    <shape android:shape="rectangle">
        <solid android:color="@android:color/holo_blue_dark"/>
        <size android:height="10dp" android:width="10dp"/>
    </shape>
</item>

<item android:top="35dp" android:left="10dp" android:right="100dp">
    <shape android:shape="rectangle">
        <solid android:color="@android:color/transparent"/>
        <size android:height="20dp" android:width="10dp"/>
    </shape>
</item>

<item android:top="30dp" android:left="20dp" android:right="90dp">
    <shape android:shape="rectangle">
        <solid android:color="@android:color/holo_blue_bright"/>
        <size android:height="30dp" android:width="10dp"/>
    </shape>
</item>

<item android:top="25dp" android:left="30dp" android:right="80dp">
    <shape android:shape="rectangle">
        <solid android:color="@android:color/holo_blue_dark"/>
        <size android:height="40dp" android:width="10dp"/>
    </shape>
</item>

<item android:top="25dp" android:left="40dp" android:right="70dp">
    <shape android:shape="rectangle">
        <solid android:color="@android:color/transparent"/>
        <size android:height="40dp" android:width="10dp"/>
    </shape>
</item>

<item android:top="20dp" android:left="50dp" android:right="60dp">
    <shape android:shape="rectangle">
        <solid android:color="@android:color/holo_blue_bright"/>
        <size android:height="40dp" android:width="10dp"/>
    </shape>
</item>

<item android:top="15dp" android:left="60dp" android:right="50dp">
    <shape android:shape="rectangle">
        <solid android:color="@android:color/holo_blue_dark"/>
        <size android:height="40dp" android:width="10dp"/>
    </shape>
</item>

<item android:top="15dp" android:left="70dp" android:right="40dp">
    <shape android:shape="rectangle">
        <solid android:color="@android:color/transparent"/>
        <size android:height="40dp" android:width="10dp"/>
    </shape>
</item>

<item android:top="10dp" android:left="80dp" android:right="30dp">
    <shape android:shape="rectangle">
        <solid android:color="@android:color/holo_blue_bright"/>
        <size android:height="40dp" android:width="10dp"/>
    </shape>
</item>

<item android:top="5dp" android:left="90dp" android:right="20dp">
    <shape android:shape="rectangle">
        <solid android:color="@android:color/holo_blue_dark"/>
        <size android:height="40dp" android:width="10dp"/>
    </shape>
</item>

<item android:top="5dp" android:left="100dp" android:right="10dp">
    <shape android:shape="rectangle">
        <solid android:color="@android:color/transparent"/>
        <size android:height="45dp" android:width="10dp"/>
    </shape>
</item>

<item android:top="0dp" android:left="110dp" android:right="0dp">
    <shape android:shape="rectangle">
        <solid android:color="@android:color/holo_blue_dark"/>
        <size android:height="50dp" android:width="10dp"/>
    </shape>
</item>

我认为你所需要的就是像平常一样对齐ImageView,然后使用layout_below对齐按钮,无需硬编码或使用嵌套视图,在按钮上使用android:gravity="center"即可完成。
   <RelativeLayout
    android:layout_below="@id/theImageView"
    android:align_parentBottom="true"
    android:layout_width="match_parent"
    android:layout_height="200dp" >

   <ImageView
       android:id="@+id/imgview"
        android:layout_width="match_parentmat"
        android:layout_height="wrap_content"  />
    <Button
        android:id="@+id/btn"
        android:layout_width="wrap_content"
        android:layout_height="wrap_content"
        android:layout_below="@+id/imgview"
        android:gravity="center"
        android:onClick="onClickButton"
        android:textSize="20sp"
        android:text="Go"/>

</RelativeLayout>
    <?xml version="1.0" encoding="utf-8"?>
<RelativeLayout xmlns:android="http://schemas.android.com/apk/res/android"
    android:layout_width="fill_parent"
    android:layout_height="fill_parent" >

    <ImageView
        android:id="@+id/imageView1"
        android:layout_width="300dp"
        android:layout_height="300dp"
        android:layout_alignParentTop="true"
        android:layout_centerHorizontal="true"
        android:layout_marginTop="20dp"
        android:src="@drawable/wood" />

    <Button
        android:id="@+id/button1"
        android:layout_width="wrap_content"
        android:layout_height="wrap_content"
        android:layout_alignLeft="@+id/imageView1"
        android:layout_below="@+id/imageView1"
        android:layout_marginLeft="101dp"
        android:layout_marginTop="53dp"
        android:text="Image Button" />
</RelativeLayout>