提高OpenCV Python中findContour函数的准确性

5
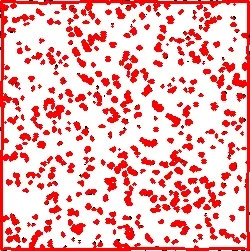
我正在尝试将最小边界框拟合到下面显示的每个“斑点”上。作为图像处理管道的一部分,我使用findContours在我的数据中检测轮廓,然后在发现的轮廓数组中绘制最小边界框。
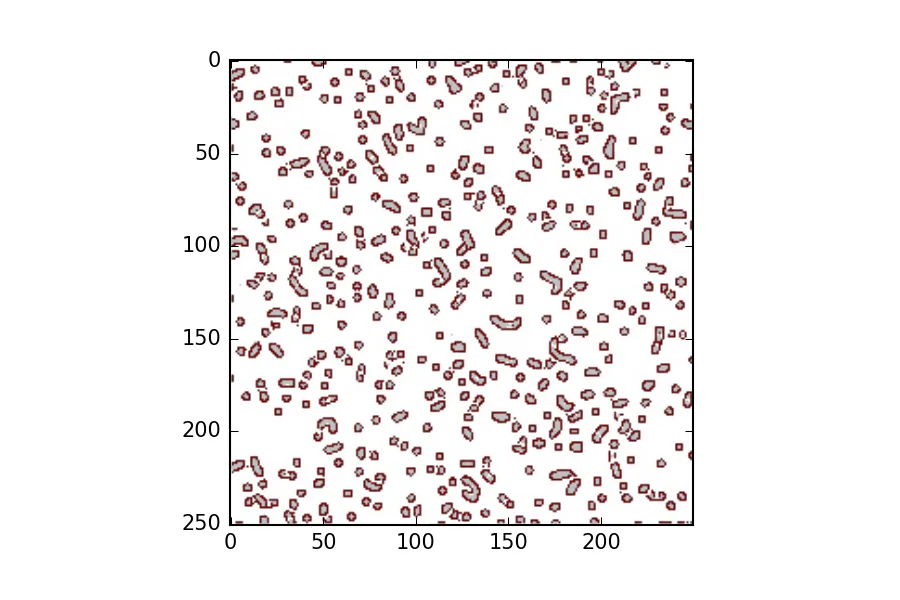
最小边界框不是非常准确-有些特征明显被错过,而另一些则未能完全“封装”完整连接的特征(而是分割成几个小的最小边界框)。我已经尝试了不同的检索模式(如下所示的RETR_TREE)和轮廓逼近方法(如下所示的CHAIN_APPROX_TC89_L1),但没有找到我真正喜欢的东西。有人能建议一个更可靠的策略,以使用OpenCV Python更准确地捕获这些轮廓吗?
import numpy as np
import cv2

# load image from series of frames
for x in range(1, 20):
    convolved = cv2.imread(x.jpg)
    original = convolved.copy

    #convert to grayscale   
    gray = cv2.cvtColor(convolved, cv2.COLOR_BGR2GRAY)

    #find all contours in given frame, store in array
    contours, hierarchy = cv2.findContours(gray,cv2.RETR_TREE, cv2.CHAIN_APPROX_TC89_L1)
    boxArea = []

    #draw minimum bounding box around each discovered contour
    for cnt in contours:
        area = cv2.contourArea(cnt)
        if area > 2 and area < 100:
            rect = cv2.minAreaRect(cnt)
            box = cv2.cv.BoxPoints(rect)
            box = np.int0(box)
            cv2.drawContours(original,[box], 0, (128,255,0),1)           
            boxArea.append(area)

    #save box-fitted image        
    cv2.imwrite('x_boxFitted.jpg', original)
    cv2.waitKey(0)

编辑:根据Sturkman的建议,绘制所有可能的轮廓似乎可以涵盖所有可视特征。

输入图像描述


请将您的代码发布 - sturkmen
请查看新的编辑。 - batlike
肯定是检测的问题,因为它在绘制轮廓线之前。 - batlike
1
尝试使用 
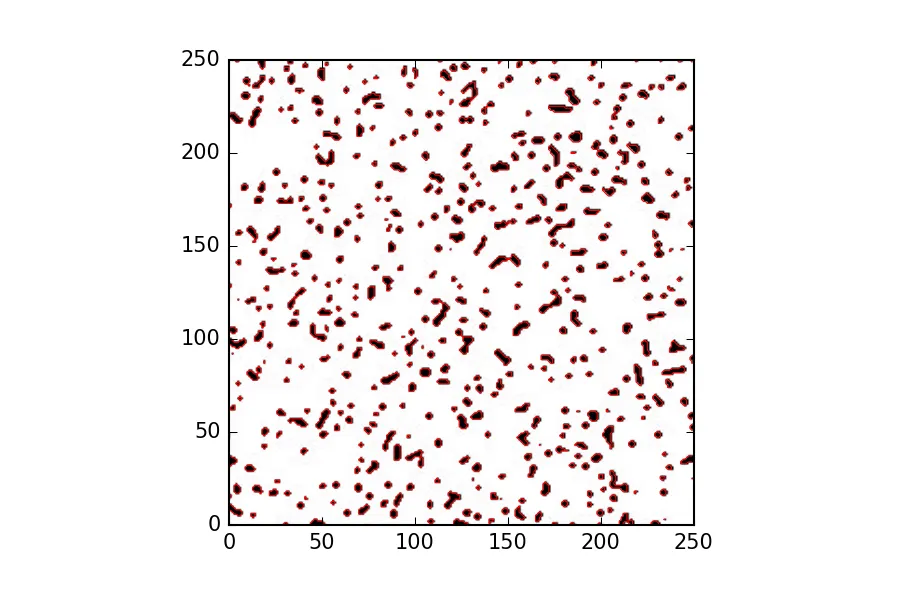
cv2.drawContours(original, contours, -1, (0,0,255), 2) 来测试绘制所有轮廓。 - sturkmen
可检测的轮廓似乎很好地覆盖了所有特征,就像ImageJ中的“填充”一样。 - batlike
显示剩余3条评论
1个回答

2

我知道这个问题是关于OpenCV的,但是因为我习惯使用skimage,这里分享一些想法(这些想法在OpenCV中肯定也有)。

import numpy as np
from matplotlib import pyplot as plt
from skimage import measure
from scipy.ndimage import imread
from skimage import feature
%matplotlib inline

'''
Contour detection using a marching square algorithm.
http://scikit-image.org/docs/dev/auto_examples/plot_contours.html
Not quite sure if this is the best approach since some centers are
biased. Probably, due to some interpolation issue.
'''

image = imread('irregular_blobs.jpg')
contours = measure.find_contours(image,25,
                                 fully_connected='low',
                                positive_orientation='high')
fig, ax = plt.subplots(ncols=1)
ax.imshow(image,cmap=plt.cm.gray)
for n, c in enumerate(contours):
    ax.plot(c[:,1],c[:,0],linewidth=0.5,color='r')

ax.set_ylim(0,250)
ax.set_xlim(0,250)
plt.savefig('skimage_contour.png',dpi=150)

Contour detection

'''
Personally, I would start with some edge detection. For example,
Canny edge detection. Your Image is really nice and it should work.
'''
edges = feature.canny(image, sigma=1.5)
edges = np.asarray(edges)
# create a masked array in order to set the background transparent
m_edges = np.ma.masked_where(edges==0,edges)
fig,ax = plt.subplots()
ax.imshow(image,cmap=plt.cm.gray,alpha=0.25)
ax.imshow(m_edges,cmap=plt.cm.jet_r)


plt.savefig('skimage_canny_overlay.png',dpi=150)

坎尼边缘检测

本质上,没有所谓的“最佳方法”。例如,边缘检测可以很好地检测位置,但某些结构仍然保持开放状态。另一方面,轮廓查找产生了封闭结构,但中心存在偏差,您必须尝试并调整参数。如果您的图像有一些干扰背景,您可以使用膨胀来减去背景。此处提供了一些如何执行膨胀的信息。有时封闭操作也会很有用。

从您发布的图像来看,似乎您的阈值太高或背景太嘈杂。降低阈值和/或膨胀可能有所帮助。


谢谢Moritz。检测轮廓对我而言并非终点,而是测量每个“斑点”沿其主轴的长度的手段。我想使用最小边界框拟合可以估计其长度。您是否知道一种方法可以沿着每个检测到的轮廓拟合多项式曲线? - batlike
你可以尝试特性检测。 - Moritz

网页内容由stack overflow 提供, 点击上面的
可以查看英文原文,
原文链接