如何使用Python的Pillow库给PNG图像添加轮廓/描边/边框?

4

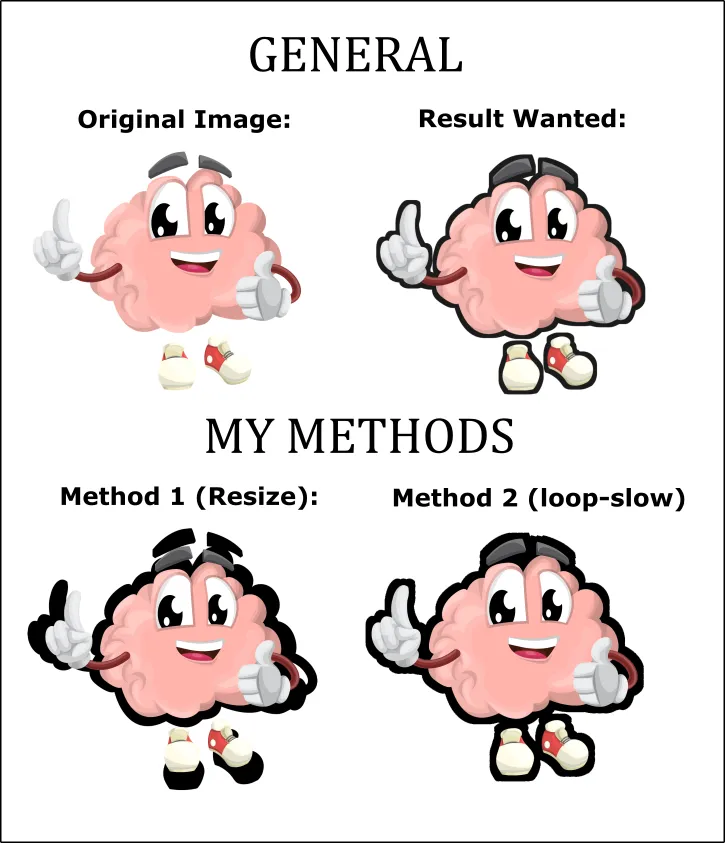
我正在尝试使用Pillow(Python-imaging-library)库来创建一个轮廓/描边/边框(以任何颜色和宽度选择)在我的.png图像周围。您可以在这里看到原始图像和我想要的结果(由手机应用程序创建):https://istack.dev59.com/4x4qh.webp

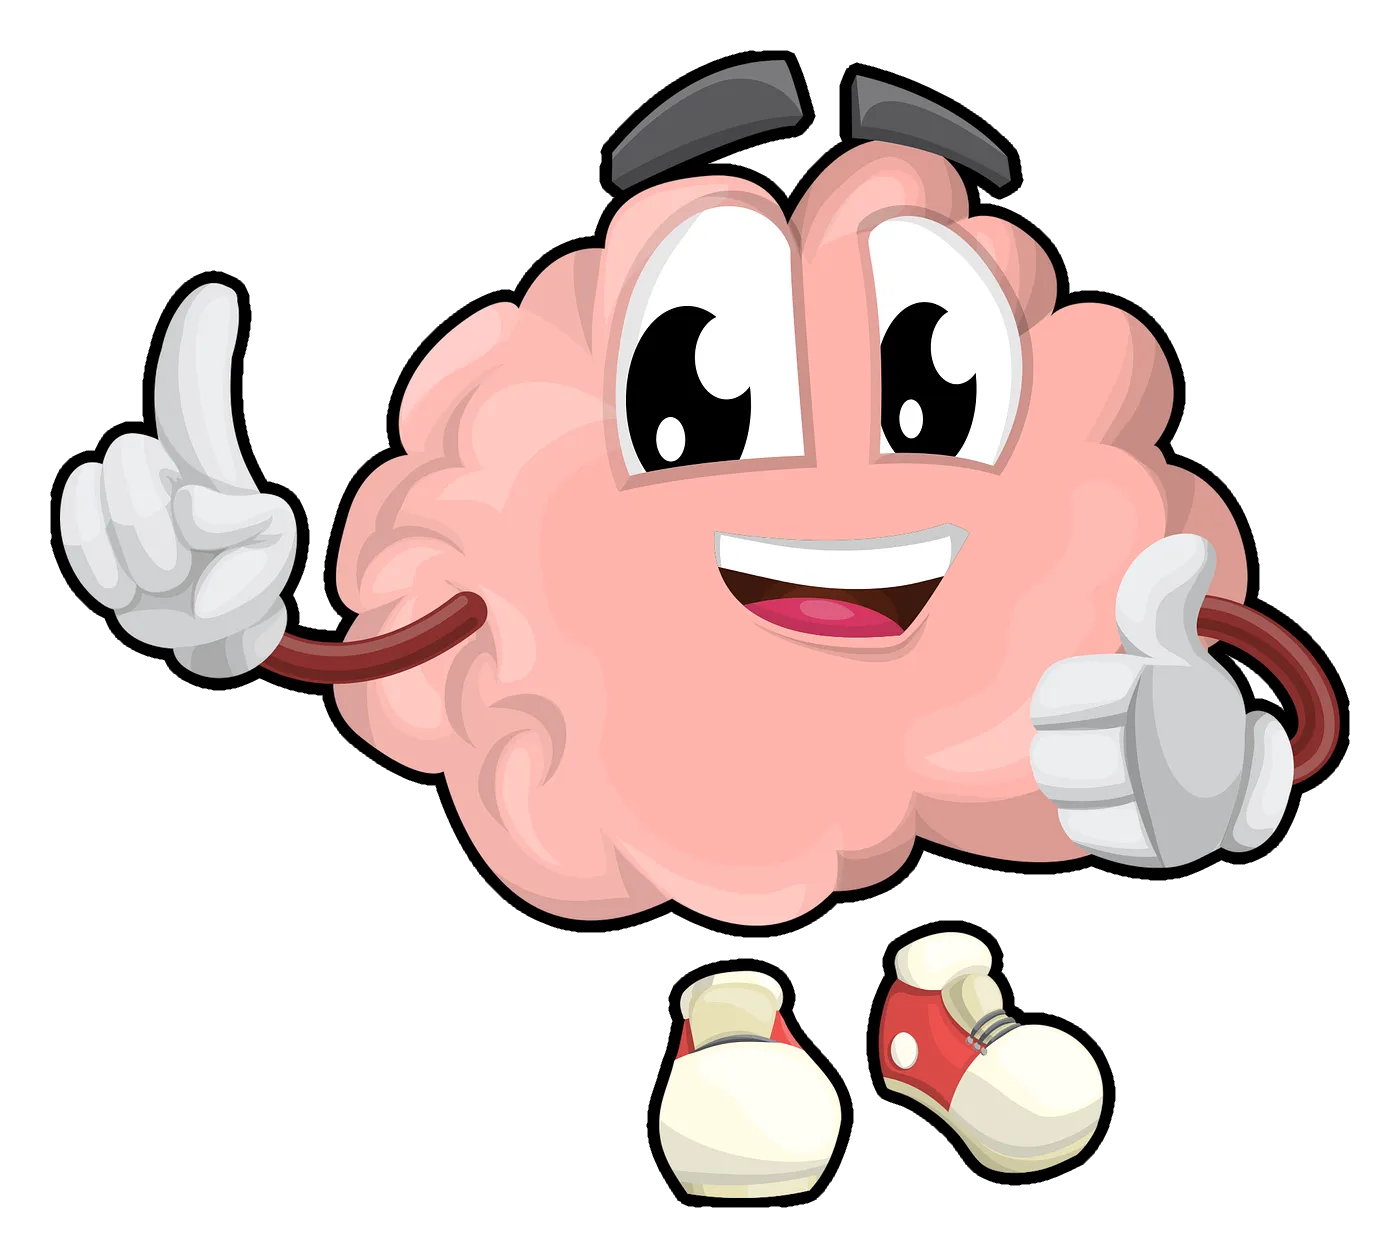
您可以在此处下载原始图像的png文件:https://pixabay.com/illustrations/brain-character-organ-smart-eyes-1773885/

我已经在中等大小(1280x1138)上完成了它,但也许最好使用最小的大小(640x569)。

我尝试用两种方法解决这个问题。

第一种方法

第一种方法是创建一个完全黑色的brain.png图像,放大它,并将原始彩色的brain图像粘贴在其上。这是我的代码:

brain_black = Image.open("brain.png") #load brain image
width = brain_black.width #in order not to type a lot
height = brain_black.height #in order not to type a lot
rectangle = Image.new("RGBA", (width, height), "black") #creating a black rectangle in the size of the brain image
brain_black.paste(rectangle, mask=brain_black) #pasting on the brain image the black rectangle, and masking it with the brain picture

#now brain_black is the brain.png image, but all its pixels are black. Let's continue:

brain_black = brain_black.resize((width+180, height+180)) #resizing the brain_black by some factor
brain_regular = Image.open("brain.png") #load the brain image in order to paste later on
brain_black.paste(brain_regular,(90,90), mask=brain_regular) #paste the regular (colored) brain on top of the enlarged black brain (in x=90, y=90, the middle of the black brain)
brain_black.save("brain_method_resize.png") #saving the image

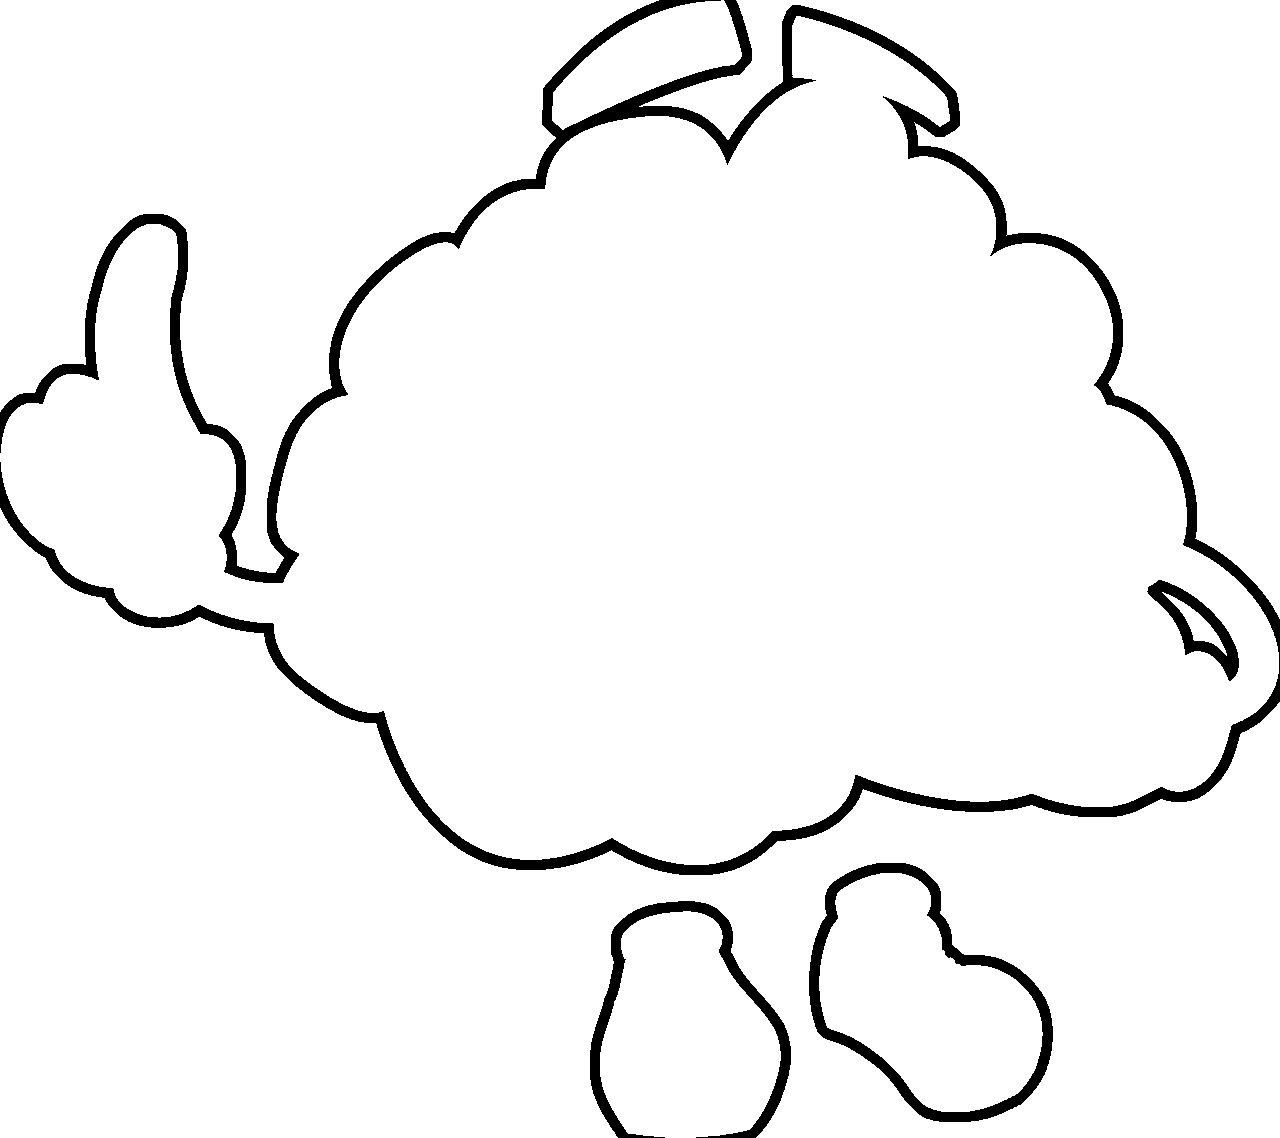
这种方法行不通,正如您在上面的图像链接中所看到的那样。它可能适用于简单的几何形状,但对于这样复杂的形状则行不通。

第二种方法

第二种方法是将大脑图像像素数据加载到二维数组中,并循环遍历所有像素。检查每个像素的颜色,在每个非透明像素(也就是 rgbA 表示中 A(或 Alpha)不为 0 的像素)中,在上方、下方、右侧、左侧、主对角线向下、主对角线向上、次对角线(/)向下和次对角线(/)向上绘制黑色像素。然后在第二个像素上方、第二个像素下方等处绘制像素。这是使用一个“for循环”完成的,重复次数是所需的笔画宽度(在本例中为30)。这是我的代码:

brain=Image.open("brain.png") #load brain image
background=Image.new("RGBA", (brain.size[0]+400, brain.size[1]+400), (0, 0, 0, 0)) #crate a background transparent image to create the stroke in it
background.paste(brain, (200,200), brain) #paste the brain image in the middle of the background
pixelsBrain = brain.load() #load the pixels array of brain
pixelsBack=background.load() #load the pixels array of background

for i in range(brain.size[0]):
    for j in range(brain.size[1]):
        r, c = i+200, j+200 #height and width offset 
        if(pixelsBrain[i,j][3]!=0): #checking if the opacity is not 0, if the alpha is not 0.
            for k in range(30): #the loop
                pixelsBack[r, c + k] = (0, 0, 0, 255)
                pixelsBack[r, c - k] = (0, 0, 0, 255)
                pixelsBack[r + k, c] = (0, 0, 0, 255)
                pixelsBack[r - k, c] = (0, 0, 0, 255)
                pixelsBack[r + k, c + k] = (0, 0, 0, 255)
                pixelsBack[r - k, c - k] = (0, 0, 0, 255)
                pixelsBack[r + k, c - k] =(0, 0, 0, 255)
                pixelsBack[r - k, c + k] = (0, 0, 0, 255)

background.paste(brain, (200,200), brain) #pasting the colored brain onto the background, because the loop "destroyed" the picture.

background.save("brain_method_loop.png")

这种方法虽然可行,但非常耗时(每张图片和30像素笔划大约需要30秒)。我想要对多张图片进行此操作,所以这种方法并不适合我。
是否有更简单、更好的方法可以使用Python Pillow库来达到我的目的?我该怎么做? 另外,如何加快循环代码的执行速度(我了解Numpy和OpenCV,哪个更适合这个目的?)
我知道如果手机应用程序可以在几毫秒内完成此操作,那么Python也可以,但我没有找到任何方法。
谢谢。

请分享您的原始图像,而不是与其他内容组合在一起的截图。 - Mark Setchell
谢谢Mark,我刚刚添加了。 - Gilad Kustin
6个回答

7

我尝试使用OpenCV来实现类似于Photoshop描边效果的解决方案(它并不完美,我仍在寻找更好的解决方案)。

该算法基于欧几里得距离变换。我还尝试了椭圆核结构的膨胀算法,它与Photoshop有些不同,但有些信息表明距离变换是Photoshop使用的方式。

def stroke(origin_image, threshold, stroke_size, colors):
    img = np.array(origin_image)
    h, w, _ = img.shape
    padding = stroke_size + 50
    alpha = img[:,:,3]
    rgb_img = img[:,:,0:3]
    bigger_img = cv2.copyMakeBorder(rgb_img, padding, padding, padding, padding, 
                                        cv2.BORDER_CONSTANT, value=(0, 0, 0, 0))
    alpha = cv2.copyMakeBorder(alpha, padding, padding, padding, padding, cv2.BORDER_CONSTANT, value=0)
    bigger_img = cv2.merge((bigger_img, alpha))
    h, w, _ = bigger_img.shape
    
    _, alpha_without_shadow = cv2.threshold(alpha, threshold, 255, cv2.THRESH_BINARY)  # threshold=0 in photoshop
    alpha_without_shadow = 255 - alpha_without_shadow
    dist = cv2.distanceTransform(alpha_without_shadow, cv2.DIST_L2, cv2.DIST_MASK_3)  # dist l1 : L1 , dist l2 : l2
    stroked = change_matrix(dist, stroke_size)
    stroke_alpha = (stroked * 255).astype(np.uint8)

    stroke_b = np.full((h, w), colors[0][2], np.uint8)
    stroke_g = np.full((h, w), colors[0][1], np.uint8)
    stroke_r = np.full((h, w), colors[0][0], np.uint8)

    stroke = cv2.merge((stroke_b, stroke_g, stroke_r, stroke_alpha))
    stroke = cv2pil(stroke)
    bigger_img = cv2pil(bigger_img)
    result = Image.alpha_composite(stroke, bigger_img)
    return result

def change_matrix(input_mat, stroke_size):
    stroke_size = stroke_size - 1
    mat = np.ones(input_mat.shape)
    check_size = stroke_size + 1.0
    mat[input_mat > check_size] = 0
    border = (input_mat > stroke_size) & (input_mat <= check_size)
    mat[border] = 1.0 - (input_mat[border] - stroke_size)
    return mat

def cv2pil(cv_img):
    cv_img = cv2.cvtColor(cv_img, cv2.COLOR_BGRA2RGBA)
    pil_img = Image.fromarray(cv_img.astype("uint8"))
    return pil_img
    
    
output = stroke(test_image, threshold=0, stroke_size=10, colors=((0,0,0),))

enter image description here


这里的 stroke_size 参数是以像素为单位吗? - Ishan Jindal

2

目前我不能为您提供一个完全测试过的 Python 解决方案,因为我有其他的任务,但我肯定可以在几毫秒内向您展示如何做,并给您一些指针。

我刚刚在命令行中使用了 ImageMagick。它可以在 Linux 和 macOS 上运行(使用 brew install imagemagick),也可以在 Windows 上运行。因此,我提取了透明通道并丢弃了所有颜色信息。然后使用形态学的“边缘扩展”操作,在 alpha 通道中的形状周围生成一个粗线条。然后我将白色边缘反转,使它们变成黑色,并使所有白色像素透明。然后覆盖在原始图像上。

以下是完整的命令:

magick baby.png \( +clone -alpha extract -morphology edgeout octagon:9  -threshold 10% -negate -transparent white \) -flatten result.png

所以基本上它打开图像,对括号内的 alpha 层的克隆副本进行处理,然后将结果中产生的黑色轮廓平铺回原始图像并保存。让我们逐步进行以下步骤:
提取 alpha 层作为 alpha.png
magick baby.png -alpha extract alpha.png

enter image description here

现在加粗边缘,反转图像并将非黑色部分透明化,然后保存为overlay.png文件。
magick alpha.png -morphology edgeout octagon:9  -threshold 10% -negate -transparent white overlay.png

enter image description here

这是最终结果,将octagon:9改为octagon:19可获得更粗的线条:

enter image description here


所以,使用PIL...你需要打开图像并转换为RGBA,然后拆分通道。你不需要触碰RGB通道,只需处理A通道。
im = Image.open('baby.png').convert('RGBA')

R, G, B, A = im.split()

需要一些形态学处理 - 请参见这里
将原始RGB通道与新的A通道合并并保存:
result = Image.merge((R,G,B,modifiedA))
result.save('result.png')

请注意,有一个名为 wand 的 Python 绑定到 ImageMagick,您可能会发现使用它来翻译我的命令行内容更容易... wand。此外,scikit-image 也有一个易于使用的 morphology suite

1
我发现使用ImageFilter模块可以实现这个,比我在这里看到的任何自定义实现都要快得多,并且不依赖于调整大小,因为这对于凸包不起作用。
from PIL import Image, ImageFilter

stroke_radius = 5
img = Image.open("img.png") # RGBA image
stroke_image = Image.new("RGBA", img.size, (255, 255, 255, 255))
img_alpha = img.getchannel(3).point(lambda x: 255 if x>0 else 0)
stroke_alpha = img_alpha.filter(ImageFilter.MaxFilter(stroke_radius))
# optionally, smooth the result
stroke_alpha = stroke_alpha.filter(ImageFilter.SMOOTH)
stroke_image.putalpha(stroke_alpha)
output = Image.alpha_composite(stroke_image, img)
output.save("output.png")

1

我编写了这个函数,它基于形态膨胀,并允许您设置笔画的大小和颜色。但是它非常缓慢,并且似乎不适用于小元素。

如果有人能帮助我加速它,那将非常有帮助。

transparent png no stroke outline

transparent png with stroke outline

def addStroke(image,strokeSize=1,color=(0,0,0)):
    #Create a disc kernel
    kernel=[]
    kernelSize=math.ceil(strokeSize)*2+1 #Should always be odd
    kernelRadius=strokeSize+0.5
    kernelCenter=kernelSize/2-1
    pixelRadius=1/math.sqrt(math.pi)
    for x in range(kernelSize):
        kernel.append([])
        for y in range(kernelSize):
            distanceToCenter=math.sqrt((kernelCenter-x+0.5)**2+(kernelCenter-y+0.5)**2)
            if(distanceToCenter<=kernelRadius-pixelRadius):
                value=1 #This pixel is fully inside the circle
            elif(distanceToCenter<=kernelRadius):
                value=min(1,(kernelRadius-distanceToCenter+pixelRadius)/(pixelRadius*2)) #Mostly inside
            elif(distanceToCenter<=kernelRadius+pixelRadius):
                value=min(1,(pixelRadius-(distanceToCenter-kernelRadius))/(pixelRadius*2)) #Mostly outside
            else:
                value=0 #This pixel is fully outside the circle
            kernel[x].append(value)
    kernelExtent=int(len(kernel)/2)
    imageWidth,imageHeight=image.size
    outline=image.copy()
    outline.paste((0,0,0,0),[0,0,imageWidth,imageHeight])
    imagePixels=image.load()
    outlinePixels=outline.load()
    #Morphological grayscale dilation
    for x in range(imageWidth):
        for y in range(imageHeight):
            highestValue=0
            for kx in range(-kernelExtent,kernelExtent+1):
                for ky in range(-kernelExtent,kernelExtent+1):
                    kernelValue=kernel[kx+kernelExtent][ky+kernelExtent]
                    if(x+kx>=0 and y+ky>=0 and x+kx<imageWidth and y+ky<imageHeight and kernelValue>0):
                        highestValue=max(highestValue,min(255,int(round(imagePixels[x+kx,y+ky][3]*kernelValue))))
            outlinePixels[x,y]=(color[0],color[1],color[2],highestValue)
    outline.paste(image,(0,0),image)
    return outline

0
非常简单和原始的解决方案:使用PIL.ImageFilter.FIND_EDGES查找绘图边缘,它大约是1像素厚的,并在每个边缘点上画一个圆。这相当快速且需要很少的库,但缺点是没有平滑处理。
from PIL import Image, ImageFilter, ImageDraw
from pathlib import Path

def mystroke(filename: Path, size: int, color: str = 'black'):
    outf = filename.parent/'mystroke'
    if not outf.exists():
        outf.mkdir()
    img = Image.open(filename)
    X, Y = img.size
    edge = img.filter(ImageFilter.FIND_EDGES).load()
    stroke = Image.new(img.mode, img.size, (0,0,0,0))
    draw = ImageDraw.Draw(stroke)
    for x in range(X):
        for y in range(Y):
            if edge[x,y][3] > 0:
                draw.ellipse((x-size,y-size,x+size,y+size),fill=color)
    stroke.paste(img, (0, 0), img )
    # stroke.show()
    stroke.save(outf/filename.name)

if __name__ == '__main__':
    folder = Path.cwd()/'images'
    for img in folder.iterdir():
        if img.is_file(): mystroke(img, 10)

0

使用PIL的解决方案

我也曾面临同样的需求:描边PNG图像。

这是输入图像:

输入图像

我看到已经有一些解决方案了,但如果你们中的一些人想要另一种选择,这是我的:

基本上,我的解决方案工作流程如下:

  1. 读取并填充PNG图像的非透明通道以及边框颜色
  2. 调整单色图像的大小使其更大
  3. 将原始图像合并到更大的单色图像中

完成了!您现在拥有一个带有您选择的宽度和颜色的描边PNG图像。


这里是实现工作流程的代码:

from PIL import Image

# Set the border and color
borderSize = 20
color = (255, 0, 0)
imgPath = "<YOUR_IMAGE_PATH>"

# Open original image and extract the alpha channel
im = Image.open(imgPath)
alpha = im.getchannel('A')

# Create red image the same size and copy alpha channel across
background = Image.new('RGBA', im.size, color=color)
background.putalpha(alpha) 

# Make the background bigger
background=background.resize((background.size[0]+borderSize, background.size[1]+borderSize))

# Merge the targeted image (foreground) with the background
foreground = Image.open(imgPath)
background.paste(foreground, (int(borderSize/2), int(borderSize/2)), foreground.convert("RGBA"))
imageWithBorder = background
imageWithBorder.show()

这里是输出图像:

输出图像

希望能对您有所帮助!


网页内容由stack overflow 提供, 点击上面的
可以查看英文原文,
原文链接