我想创建一个带有圆形顶部边缘的UIView,就像这张图片一样。请问我该如何做?
所需结果: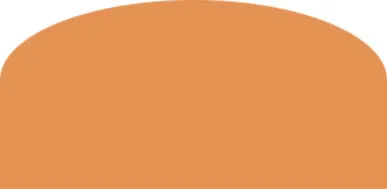 不需要的结果:

所需结果:
不需要的结果:
不需要的结果:
这个答案真的帮助了我,我通过以下代码片段实现了这种效果:
Swift 3.1
extension UIView {
    func addBottomRoundedEdge(desiredCurve: CGFloat?) {
        let offset: CGFloat = self.frame.width / desiredCurve!
        let bounds: CGRect = self.bounds

        let rectBounds: CGRect = CGRect(x: bounds.origin.x, y: bounds.origin.y + bounds.size.height / 2, width: bounds.size.width, height: bounds.size.height / 2)
        let rectPath: UIBezierPath = UIBezierPath(rect: rectBounds)
        let ovalBounds: CGRect = CGRect(x: bounds.origin.x - offset / 2, y: bounds.origin.y, width: bounds.size.width + offset, height: bounds.size.height)
        let ovalPath: UIBezierPath = UIBezierPath(ovalIn: ovalBounds)
        rectPath.append(ovalPath)

        // Create the shape layer and set its path
        let maskLayer: CAShapeLayer = CAShapeLayer()
        maskLayer.frame = bounds
        maskLayer.path = rectPath.cgPath

        // Set the newly created shape layer as the mask for the view's layer
        self.layer.mask = maskLayer
    }
}
重写UIView类的绘制方法。
针对上部弧形边缘
override func draw(_ rect: CGRect) {
        let y:CGFloat = 20
        let curveTo:CGFloat = 0

        let myBezier = UIBezierPath()
        myBezier.move(to: CGPoint(x: 0, y: y))
        myBezier.addQuadCurve(to: CGPoint(x: rect.width, y: y), controlPoint: CGPoint(x: rect.width / 2, y: curveTo))
        myBezier.addLine(to: CGPoint(x: rect.width, y: rect.height))
        myBezier.addLine(to: CGPoint(x: 0, y: rect.height))
        myBezier.close()
        let context = UIGraphicsGetCurrentContext()
        context!.setLineWidth(4.0)
        //UIColor.white.setFill()
        backgroundColor?.setFill()
        myBezier.fill()
        let maskLayer: CAShapeLayer = CAShapeLayer()
        maskLayer.frame = bounds
        maskLayer.path = myBezier.cgPath
        self.layer.mask = maskLayer

    }
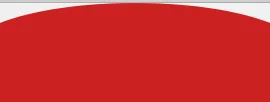
对于曲线底边
override func draw(_ rect: CGRect) {

            let y:CGFloat = 15
            let curveTo:CGFloat = 0

            let myBezier = UIBezierPath()
            myBezier.move(to: CGPoint(x: 0, y: rect.height - y ))
            myBezier.addQuadCurve(to: CGPoint(x: rect.width, y:  rect.height - y), controlPoint: CGPoint(x: rect.width / 2, y: rect.height))
            myBezier.addLine(to: CGPoint(x: rect.width, y: 0))
            myBezier.addLine(to: CGPoint(x: 0, y: 0))
            myBezier.close()
            let context = UIGraphicsGetCurrentContext()
            context!.setLineWidth(4.0)
            //UIColor.white.setFill()
            backgroundColor?.setFill()
            myBezier.fill()
            let maskLayer: CAShapeLayer = CAShapeLayer()
            maskLayer.frame = bounds
            maskLayer.path = myBezier.cgPath
            self.layer.mask = maskLayer

        }
为了转发我在另一个帖子里发布的答案:
我现在可以确认这是iOS 6之后引入的bug。我有一台运行iOS 6.1的旧4s手机。在那台机器上,这段代码:
  path = [UIBezierPath bezierPathWithRoundedRect: bounds
    byRoundingCorners: UIRectCornerTopLeft | UIRectCornerTopRight
   cornerRadii: CGSizeMake(bounds.size.width/2, bounds.size.width/6)
 ];
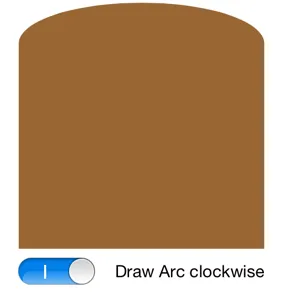 。这是从 iOS 8.1.2 运行相同代码的效果:
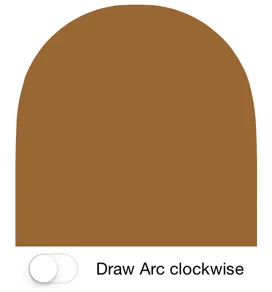 。看起来,在 iOS >=7.0 上,它忽略了指定半径的高度,并使用宽度值作为角落椭圆形的高度和宽度值,这迫使它们始终成为四分之一圆。我已经在苹果的错误报告系统上记录了一个错误。我们将看看他们会说什么。我建议每个遇到此问题的人都报告一个错误。他们收到的报告越多,就越有可能修复它。(忽略底部的 UISwitch。这是前一个测试中留下的。)
编辑:我已经编写了一段代码,构建了一个贝塞尔曲线,大致近似于 iOS < 7 生成的曲线外观。我刚刚发现了一篇关于使用贝塞尔曲线逼近圆形的文章。使用该文章中的控制点,我们可以很容易地构建自己的等效于 bezierPathWithRoundedRect:byRoundingCorners:cornerRadii: 方法的版本,可在所有版本的 iOS 上使用。
UIBezierCurve的addQuadCurveToPoint:controlPoint方法。您可以从路径的任何位置绘制二次曲线到一个点,使用另一个点作为控制点,这是确定结果路径将具有多少弧度和曲线的一种方式。但不要忘记,如果您将图层用作蒙版,则还必须绘制形状的矩形部分,否则蒙版将只是曲线。
我曾在stackoverflow的某个地方找到这段代码,它非常有效。以下是代码:
-(UIView *)roundCornersOnView:(UIView *)view onTopLeft:(BOOL)tl topRight:(BOOL)tr bottomLeft:(BOOL)bl bottomRight:(BOOL)br radius:(float)radius {

    if (tl || tr || bl || br) {
        UIRectCorner corner = (bl ? UIRectCornerBottomLeft : 0) | (br ? UIRectCornerBottomRight : 0) | (tl ? UIRectCornerTopLeft : 0) | (tr ? UIRectCornerTopRight : 0);
        UIView *roundedView = view;
        UIBezierPath *maskPath = [UIBezierPath bezierPathWithRoundedRect:roundedView.bounds byRoundingCorners:corner cornerRadii:CGSizeMake(radius, radius)];
        CAShapeLayer *maskLayer = [CAShapeLayer layer];
        maskLayer.frame = roundedView.bounds;
        maskLayer.path = maskPath.CGPath;
        roundedView.layer.mask = maskLayer;
        return roundedView;
    } else {
        return view;
    }

}
假设你的视图名称为_tView,则调用:
_tView = (UIView *)[self roundCornersOnView:_tView onTopLeft:YES topRight:YES bottomLeft:NO bottomRight:NO radius:25.0];
这将会输出如下:
UIRectCorner 作为单个位掩码字段输入 - 扩展参数列表似乎很奇怪,然后将其压缩回正确的形式。 - Paul.s在storyboards中也有一种简单的方法来实现这个功能。