iOS图像中的气泡效果

3
我有一些图片,我想把它们“放在气泡里”。这些气泡似乎围绕屏幕漂浮着,里面陷入了这些图片。
最好的方法是将内部图像与气泡图像结合起来,并以某种方式扭曲内部图像,使其看起来像反射在气泡内部。
有人知道如何实现这种效果而不使用纹理和网格吗?也许有人记得一个旧项目或类似的东西做了类似的事情?
这是一个示例说明:

根据 CoreImage 参考资料,滤镜 CIGlassLozenge 在 iOS 上不可用。因此,这并没有让您的生活变得更加轻松,因为您必须找到第三方库或代码片段来达到此效果。 - holex
2个回答

12
您可以使用我开源的GPUImage框架中的GPUImageSphereRefractionFilter来实现这一点:
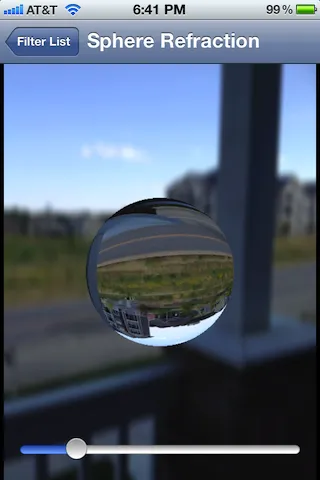
Spherical refraction example

我会详细描述在这个答案中关于Android上类似影响的工作原理。基本上,我使用片段着色器折射通过想象中的球体穿过的光线,然后我使用它来查找包含源图像的纹理。背景使用简单的高斯模糊进行模糊处理。 如果您想获得与您展示的图像完全相同的外观,则可能需要调整此片段着色器以向球体添加一些刮擦角度颜色,但这应该可以让您接近。 出于乐趣,我决定尝试更加精确地复制上面的玻璃球。我添加了刮擦角度照明和球体上的镜面反射照明,以及不反转折射纹理坐标,导致了这个结果:
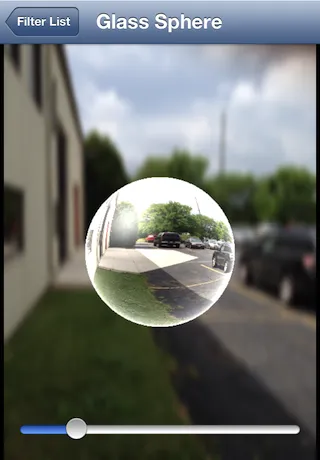
Grazing angle lighting sphere

我为这个新版本使用了以下片段着色器:
 varying highp vec2 textureCoordinate;

 uniform sampler2D inputImageTexture;

 uniform highp vec2 center;
 uniform highp float radius;
 uniform highp float aspectRatio;
 uniform highp float refractiveIndex;
// uniform vec3 lightPosition;
 const highp vec3 lightPosition = vec3(-0.5, 0.5, 1.0);
 const highp vec3 ambientLightPosition = vec3(0.0, 0.0, 1.0);

 void main()
 {
     highp vec2 textureCoordinateToUse = vec2(textureCoordinate.x, (textureCoordinate.y * aspectRatio + 0.5 - 0.5 * aspectRatio));
     highp float distanceFromCenter = distance(center, textureCoordinateToUse);
     lowp float checkForPresenceWithinSphere = step(distanceFromCenter, radius);

     distanceFromCenter = distanceFromCenter / radius;

     highp float normalizedDepth = radius * sqrt(1.0 - distanceFromCenter * distanceFromCenter);
     highp vec3 sphereNormal = normalize(vec3(textureCoordinateToUse - center, normalizedDepth));

     highp vec3 refractedVector = 2.0 * refract(vec3(0.0, 0.0, -1.0), sphereNormal, refractiveIndex);
     refractedVector.xy = -refractedVector.xy;

     highp vec3 finalSphereColor = texture2D(inputImageTexture, (refractedVector.xy + 1.0) * 0.5).rgb;

     // Grazing angle lighting
     highp float lightingIntensity = 2.5 * (1.0 - pow(clamp(dot(ambientLightPosition, sphereNormal), 0.0, 1.0), 0.25));
     finalSphereColor += lightingIntensity;

     // Specular lighting
     lightingIntensity  = clamp(dot(normalize(lightPosition), sphereNormal), 0.0, 1.0);
     lightingIntensity  = pow(lightingIntensity, 15.0);
     finalSphereColor += vec3(0.8, 0.8, 0.8) * lightingIntensity;

     gl_FragColor = vec4(finalSphereColor, 1.0) * checkForPresenceWithinSphere;
 }

这个滤镜可以通过GPUImageGlassSphereFilter运行。


我刚刚看到了这个过滤器。太完美了,谢谢Brad。 - Paul de Lange
有没有办法关闭背景图像,只保留反射的球体图像? - Paul de Lange
1
模糊的背景不是默认滤镜的一部分,它只生成了球体。在FilterShowcase示例中(我从中绘制了上面的内容),我使用了高斯模糊滤镜和混合来组合这两个过滤后的图像。您可以只使用球形折射滤镜来获取中心球形图像。 - Brad Larson
Brad,无论中心在哪里,似乎总是显示中心坐标。例如,如果我移动中心位置,图像中心的像素也随着玻璃球一起移动。这有道理吗?是否有一种方法可以使用当前中心周围的像素而不是图像中心创建玻璃球? - jjxtra

2

记录一下,我最终使用了GPUImage,就像@BradLarson建议的那样,但我不得不编写一个自定义滤镜如下。这个滤镜需要一个“内部”图像和一个气泡纹理,将两者混合在一起,同时执行折射计算,但不翻转图像坐标。 效果如下:

enter image description here

.h

@interface GPUImageBubbleFilter : GPUImageTwoInputFilter

@property (readwrite, nonatomic) CGFloat refractiveIndex;   
@property (readwrite, nonatomic) CGFloat radius;            

@end

.m

#import "GPUImageBubbleFilter.h"

NSString *const kGPUImageBubbleShaderString = SHADER_STRING
(
 varying highp vec2 textureCoordinate;
 varying highp vec2 textureCoordinate2;

 uniform sampler2D inputImageTexture;
 uniform sampler2D inputImageTexture2;

 uniform highp vec2 center;
 uniform highp float radius;
 uniform highp float aspectRatio;
 uniform highp float refractiveIndex;

 void main()
 {
     highp vec2 textureCoordinateToUse = vec2(textureCoordinate.x, (textureCoordinate.y * aspectRatio + 0.5 - 0.5 * aspectRatio));
     highp float distanceFromCenter = distance(center, textureCoordinateToUse);
     lowp float checkForPresenceWithinSphere = step(distanceFromCenter, radius);

     distanceFromCenter = distanceFromCenter / radius;

     highp float normalizedDepth = radius * sqrt(1.0 - distanceFromCenter * distanceFromCenter);
     highp vec3 sphereNormal = normalize(vec3(textureCoordinateToUse - center, normalizedDepth));

     highp vec3 refractedVector = refract(vec3(0.0, 0.0, -1.0), sphereNormal, refractiveIndex);

     lowp vec4 textureColor = texture2D(inputImageTexture, (refractedVector.xy + 1.0) * 0.5) * checkForPresenceWithinSphere; 
     lowp vec4 textureColor2 = texture2D(inputImageTexture2, textureCoordinate2) * checkForPresenceWithinSphere;

     gl_FragColor = mix(textureColor, textureColor2, textureColor2.a);    
 }

 );


@interface GPUImageBubbleFilter () {
    GLint radiusUniform, centerUniform, aspectRatioUniform, refractiveIndexUniform;
}

@property (readwrite, nonatomic) CGFloat aspectRatio;

@end

@implementation GPUImageBubbleFilter
@synthesize radius = _radius, refractiveIndex = _refractiveIndex, aspectRatio = _aspectRatio;

- (id) init {
    self = [super initWithFragmentShaderFromString: kGPUImageBubbleShaderString];
    if( self ) {
        radiusUniform = [filterProgram uniformIndex: @"radius"];
        aspectRatioUniform = [filterProgram uniformIndex: @"aspectRatio"];
        centerUniform = [filterProgram uniformIndex: @"center"];
        refractiveIndexUniform = [filterProgram uniformIndex: @"refractiveIndex"];

        self.radius = 0.5;
        self.refractiveIndex = 0.5;
        self.aspectRatio = 1.0;

        GLfloat center[2] = {0.5, 0.5};
        [GPUImageOpenGLESContext useImageProcessingContext];
        [filterProgram use];
        glUniform2fv(centerUniform, 1, center);

        [self setBackgroundColorRed: 0 green: 0 blue: 0 alpha: 0];
    }

    return self;
}

#pragma mark - Accessors
- (void) setRadius:(CGFloat)radius {
    _radius = radius;

    [GPUImageOpenGLESContext useImageProcessingContext];
    [filterProgram use];
    glUniform1f(radiusUniform, _radius);
}

- (void) setAspectRatio:(CGFloat)aspectRatio {
    _aspectRatio = aspectRatio;

    [GPUImageOpenGLESContext useImageProcessingContext];
    [filterProgram use];
    glUniform1f(aspectRatioUniform, _aspectRatio);
}

- (void)setRefractiveIndex:(CGFloat)newValue;
{
    _refractiveIndex = newValue;

    [GPUImageOpenGLESContext useImageProcessingContext];
    [filterProgram use];
    glUniform1f(refractiveIndexUniform, _refractiveIndex);
}

我想看看是否可以仅使用一些光照计算来实现您的气泡效果和上方的玻璃球,因此我已经更新了我的答案。您的气泡纹理可能仍然会产生更美观的结果,但您可以尝试使用GPUImageGlassSphereFilter来查看它是否也适用于您的应用程序。 - Brad Larson
坦率地说,继续编程真的很有趣 :) - Paul de Lange

网页内容由stack overflow 提供, 点击上面的
可以查看英文原文,
原文链接