在一张图片中检测多个圆形

7
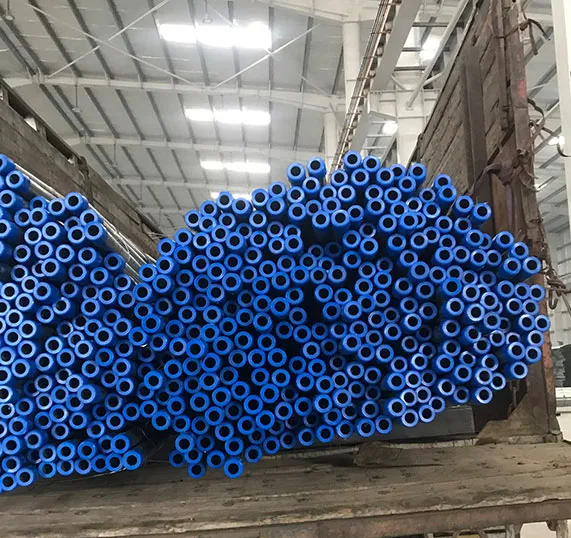
我正在尝试检测这张图片中水管的数量。为此,我正在尝试使用基于OpenCV和Python的检测方法。然而,我得到的结果让我感到有些困惑,因为圆圈的分布范围太大且不准确。

enter image description here

代码

import numpy as np
import argparse
import cv2

# construct the argument parser and parse the arguments
ap = argparse.ArgumentParser()
ap.add_argument("-i", "--image", required = True, help = "Path to the image")
args = vars(ap.parse_args())

# load the image, clone it for output, and then convert it to grayscale
image = cv2.imread(args["image"])
output = image.copy()
gray = cv2.cvtColor(image, cv2.COLOR_BGR2GRAY)

#detect circles in the image
#circles = cv2.HoughCircles(gray, cv2.HOUGH_GRADIENT, 1.2, param1=40,minRadius=10,maxRadius=35)
circles = cv2.HoughCircles(gray, cv2.HOUGH_GRADIENT, 8.5,70,minRadius=0,maxRadius=70)

#print(len(circles[0][0]))
# ensure at least some circles were found
if circles is not None:
    # convert the (x, y) coordinates and radius of the circles to integers
    circles = np.round(circles[0, :]).astype("int")
    # count = count+1   

    # print(count) 

    # loop over the (x, y) coordinates and radius of the circles
    for (x, y, r) in circles:
        # draw the circle in the output image, then draw a rectangle
        # corresponding to the center of the circle
        cv2.circle(output, (x, y), r, (0, 255, 0), 4)
        cv2.rectangle(output, (x - 5, y - 5), (x + 5, y + 5), (0, 128, 255), -1)

    # show the output image
   # cv2.imshow("output", np.hstack([output]))
    cv2.imwrite('output.jpg',np.hstack([output]),[cv2.IMWRITE_JPEG_QUALITY, 70])
    cv2.waitKey(0)

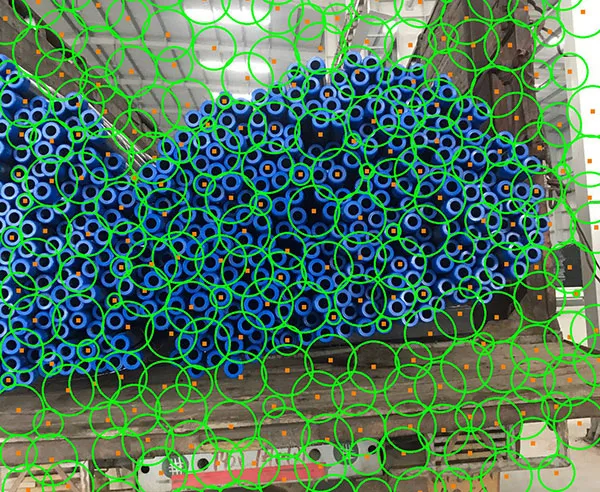
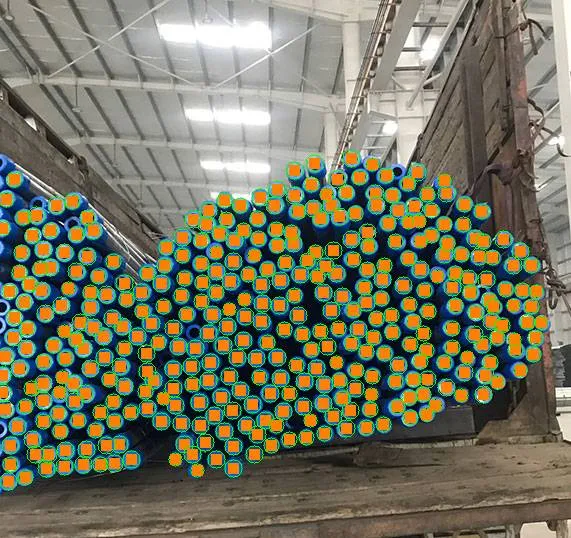
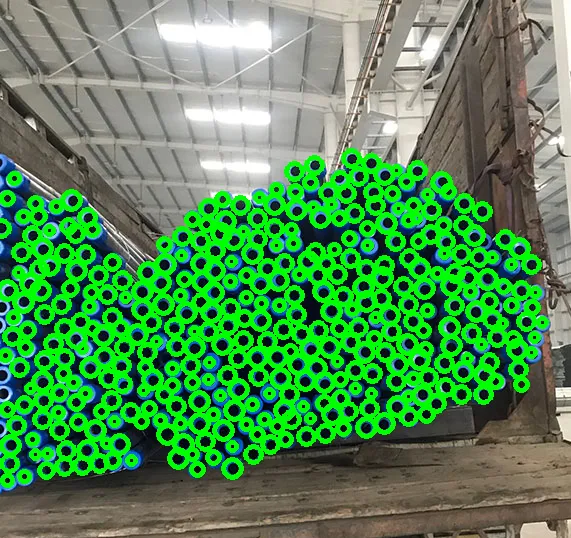
运行后,我确实看到了许多检测到的圆,但结果完全混乱。我的问题是,如何改善这种检测。在HoughCircles方法中,哪些参数需要特别优化以实现更高的准确性?或者,我应该采取标注数百个类似图像的边界框的方法,然后通过像Yolo这样的完整CNN对它们进行训练以执行检测?

enter image description here

采用此处答案2中提到的方法使用OpenCV拍摄金属零件孔的直径图片,我得到了这个输出。它看起来接近于进行计数,但在图像亮度变换期间错过了许多实际的管道。

enter image description here


你的代码在最开始就出了问题:gray = cv2.cvtColor(image, cv2.COLOR_BGR2GRAY)。你有蓝色通道,可以利用这个知识来提取灰度图像:蓝色通道比其他通道具有更大的对比度,只需使用该通道即可。 - Cris Luengo
3个回答

11

调用HoughCircles时最重要的参数是:

  1. param1:因为您使用了cv2.HOUGH_GRADIENT,所以param1是边缘检测算法的高阈值,而param1 / 2则是低阈值。
  2. param2:它代表累加器阈值,因此值越低,返回的圆形就越多。
  3. minRadiusmaxRadius:示例中蓝色圆的直径大约为20个像素,因此将70个像素用于maxRadius就是算法返回这么多圆形的原因。
  4. minDist:两个圆的中心之间的最小距离。

以下是参数化定义:

circles = cv2.HoughCircles(gray,
                           cv2.HOUGH_GRADIENT,
                           minDist=6,
                           dp=1.1,
                           param1=150,
                           param2=15,
                           minRadius=6,
                           maxRadius=10)

返回:

在此输入图片描述


这个是最准确的。图片中包含377个管道,而运行您的代码检测到了373个管道。准确度非常高,我相信这是一个很好的开始,可以更好地了解您修改的参数。 - Donny

6
你可以进行自适应阈值处理作为预处理。这基本上是寻找相对于相邻像素较亮的区域,全局阈值会失去一些管道,而这种方法可以更好地保留它们。
import cv2
import matplotlib.pyplot as plt
import numpy as np

img = cv2.imread('a2MTm.jpg')
blur_hor = cv2.filter2D(img[:, :, 0], cv2.CV_32F, kernel=np.ones((11,1,1), np.float32)/11.0, borderType=cv2.BORDER_CONSTANT)
blur_vert = cv2.filter2D(img[:, :, 0], cv2.CV_32F, kernel=np.ones((1,11,1), np.float32)/11.0, borderType=cv2.BORDER_CONSTANT)
mask = ((img[:,:,0]>blur_hor*1.2) | (img[:,:,0]>blur_vert*1.2)).astype(np.uint8)*255

plt.imshow(mask)

您可以继续进行相同的后处理步骤。

以下是一些处理步骤的示例:

circles = cv2.HoughCircles(mask,
                           cv2.HOUGH_GRADIENT,
                           minDist=8,
                           dp=1,
                           param1=150,
                           param2=12,
                           minRadius=4,
                           maxRadius=10)
output = img.copy()
for (x, y, r) in circles[0, :, :]:
  cv2.circle(output, (x, y), r, (0, 255, 0), 4)

enter image description here

你可以调整参数以获得所需结果,了解有关参数的信息在这里

我使用了这个方法,得到了一个非常好的转换图像,显示了可见眼中的所有圆。然而,当我在掩蔽图像上运行HoughCircles时,准确率只有大约50%。你能建议我如何使用这种技术来得到正确的计数吗? - Donny
我分享了一些后处理实例,你应该能够获得比50%更高的结果,这些都是可调参数,你可以继续进行微调。 - shortcipher3
点赞使用蓝色通道而不是OP的COLOR_BGR2GRAY转换。 - Cris Luengo
1
最终使用378个管道获得了100%的准确率(事实上,它检测到了我在手动计数中漏掉的一个)。这是一个非常好的答案。 - Donny

6

不使用cv2.HoughCircles的另一种方法是使用轮廓过滤。我们可以对图像进行阈值处理,然后使用斑点的纵横比、轮廓面积和半径进行过滤。以下是结果:

enter image description here

计数: 344

代码

import cv2

image = cv2.imread('1.jpg')
gray = cv2.cvtColor(image, cv2.COLOR_BGR2GRAY)
thresh = cv2.adaptiveThreshold(gray,255,cv2.ADAPTIVE_THRESH_GAUSSIAN_C, cv2.THRESH_BINARY_INV,27,3)

cnts = cv2.findContours(thresh, cv2.RETR_TREE, cv2.CHAIN_APPROX_SIMPLE)
cnts = cnts[0] if len(cnts) == 2 else cnts[1]
count = 0
for c in cnts:
    area = cv2.contourArea(c)
    x,y,w,h = cv2.boundingRect(c)
    ratio = w/h
    ((x, y), r) = cv2.minEnclosingCircle(c)
    if ratio > .85 and ratio < 1.20 and area > 50 and area < 120 and r < 7:
        cv2.circle(image, (int(x), int(y)), int(r), (36, 255, 12), -1)
        count += 1

print('Count: {}'.format(count))

cv2.imshow('thresh', thresh)
cv2.imshow('image', image)
cv2.waitKey()

网页内容由stack overflow 提供, 点击上面的
可以查看英文原文,
原文链接