Python OpenCV-查找圆形(太阳), 从图片中获取圆形的中心坐标

3

我是一名新手,对编程有些陌生。

我有一个bmp格式的16位太阳图片。这张图片看起来像一个白色圆圈,黑色背景。

enter image description here

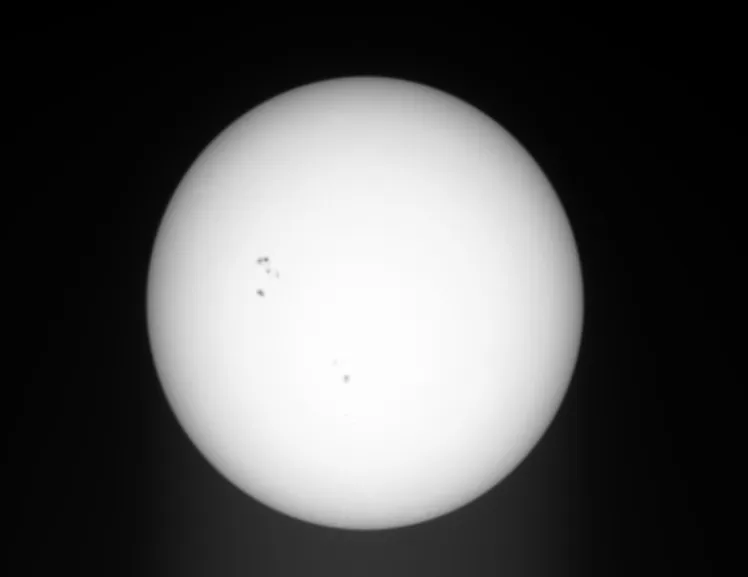
我想要找到圆圈并确定它在x,y坐标上的中心点。

这是我的脚本:

import cv
import numpy as np


orig = cv.LoadImage('sun0016.bmp')

grey_scale = cv.CreateImage(cv.GetSize(orig), 8, 1)
processed = cv.CreateImage(cv.GetSize(orig), 8, 1)

cv.Smooth(orig, orig, cv.CV_GAUSSIAN, 5, 5)
cv.CvtColor(orig, grey_scale, cv.CV_RGB2GRAY)
cv.Erode(grey_scale, processed, None, 10)
cv.Dilate(processed, processed, None, 10)
cv.Canny(processed, processed, 5, 70, 3)
cv.Smooth(processed, processed, cv.CV_GAUSSIAN, 15, 15)

storage = cv.CreateMat(orig.width, 1, cv.CV_32FC3)


cv.HoughCircles(processed, storage, cv.CV_HOUGH_GRADIENT, 1, 16.0, 10, 140)

for i in range(0, len(np.asarray(storage))):
    print "circle #%d" %i
    Radius = int(np.asarray(storage)[i][0][2])
    x = int(np.asarray(storage)[i][0][0])
    y = int(np.asarray(storage)[i][0][1])
    center = (x, y)
    print x,y

    cv.Circle(orig, center, 1, cv.CV_RGB(0, 255, 0), 1, 8, 0)
    cv.Circle(orig, center, Radius, cv.CV_RGB(255, 0, 0), 1, 8, 0)

    cv.Circle(processed, center, 1, cv.CV_RGB(0, 0, 0), -1, 8, 0)
    cv.Circle(processed, center, Radius, cv.CV_RGB(255, 0, 0), 3, 8, 0)

cv.ShowImage("sun0016", orig)
cv.ShowImage("processed", processed)
cv_key = cv.WaitKey(0)

当我运行这个程序时,我发现太阳的边缘是一个带有中心的圆形,但非常不精确。请注意设置参数HoughCircles模块以精确搜索圆形。谢谢。

1
你能给这张图片加个链接吗?这里的主要问题是找到半径的合适范围。 - Mailerdaimon
好的,这是上传链接:http://postimg.org/image/5qq6psolz/993df3d4/ - Franta Konopnik
有了那么清晰的图片,我会将其阈值化为二进制,然后找到斑点的质心 - 不需要使用霍夫变换。或者这不是一个典型的图像吗? - Roger Rowland
这是望远镜拍摄的图像,我想用脚本找到太阳的中心,并将其与CCD芯片的中心对齐。如果我知道中心之间的差异,就可以轻松地进行安装馈送。 - Franta Konopnik
1
看一下这个答案和这个问题 - 它们有帮助吗? - Roger Rowland
显示剩余2条评论
3个回答

1

这里的主要问题是找到合适的半径范围。

你可以看一下图片,猜测出半径。

从你给出的图片来看,我猜180-220可能是一个不错的范围。

你的代码应该是:

cv.HoughCircles(processed, storage, cv.CV_HOUGH_GRADIENT, 1, 16.0, 180, 220)

只需尝试找到适当的minRadiusmaxRadius值,它们应该能很好地工作。


这就是为什么我写下了我的猜测,而不是计算出来,那取决于你。我只看到了源图像。如果你的多个预处理步骤之一改变了半径,我没有考虑到它。要么你试错找到好的值,要么你打印出霍夫圆变换的输入图像并测量范围。如果范围正确且没有多个圆,霍夫直线变换是相当准确的。 - Mailerdaimon
我不明白。我以为模块houghcircles会自动找到太阳。 - Franta Konopnik
它确实可以,但如果您需要非常精确的输出,就必须选择一个好的半径范围。如果您选择了错误的半径范围,则HoughCircles仍然可以找到圆形,但它们可能会被位移或者不是您正在寻找的圆形。 - Mailerdaimon
我明白了。那么这个范围必须通过实验找出来吗?有没有查找范围的执行方法? - Franta Konopnik
通过实验或者通过传入HoughCircle方法的图像来测量,只需计算对象在像素中的半径即可。 - Mailerdaimon
半径为227像素。但如果范围在220-230之间,脚本就无法工作。我不明白。 - Franta Konopnik

1
这是我的问题的解决方案。
import numpy as np
import cv2

im = cv2.imread('sun0016.bmp')
height, width, depth = im.shape
print height, width, depth
thresh = 132
imgray = cv2.cvtColor(im,cv2.COLOR_BGR2GRAY)
blur = cv2.GaussianBlur(imgray,(5,5),0)
edges = cv2.Canny(blur,thresh,thresh*2)
contours, hierarchy = cv2.findContours(edges,cv2.RETR_TREE,cv2.CHAIN_APPROX_SIMPLE)
cnt = contours[0]
cv2.drawContours(im,contours,-1,(0,255,0),-1)

#centroid_x = M10/M00 and centroid_y = M01/M00
M = cv2.moments(cnt)
x = int(M['m10']/M['m00'])
y = int(M['m01']/M['m00'])
print x,y
print width/2.0,height/2.0
print width/2-x,height/2-y


cv2.circle(im,(x,y),1,(0,0,255),2)
cv2.putText(im,"center of Sun contour", (x,y), cv2.FONT_HERSHEY_SIMPLEX, 1, (0,0,255))
cv2.circle(im,(width/2,height/2),1,(255,0,0),2)
cv2.putText(im,"center of image", (width/2,height/2), cv2.FONT_HERSHEY_SIMPLEX, 1, (255,0,0))
cv2.imshow('contour',im)
cv2.waitKey(0)

1

如果有人在未来遇到这个问题,我想提供一种替代解决方案。

以下函数使用 cv2.inRange 而非 cv2.Canny,以及 cv2.minEnclosingCircle 而非 cv2.moments。它通过测量候选最小包围圆的半径来选择由 cv2.findContours 找到的最大轮廓。这种过滤可以帮助拒绝例如水印或灰尘等假阳性,但根据您的要求,您可能希望以不同的方式进行此步骤,或者完全省略它。

该函数返回检测到的圆盘的 x、y 坐标和半径,对于我正在处理的项目而言这是必需的。

import cv2


def find_disk(img, threshold=10):
    """Finds the center and radius of a single solar disk present in the supplied image.

    Uses cv2.inRange, cv2.findContours and cv2.minEnclosingCircle to determine the centre and 
    radius of the solar disk present in the supplied image.

    Args:
        img (numpy.ndarray): greyscale image containing a solar disk against a background that is below `threshold`.
        threshold (int): threshold of min pixel value to consider as part of the solar disk

    Returns:
        tuple: center coordinates in x,y form (int) 
        int: radius
    """
    if img is None:
        raise TypeError("img argument is None - check that the path of the loaded image is correct.")

    if len(img.shape) > 2:
        raise TypeError("Expected single channel (grayscale) image.")

    blurred = cv2.GaussianBlur(img, (5, 5), 0)
    mask = cv2.inRange(blurred, threshold, 255)
    img_mod, contours, hierarchy = cv2.findContours(mask, cv2.RETR_EXTERNAL, cv2.CHAIN_APPROX_SIMPLE)

    # Find and use the biggest contour
    r = 0
    for cnt in contours:
        (c_x, c_y), c_r = cv2.minEnclosingCircle(cnt)
        # cv2.circle(img, (round(c_x), round(c_y)), round(c_r), (255, 255, 255), 2)
        if c_r > r:
            x = c_x
            y = c_y
            r = c_r

    # print("Number of contours found: {}".format(len(contours)))
    # cv2.imwrite("mask.jpg", mask)
    # cv2.imwrite("circled_contours.jpg", img)

    if x is None:
        raise RuntimeError("No disks detected in the image.")

    return (round(x), round(y)), round(r)


if __name__ == "__main__":
    image = cv2.imread("path/to/your/image.jpg")
    gray = cv2.cvtColor(image, cv2.COLOR_BGR2GRAY)

    center, radius = find_disk(img=gray, threshold=20)

    print("circle x,y: {},{}".format(center[0], center[1]))
    print("circle radius: {}".format(radius))

    # Output the original image with the detected disk superimposed
    cv2.circle(image, center, radius, (0, 0, 255), 1)
    cv2.rectangle(image, (center[0] - 2, center[1] - 2), (center[0] + 2, center[1] + 2), (0, 0, 255), -1)
    cv2.imwrite("disk_superimposed.jpg", image)

我在一些注释的调试语句中留下了,如果您需要进一步调整,请使用它们。
如果您的图片包含很多反光,您可能希望使用更高的阈值。

网页内容由stack overflow 提供, 点击上面的
可以查看英文原文,
原文链接