使用Python从图像中删除特定颜色的所有内容(具有颜色变化容差)。

3

我有一些文本是蓝色 #00a2e8,还有一些黑色文本在 PNG 图像上(白色背景)。

如何使用 Python PIL 或 OpenCV 删除图像中的所有蓝色内容(包括蓝色文本),并对颜色变化有一定的容忍度?

实际上,每个文本像素的颜色并不完全相同,存在蓝色的变化和阴影。

这是我想到的:

  • 从 RGB 转换为 HSV
  • 查找蓝色的 Hue h0
  • 对于 Hue 在区间 [h0-10, h0+10] 中的 Numpy 掩码
  • 将这些像素设置为白色

在编写代码之前,是否有更标准的方法可以使用 Python PIL 或 OpenCV 实现此功能?

示例 PNG 文件:应删除 foobar

enter image description here


1
你刚刚问如何使用cv.inRange - Christoph Rackwitz
请查看 https://dev59.com/12gu5IYBdhLWcg3w9br_ - Jeru Luke
当你“移除”蓝色时,会剩下什么?会是黑色吗?还是白色?或者是透明的? - Mark Setchell
@MarkSetchell 白色。如果您有任何想法,感谢!示例PNG:https://i.stack.imgur.com/nwP8M.png - Basj
3个回答

7
您的图像存在一些问题。首先,它具有完全不必要的 alpha 通道,可以忽略。其次,您的蓝色周围的颜色与蓝色相差相当大!
我使用了您计划中的方法,发现移除效果非常差:
#!/usr/bin/env python3

import cv2
import numpy as np

# Load image
im = cv2.imread('nwP8M.png')

# Define lower and upper limits of our blue
BlueMin = np.array([90,  200, 200],np.uint8)
BlueMax = np.array([100, 255, 255],np.uint8)

# Go to HSV colourspace and get mask of blue pixels
HSV  = cv2.cvtColor(im,cv2.COLOR_BGR2HSV)
mask = cv2.inRange(HSV, BlueMin, BlueMax)

# Make all pixels in mask white
im[mask>0] = [255,255,255]
cv2.imwrite('DEBUG-plainMask.png', im)

这样就得到了这个结果:

enter image description here

如果你扩大范围,以获得更加平滑的边缘,你会开始影响到绿色字母,因此我膨胀了掩模,使空间上靠近蓝色的像素以及在色彩上靠近蓝色的像素都变成白色:

# Try dilating (enlarging) mask with 3x3 structuring element
SE   = cv2.getStructuringElement(cv2.MORPH_ELLIPSE, (3,3))
mask = cv2.dilate(mask, kernel, iterations=1)

# Make all pixels in mask white
im[mask>0] = [255,255,255]
cv2.imwrite('result.png', im)

这将为您提供以下效果:

在此输入图片描述

您可能希望对其他图像的实际值进行微调,但原理是相同的。


完美! 旁注:inRange和直接使用numpy数组过滤器(如img[(hsv[:,:,0]>h0) & (hsv[:,:,0]<h1) & (hsv[:,:,1]>s0) & (hsv[:,:,1]<s1) & (hsv[:,:,2]>v0) & (hsv[:,:,2]<v1)] = [255, 255, 255])真的有区别吗? - Basj
1
这基本上是它的功能,但它将使用高效的SIMD指令进行编码,并且可能比Numpy快得多。 - Mark Setchell
@Basj,我已经添加了我的答案,使用了不同的方法。 - Jeru Luke
BlueMinBlueMax的值不是基于RGB定义的吗?那么你是如何在HSV转换版本中使用它们的呢? - Raleigh L.
1
@RaleighL。好问题,但它们是在HSV空间中定义的。看一下这张图https://en.wikipedia.org/wiki/HSL_and_HSV#/media/File:Hsv-polar-coord-hue-chroma.svg,你可以看到蓝色大约是180..200,但OpenCV使用0..180的范围来适应uint8中的360度,所以您需要实际的角度并获得90..100,就像我使用的那样。Sat和Value都很高,所以我使用了200..255。 - Mark Setchell
在前面的评论中,"hakve"应该是"halve"。 - Mark Setchell

0

我认为你正在寻找函数inRange:

thresh = 5
bgr = [255 - thresh, thresh , thresh ]
minBGR = np.array([bgr[0] - thresh, bgr[1] - thresh, bgr[2] - thresh])
maxBGR = np.array([bgr[0] + thresh, bgr[1] + thresh, bgr[2] + thresh])
maskBGR = cv2.inRange(image, minBGR, maxBGR)
resultBGR = cv2.bitwise_or(image, maskBGR)

谢谢@duloren。你会用哪个bgrthresh来处理这个例子?https://i.stack.imgur.com/nwP8M.png 要去除的颜色是十六进制 #00a2e8。你有适用于这种情况的示例吗? - Basj

0
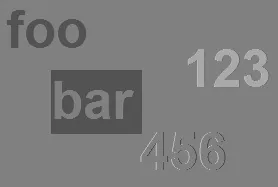
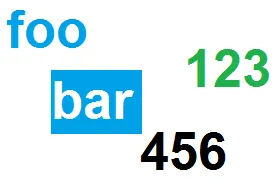
我想提出一种不同的方法。我的基本思路是将图像从BGR转换为LAB颜色空间,并确定是否可以分离出蓝色区域。这可以通过专注于LAB中的b分量来完成,因为它代表从黄色到蓝色的颜色。 代码
img = cv2.imread('image_path', cv2.IMREAD_UNCHANGED)
lab = cv2.cvtColor(img, cv2.COLOR_BGR2LAB)
b_component = lab[:,:,2]

注意:蓝色区域实际上相当暗,因此可以轻松地隔离出来。

enter image description here

th = cv2.threshold(b_component,127,255,cv2.THRESH_BINARY_INV+cv2.THRESH_OTSU)[1]

但是在应用阈值后,图像中包含一些不想考虑的数字文本区域周围的不必要的白色像素。

enter image description here

为了避免不需要的区域,我尝试了以下方法:
  • 查找面积大于某个值的轮廓,并将它们绘制在2通道掩模上
  • 对每个轮廓的矩形边界框区域进行掩蔽
  • 定位该边界框区域内阈值图像上值为255(白色)的像素
  • 将这些像素值在原始PNG图像上改变为白色。
代码如下:
# finding contours
contours = cv2.findContours(th, cv2.RETR_TREE, cv2.CHAIN_APPROX_SIMPLE)
contours = contours[0] if len(contours) == 2 else contours[1]

# initialize a mask of image shape and make copy of original image
black = np.zeros((img.shape[0], img.shape[1]), np.uint8)
res = img.copy()

# draw only contours above certain area on the mask
for c in contours:
    area = cv2.contourArea(c)
    if int(area) > 200:
            cv2.drawContours(black, [c], 0, 255, -1)

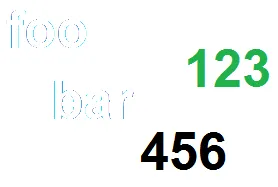
如果您看到以下掩码,则已将轮廓内的所有像素都用白色包围起来。但是,单词“bar”内的像素不应被考虑在内。

enter image description here

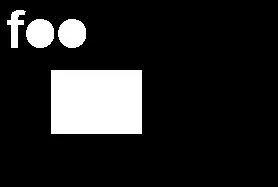
只隔离蓝色像素区域,我们使用阈值图像“AND”运算。
mask = cv2.bitwise_and(th, th, mask = black)

enter image description here

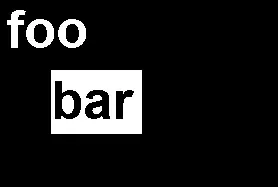
我们得到了实际想要的口罩。在mask中是白色的区域,在原始图像的副本res中也被变成了白色。
res[mask == 255] = (255, 255, 255, 255)

enter image description here

但上述图像并不完美。单词“foo”的边缘周围仍有一些区域可见。 
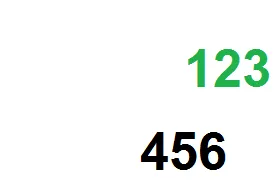
接下来,我们会膨胀“mask”并重复操作。
res = img.copy()
kernel_ellipse = cv2.getStructuringElement(cv2.MORPH_ELLIPSE, (3,3))
dilate = cv2.dilate(mask, kernel_ellipse, iterations=1) 
res[dilate == 255] = (255, 255, 255, 255)

enter image description here

注意:使用LAB颜色空间的A和B分量,您可以轻松地分离不同的颜色,而无需花费时间寻找范围。还可以分割具有相邻阴影和饱和度的颜色。

这里再次使用“滑动条”可能会很有用。 - fmw42
@fmw42 是的,我同意。 - Jeru Luke
不可复制 - undefined

网页内容由stack overflow 提供, 点击上面的
可以查看英文原文,
原文链接