PyTorch中的高斯滤波器

6

我希望找到一种使用PyTorch函数将高斯滤波器应用于图像(张量)的方法。使用numpy,相当代码为

import numpy as np
from scipy import signal
import matplotlib.pyplot as plt

# Define 2D Gaussian kernel
def gkern(kernlen=256, std=128):
    """Returns a 2D Gaussian kernel array."""
    gkern1d = signal.gaussian(kernlen, std=std).reshape(kernlen, 1)
    gkern2d = np.outer(gkern1d, gkern1d)
    return gkern2d

# Generate random matrix and multiply the kernel by it
A = np.random.rand(256*256).reshape([256,256])

# Test plot
plt.figure()
plt.imshow(A*gkern(256, std=32))
plt.show()

我找到的最接近的建议基于这篇帖子

import torch.nn as nn

conv = nn.Conv2d(in_channels = 1, out_channels = 1, kernel_size=264, bias=False)
with torch.no_grad():
    conv.weight = gaussian_weights

但是它却给出了一个错误 NameError: name 'gaussian_weights' is not defined。我该怎么让它正常工作呢?


3
我认为gaussian_weights应该是由高斯函数生成的核函数,就像使用scipy.signal.gaussian一样。 - jkr
是的,我也有同样的想法。所以现在问题变成了:是否有一种方法可以定义一个高斯核(或2D高斯核),而不使用Numpy和/或显式指定权重? - albus_c
也许这个链接可以帮助你:https://discuss.pytorch.org/t/is-there-anyway-to-do-gaussian-filtering-for-an-image-2d-3d-in-pytorch/12351/3 - Andreas K.
1
PyTorch实现在这里:https://forums.fast.ai/t/proposal-to-add-gaussian-blur-to-data-augmentation/38604/2 - Victor Zuanazzi
4个回答

9

我也有同样的想法。那么问题就变成了:是否有一种方法可以定义一个高斯核(或二维高斯),而不使用Numpy和/或明确指定权重?

是的,这很容易。只需要查看signal.gaussian函数文档。有一个链接指向源代码。所以该方法所做的是:

def gaussian(M, std, sym=True):
    if M < 1:
        return np.array([])
    if M == 1:
        return np.ones(1, 'd')
    odd = M % 2
    if not sym and not odd:
        M = M + 1
    n = np.arange(0, M) - (M - 1.0) / 2.0
    sig2 = 2 * std * std
    w = np.exp(-n ** 2 / sig2)
    if not sym and not odd:
        w = w[:-1]
    return w

你很幸运,因为将其转换为Pytorch非常简单,(几乎)只需将np替换为torch即可完成!

此外,请注意,在torch中,np.outer的等效方法是ger


5

PyTorch有一个类可以将高斯模糊应用于图像:

torchvision.transforms.GaussianBlur(kernel_size, sigma=(0.1, 2.0))

查看文档获取更多信息。


2
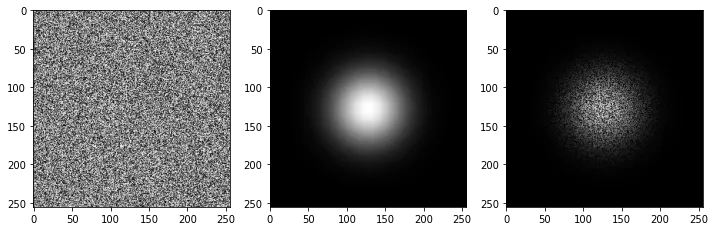
假设问题实际上要求对高斯函数进行卷积(即高斯模糊,这是标题和已接受答案给我的印象),而不是进行乘法(即晕影效果,这是问题的演示代码产生的效果),那么下面是一个纯PyTorch版本的代码,它不需要安装torchvision(否则可以使用torchvision.transforms.GaussianBlur(),这是Mushfirat Mohaimin's answer提出的方案):
from math import ceil

import torch
from torch.nn.functional import conv2d
from torch.distributions import Normal


def gaussian_kernel_1d(sigma: float, num_sigmas: float = 3.) -> torch.Tensor:
    
    radius = ceil(num_sigmas * sigma)
    support = torch.arange(-radius, radius + 1, dtype=torch.float)
    kernel = Normal(loc=0, scale=sigma).log_prob(support).exp_()
    # Ensure kernel weights sum to 1, so that image brightness is not altered
    return kernel.mul_(1 / kernel.sum())


def gaussian_filter_2d(img: torch.Tensor, sigma: float) -> torch.Tensor:
    
    kernel_1d = gaussian_kernel_1d(sigma)  # Create 1D Gaussian kernel
    
    padding = len(kernel_1d) // 2  # Ensure that image size does not change
    img = img.unsqueeze(0).unsqueeze_(0)  # Need 4D data for ``conv2d()``
    # Convolve along columns and rows
    img = conv2d(img, weight=kernel_1d.view(1, 1, -1, 1), padding=(padding, 0))
    img = conv2d(img, weight=kernel_1d.view(1, 1, 1, -1), padding=(0, padding))
    return img.squeeze_(0).squeeze_(0)  # Make 2D again


if __name__ == "__main__":

    import matplotlib.pyplot as plt
    
    img = torch.rand(size=(100, 100))
    img_filtered = gaussian_filter_2d(img, sigma=1.5)
    plt.subplot(121)
    plt.imshow(img)
    plt.subplot(122)
    plt.imshow(img_filtered)
    plt.show()

该代码使用了Andrei Bârsan在this answer的评论中提到的可分离滤波器的基本思想。这意味着,使用2D高斯核进行卷积可以通过分别沿图像的列和行进行一次卷积来替换。总体上更有效率,因为对于边长为N的核,每个像素需要使用2N而不是N²次乘法。
因此,在提供的代码中,我们首先使用gaussian_kernel_1d()创建一个1D高斯核,然后在gaussian_filter_2d()中应用两次。
关于代码,还有一些注意事项:
参数num_sigmas控制我们实际采样高斯函数凸起的标准差数量,从而产生卷积核。由于高斯函数理论上具有无限的支持(意味着它永远不为零),这就需要在精度和卷积核大小之间进行权衡(这会影响速度和内存使用)。长度为3 * sigma应该足够了,因为它将覆盖对应高斯函数下99.7%的面积,通常可以满足支持的两个半部分。
与其使用Normal().log_prob().exp_()来生成卷积核,我们可以在此明确编写正态分布的函数,这可能会更有效率。事实上,我们可以编写kernel = support.square_().mul_(-.5 / (sigma ** 2)).exp_(),从而(1)原地更改support的值(因为我们不再需要它们),并且(2)甚至省略正态分布的归一化常数(因为我们必须在返回卷积核之前对其进行归一化)。
虽然我们使用conv2d()而不是conv1d(),但实际上我们仍然有两个1D卷积,因为我们在conv2d()中应用了一个N×1和1×N的卷积核。我们本可以使用conv1d(),但使用conv2d()时代码要简单得多。
在较新的PyTorch版本中,我们可以使用conv2d(…, padding="same"),而不是自己计算填充量。无论哪种情况,使用conv2d()padding参数都意味着使用零填充。如果我们想要更多的填充选项,我们可以在卷积之前手动使用torch.nn.functional.pad()填充图像。

1

使用以上所有代码,并更新为Pytorch修订版的torch.outer

import torch
def gaussian_fn(M, std):
    n = torch.arange(0, M) - (M - 1.0) / 2.0
    sig2 = 2 * std * std
    w = torch.exp(-n ** 2 / sig2)
    return w

def gkern(kernlen=256, std=128):
    """Returns a 2D Gaussian kernel array."""
    gkern1d = gaussian_fn(kernlen, std=std) 
    gkern2d = torch.outer(gkern1d, gkern1d)
    return gkern2d

# Generate random matrix and multiply the kernel by it
A = np.random.rand(256*256).reshape([256,256])
A = torch.from_numpy(A)
guassian_filter = gkern(256, std=32)

ax=[]
f = plt.figure(figsize=(12,5))
ax.append(f.add_subplot(131))
ax.append(f.add_subplot(132))
ax.append(f.add_subplot(133))
ax[0].imshow(A, cmap='gray')
ax[1].imshow(guassian_filter, cmap='gray')
ax[2].imshow(A*guassian, cmap='gray')
plt.show()

enter image description here


1
值得指出的是,预计算高斯模糊外积并不是必须的。如果您只是使用水平和垂直滤波器(任意顺序)对图像进行卷积,将会得到相同的结果。实际上,对于更大的滤波器尺寸(例如>20),使用外积核的过程将比较慢,因为您需要执行更少的计算(滤波器复杂度从K^2降至2K)。 - Andrei Bârsan

网页内容由stack overflow 提供, 点击上面的
可以查看英文原文,
原文链接