ggplot2:y轴标签在绘图区内左对齐

5
我正在寻找一种自动移动y轴刻度标签的方法,以便它们左对齐并出现在实际绘图区内。我喜欢ggplot主题组件的通用灵活性,但是在尝试找到一般方法时遇到了困难。
我知道给
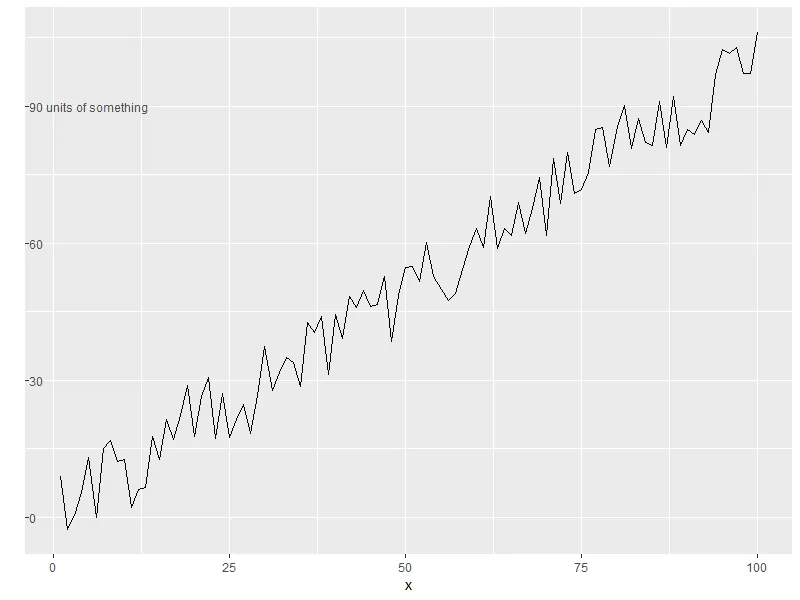
axis.text.y一个hjust=0和负右边距(*恶心*)的组合可以实现这个效果,但是负边距必须手动设置以匹配最长y轴刻度标签的宽度。
例如,请考虑以下代码:
library(ggplot2)

set.seed(0)
dat <- data.frame(x = 1:100, y = (1:100) + runif(100, -10, 10))

p1 <- ggplot(dat, aes(x, y)) + 
  geom_line() +
  scale_y_continuous("", breaks = c(0, 30, 60, 90),
                     labels = c(0, 30, 60, "90 units of something")) +
  theme(axis.text.y = element_text(hjust = 0,
                                   margin = margin(0, -3.1, 0, 0, 'cm')))

我认为它巧妙地将 y 轴标签 (例如 "某物的单位") 整合到了图表主体中,但为了实现这一点,必须手动找到最后一行中的 -3.1(通过试错),这让人倍感委屈:我不仅使用了负边距来拉动文本到它不想在的位置——还加入了一些神秘、脆弱、硬编码的魔幻数字。
有没有人知道我可以在哪里寻找更通用、更优雅的解决方案?

粗糙的方法,但是... ggplot(dat, aes(x, y)) + geom_line() + scale_y_continuous("", breaks=c(0, 30, 60, 90)) + annotate("text", x=-Inf, y=c(0, 30, 60, 90), label=c(0, 30, 60, "90个单位的某物"), hjust=0 )+ theme(axis.text.y = element_blank()) - user20650
谢谢!我曾经尝试过类似的东西,但是不喜欢因此失去对刻度标签的主题控制。 - Andrew Milligan
同意,可能可以使用 https://dev59.com/8obca4cB1Zd3GeqPVWdF 或 https://stackoverflow.com/questions/45123684/how-to-draw-boxes-borders-around-x-or-y-axis-labels 的思路来实现,但有点玄学。 - user20650
1
“失去刻度标签的主题控制”是什么意思? - Roman
1个回答

4
这里有一个使用grobs的技巧,它将y轴标签从其原始位置移开,重叠在绘图区域上方。
虽然我不认为这完全优雅(毕竟这是一个需要在ggplotGrob中转换的hack),但定位并不是硬编码的,你可以在转换之前在ggplot()中指定任何主题控件。
设置:
library(ggplot2)
library(grid)
library(gtable)

# sample data
set.seed(0)
dat <- data.frame(x=1:100, y=(1:100) + runif(100, -10, 10))

# create ggplot object
p <- ggplot(dat, aes(x, y)) + 
  geom_line() +
  scale_y_continuous("", 
                     breaks = c(0, 30, 60, 90),
                     labels = c(0, 30, 60, "90 units of something")) +
  # left-align y-axis labels
  # you can also specify other theme parameters as desired
  theme(axis.text.y = element_text(hjust = 0))

黑客入侵 grobs:

# convert from ggplot to grob object
gp <- ggplotGrob(p)

# locate the grob that corresponds to y-axis labels
y.label.grob <- gp$grobs[[which(gp$layout$name == "axis-l")]]$children$axis    

# remove y-axis labels from the plot, & shrink the space occupied by them
gp$grobs[[which(gp$layout$name == "axis-l")]] <- zeroGrob()
gp$widths[gp$layout$l[which(gp$layout$name == "axis-l")]] <- unit(0, "cm")

定义一个新的y轴刻度/标签的grob,水平顺序为[ticks][labels][buffer space]:

# create new gtable
new.y.label.grob <- gtable(heights = unit(1, "npc"))

# place axis ticks in the first column
new.y.label.grob <- gtable_add_cols(new.y.label.grob,
                                    widths = y.label.grob[["widths"]][2])
new.y.label.grob <- gtable_add_grob(new.y.label.grob,
                                    y.label.grob[["grobs"]][[2]],
                                    t = 1, l = 1)

# place axis labels in the second column
new.y.label.grob <- gtable_add_cols(new.y.label.grob,
                                    widths = y.label.grob[["widths"]][1])
new.y.label.grob <- gtable_add_grob(new.y.label.grob,
                                    y.label.grob[["grobs"]][[1]],
                                    t = 1, l = 2)

# add third column that takes up all the remaining space
new.y.label.grob <- gtable_add_cols(new.y.label.grob,
                                    widths = unit(1, "null"))

将新定义的y轴标签grob添加回图形grob中,位置与绘图区域相同:
gp <- gtable_add_grob(gp,
                      new.y.label.grob,
                      t = gp$layout$t[which(gp$layout$name == "panel")],
                      l = gp$layout$l[which(gp$layout$name == "panel")])

检查结果:

grid.draw(gp)

result


网页内容由stack overflow 提供, 点击上面的
可以查看英文原文,
原文链接