iOS7中UITextView表现异常。当您输入并进入UITextView的最后一行时,滚动视图不会像应该滚动到底部,导致文本被“裁剪”。我尝试将其的clipsToBounds属性设置为NO,但它仍然裁剪文本。
我不想调用“setContentOffset:animated”,因为首先:这是非常hacky的解决方案...第二:如果光标在文本框的中间(垂直)位置,将导致不必要的滚动。
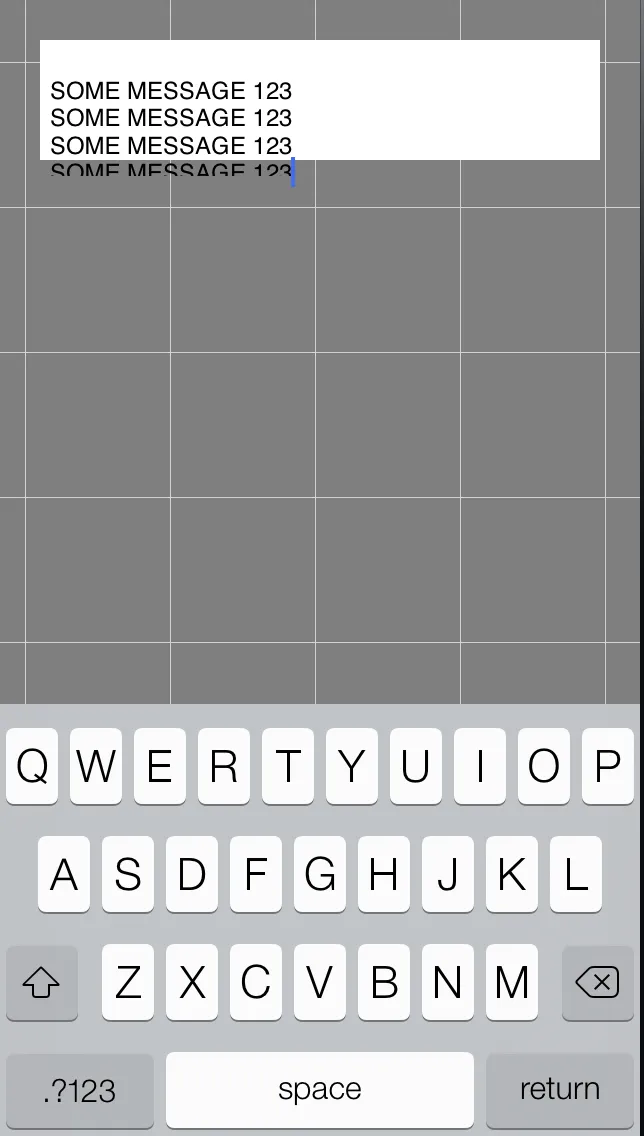
以下是截图。
非常感谢任何帮助!
谢谢!
iOS7中UITextView表现异常。当您输入并进入UITextView的最后一行时,滚动视图不会像应该滚动到底部,导致文本被“裁剪”。我尝试将其的clipsToBounds属性设置为NO,但它仍然裁剪文本。
我不想调用“setContentOffset:animated”,因为首先:这是非常hacky的解决方案...第二:如果光标在文本框的中间(垂直)位置,将导致不必要的滚动。
以下是截图。
非常感谢任何帮助!
谢谢!
问题是由于iOS 7引起的。在文本视图委托中,添加以下代码:
- (void)textViewDidChange:(UITextView *)textView {
    CGRect line = [textView caretRectForPosition:
        textView.selectedTextRange.start];
    CGFloat overflow = line.origin.y + line.size.height
        - ( textView.contentOffset.y + textView.bounds.size.height
        - textView.contentInset.bottom - textView.contentInset.top );
    if ( overflow > 0 ) {
        // We are at the bottom of the visible text and introduced a line feed, scroll down (iOS 7 does not do it)
        // Scroll caret to visible area
        CGPoint offset = textView.contentOffset;
        offset.y += overflow + 7; // leave 7 pixels margin
        // Cannot animate with setContentOffset:animated: or caret will not appear
        [UIView animateWithDuration:.2 animations:^{
            [textView setContentOffset:offset];
        }];
    }
}
尝试像这样实现UITextViewDelegate中的-textViewDidChangeSelection:委托方法:
-(void)textViewDidChangeSelection:(UITextView *)textView {
    [textView scrollRangeToVisible:textView.selectedRange];
}
- (void)textViewDidChange:(UITextView *)textView {
    NSRange selection = textView.selectedRange;

    if (selection.location + selection.length == [textView.text length]) {
        CGRect caretRect = [textView caretRectForPosition:textView.selectedTextRange.start];
        CGFloat overflow = caretRect.origin.y + caretRect.size.height - (textView.contentOffset.y + textView.bounds.size.height - textView.contentInset.bottom - textView.contentInset.top);

        if (overflow > 0.0f) {
            CGPoint offset = textView.contentOffset;
            offset.y += overflow + 7.0f;

            [UIView animateWithDuration:0.2f animations:^{
                [textView setContentOffset:offset];
            }];
        }
    } else {
        [textView scrollRangeToVisible:selection];
    }
}
我认为这篇文章提供了关于iOS 7中UITextView滚动/键盘相关问题的最终解决方案。它干净、易读、易用、易于维护,可以轻松地重复使用。
基本技巧: 只需更改UITextView的大小,而不是内容插入!
下面是一个实际操作的例子。假设您有一个基于NIB/Storyboard的UIViewController,使用自动布局,并且UITextView填充整个根视图。如果没有,您需要根据自己的需要调整textViewBottomSpaceConstraint的更改方式。
如何操作:
@property (nonatomic, weak) IBOutlet NSLayoutConstraint *textViewBottomSpaceConstraint;
@property (nonatomic) CGFloat textViewBottomSpaceConstraintFromNIB;
请在Interface Builder中连接textViewBottomSpaceConstraint(不要忘记!)
然后在viewDidLoad中:
// Save the state of the UITextView's bottom constraint as set up in your NIB/Storyboard
self.textViewBottomSpaceConstraintFromNIB = self.textViewBottomSpaceConstraint.constant;

[[NSNotificationCenter defaultCenter] addObserver:self
                                         selector:@selector(keyboardWillShowNotification:)
                                             name:UIKeyboardWillShowNotification
                                           object:nil];
[[NSNotificationCenter defaultCenter] addObserver:self
                                         selector:@selector(keyboardWillHideNotification:)
                                             name:UIKeyboardWillHideNotification
                                           object:nil];
添加以下方法来处理键盘调整大小(感谢https://github.com/brennanMKE/Interfaces/tree/master/Keyboarding - 这些方法由brennan提供!):
- (void)keyboardWillShowNotification:(NSNotification *)notification {
    CGFloat height = [self getKeyboardHeight:notification forBeginning:TRUE];
    NSTimeInterval duration = [self getDuration:notification];
    UIViewAnimationOptions curve = [self getAnimationCurve:notification];

    [self keyboardWillShowWithHeight:height duration:duration curve:curve];
}

- (void)keyboardWillHideNotification:(NSNotification *)notification {
    CGFloat height = [self getKeyboardHeight:notification forBeginning:FALSE];
    NSTimeInterval duration = [self getDuration:notification];
    UIViewAnimationOptions curve = [self getAnimationCurve:notification];

    [self keyboardWillHideWithHeight:height duration:duration curve:curve];
}

- (NSTimeInterval)getDuration:(NSNotification *)notification {
    NSDictionary *info = [notification userInfo];

    NSTimeInterval duration;

    NSValue *durationValue = [info objectForKey:UIKeyboardAnimationDurationUserInfoKey];
    [durationValue getValue:&duration];

    return duration;
}

- (CGFloat)getKeyboardHeight:(NSNotification *)notification forBeginning:(BOOL)forBeginning {
    NSDictionary *info = [notification userInfo];

    CGFloat keyboardHeight;

    NSValue *boundsValue = nil;
    if (forBeginning) {
        boundsValue = [info valueForKey:UIKeyboardFrameBeginUserInfoKey];
    }
    else {
        boundsValue = [info valueForKey:UIKeyboardFrameEndUserInfoKey];
    }

    UIDeviceOrientation orientation = [[UIDevice currentDevice] orientation];
    if (UIDeviceOrientationIsLandscape(orientation)) {
        keyboardHeight = [boundsValue CGRectValue].size.width;
    }
    else {
        keyboardHeight = [boundsValue CGRectValue].size.height;
    }

    return keyboardHeight;
}

- (UIViewAnimationOptions)getAnimationCurve:(NSNotification *)notification {
    UIViewAnimationCurve curve = [[notification.userInfo objectForKey:UIKeyboardAnimationCurveUserInfoKey] integerValue];

    switch (curve) {
        case UIViewAnimationCurveEaseInOut:
            return UIViewAnimationOptionCurveEaseInOut;
            break;
        case UIViewAnimationCurveEaseIn:
            return UIViewAnimationOptionCurveEaseIn;
            break;
        case UIViewAnimationCurveEaseOut:
            return UIViewAnimationOptionCurveEaseOut;
            break;
        case UIViewAnimationCurveLinear:
            return UIViewAnimationOptionCurveLinear;
            break;
    }

    return kNilOptions;
}
- (void)keyboardWillShowWithHeight:(CGFloat)height duration:(CGFloat)duration curve:(UIViewAnimationOptions)curve
{
    CGFloat correctionMargin = 15; // you can experiment with this margin so the bottom text view line is not flush against the keyboard which doesn't look nice
    self.textViewBottomSpaceConstraint.constant = height + correctionMargin;

    [self.view setNeedsUpdateConstraints];

    [UIView animateWithDuration:duration delay:0 options:curve animations:^{
        [self.view layoutIfNeeded];
    } completion:^(BOOL finished) {

    }];
}

- (void)keyboardWillHideWithHeight:(CGFloat)height duration:(CGFloat)duration curve:(UIViewAnimationOptions)curve
{
    self.textViewBottomSpaceConstraint.constant = self.textViewBottomSpaceConstraintFromNIB;

    [self.view setNeedsUpdateConstraints];

    [UIView animateWithDuration:duration delay:0 options:curve animations:^{
        [self.view layoutIfNeeded];
    } completion:^(BOOL finished) {

    }];
}
- (void)textViewDidBeginEditing:(UITextView *)textView
{
    [textView scrollRangeToVisible:textView.selectedRange];
}

- (void)textViewDidChangeSelection:(UITextView *)textView
{
    [textView scrollRangeToVisible:textView.selectedRange];
}
这一行导致我看不到最后一行文字:
textView.scrollEnabled = false
textView.contentInset = UIEdgeInsetsMake(0.0, 0.0, 10.0, 0.0);
这也将解决您的问题
这是 davididsk 最优秀的解决方案(来自上面)的 MonoTouch 版本。
TextView.SelectionChanged += (object sender, EventArgs e) => {
                TextView.ScrollRangeToVisible(TextView.SelectedRange);
            };


            TextView.Changed += (object sender, EventArgs e) => {

                CGRect line = TextView.GetCaretRectForPosition(TextView.SelectedTextRange.Start);
                nfloat overflow = line.Y + line.Height -
                                     (TextView.ContentOffset.Y +
                                      TextView.Bounds.Height -
                                      TextView.ContentInset.Bottom -
                                      TextView.ContentInset.Top );
                if ( overflow > 0 )
                {
                    // We are at the bottom of the visible text and introduced
                    // a line feed, scroll down (iOS 7 does not do it)
                    // Scroll caret to visible area
                    CGPoint offset = TextView.ContentOffset;
                    offset.Y+= overflow + 7; // leave 7 pixels margin
                    // Cannot animate with setContentOffset:animated:
                    // or caret will not appear
                    UIView.Animate(0.1,()=> {
                        TextView.ContentOffset = offset;
                    });
                }
            };
textView.autoresizingMask = UIViewAutoresizingFlexibleWidth | UIViewAutoresizingFlexibleHeight;
这对我解决了问题