让 Networkx 中的边从节点外部开始

5

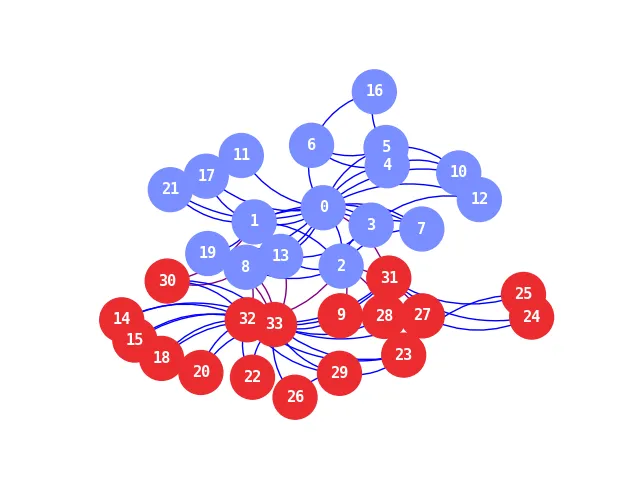
我有一个带权重的圆形布局绘图。 我想让边从节点的外部开始,但找不到方法。我尝试设置alpha=1,但那并没有给我想要的结果。 下面的图片显示了我现在得到的结果。

enter image description here

这是我现在用于节点的代码:
for n in G.nodes():
    if n in set1:
        G.nodes[n]['color'] = '#7a8eff'
    elif n in set2:
        G.nodes[n]['color'] = '#eb2c30'
    elif n in set3:
        G.nodes[n]['color'] = '#7300ff'
    else:
        G.nodes[n]['color'] = '#730a15'

colors = [node[1]['color'] for node in G.nodes(data=True)]
nx.draw_networkx_nodes(G, pos, node_size=1000, node_color=colors)


# edges
for edge in G.edges():
    source, target = edge
    rad = 0.25
    node_color_dict = dict(G.nodes(data='color'))
    if node_color_dict[source] == node_color_dict[target]:
        arrowprops=dict(lw=G.edges[(source,target)]['weight'],
                        arrowstyle="-",
                        color='blue',
                        connectionstyle=f"arc3,rad={rad}",
                        linestyle= '-',
                        alpha=0.45)
        ax.annotate("",
                    xy=pos[source],
                    xytext=pos[target],
                    arrowprops=arrowprops
                   )
    else:
        arrowprops=dict(lw=G.edges[(source,target)]['weight'],
                        arrowstyle="-",
                        color='purple',
                        connectionstyle=f"arc3,rad={rad}",
                        linestyle= '-',
                        alpha=0.45)
        ax.annotate("",
                    xy=pos[source],
                    xytext=pos[target],
                    arrowprops=arrowprops
                   )
# labels
nx.draw_networkx_labels(G, pos, font_size=11, font_family="monospace", font_color='white', font_weight='bold', alpha=1.0)


如果只使用nx.draw,我无法重现问题,我们需要完整的代码来帮助您。我猜您首先绘制节点,然后再绘制边缘。更改此顺序可能会解决问题。如果您添加一个最小可重现示例,那么帮助您就会变得更加容易。 - Sparky05
@Sparky05,我添加了更多的代码,希望有所帮助。 - nandz123
在这种情况下,将 zorder 添加到 arrowprops 应该可以解决您的问题。我已经在下面扩展了代码示例。 - Sparky05
@Sparky05 它能工作,但我现在遇到的唯一问题是节点标签不显示。 我只是使用:nx.draw_networkx_labels(G, pos, font_size=11, font_family="monospace", font_color='white', font_weight='bold') 绘制标签。 - nandz123
我现在已经建立了一个完整的示例,包括边缘、节点和节点标签。 - Sparky05
1个回答

5
一个完整的例子,可以产生期望的结果:
import networkx as nx
import matplotlib.pylab as pl


G = nx.karate_club_graph()
pos = nx.kamada_kawai_layout(G)

set1 = set(node for node in G if G.nodes[node]["club"] == "Mr. Hi")
set2 = set(node for node in G if G.nodes[node]["club"] != "Mr. Hi")

for n in G.nodes():
    if n in set1:
        G.nodes[n]['color'] = '#7a8eff'
    elif n in set2:
        G.nodes[n]['color'] = '#eb2c30'

for u, v in G.edges():
    G.edges[(u,v)]["weight"] = 1

colors = [node[1]['color'] for node in G.nodes(data=True)]
nodes_draw = nx.draw_networkx_nodes(G, pos, node_size=1000, node_color=colors)

ax = pl.gca()

# draw in the order, edges, nodes, node labels
zorder_edges = 3
zorder_nodes = 4
zorder_node_labels = 5

# edges
for edge in G.edges():
    source, target = edge
    rad = 0.25
    node_color_dict = dict(G.nodes(data='color'))
    if node_color_dict[source] == node_color_dict[target]:
        arrowprops=dict(lw=G.edges[(source,target)]['weight'],
                        arrowstyle="-",
                        color='blue',
                        connectionstyle=f"arc3,rad={rad}",
                        linestyle= '-',
                        #alpha=0.45,
                        zorder=zorder_edges,
                        )
        ax.annotate("",
                    xy=pos[source],
                    xytext=pos[target],
                    arrowprops=arrowprops
                   )
    else:
        arrowprops=dict(lw=G.edges[(source,target)]['weight'],
                        arrowstyle="-",
                        color='purple',
                        connectionstyle=f"arc3,rad={rad}",
                        linestyle= '-',
                        #alpha=0.45,
                        zorder=zorder_edges,
                        )
        ax.annotate("",
                    xy=pos[source],
                    xytext=pos[target],
                    arrowprops=arrowprops
                   )
# labels
node_labels_dict = nx.draw_networkx_labels(G, pos, font_size=11, font_family="monospace", font_color='white', font_weight='bold',
                                           #alpha=1.0
                                           )

nodes_draw.set_zorder(zorder_nodes)
for node_labels_draw in node_labels_dict.values():
    node_labels_draw.set_zorder(zorder_node_labels)

pl.axis("off")
# do don't cut off nodes
ax.set_xlim([1.1*x for x in ax.get_xlim()])
ax.set_ylim([1.1*y for y in ax.get_ylim()])
pl.show()

结果:

Visualization of the resulting network

背景

您可以更改创建的matplotlib对象的zorder

import networkx as nx
import matplotlib.pylab as pl
# an example graph with string (names) as nodes
g = nx.karate_club_graph()
pos = nx.kamada_kawai_layout(g)

e = nx.draw_networkx_edges(g, pos=pos, )
n = nx.draw_networkx_nodes(g, pos=pos, )

e.set_zorder(5) 
n.set_zorder(10)
pl.show()

如果您使用一些高级边缘绘制,请将zorder参数添加到annotate的箭头属性参数(所有可能的参数),例如:
arrowprops=dict(lw=G.edges[(source,target)]['weight'],
                        arrowstyle="-",
                        color='blue',
                        connectionstyle=f"arc3,rad={rad}",
                        linestyle= '-',
                        alpha=0.45,
                        zorder=0)

我已经包含了这个答案,以避免在边界处切断节点。

网页内容由stack overflow 提供, 点击上面的
可以查看英文原文,
原文链接