UITextField - 圆角问题

27

我提出我遇到的问题。我正在按照下面的方式以编程方式创建一个 UITextField

UItextField *mobileNumberField = [[UITextField alloc] initWithFrame:CGRectMake(10, 195, 300, 41)];
mobileNumberField.delegate = self;
mobileNumberField.borderStyle = UITextBorderStyleRoundedRect;
[mobileNumberField.layer setCornerRadius:14.0f];
mobileNumberField.placeholder = @"Mobile Number";
[self.paymentsHomeView addSubview:mobileNumberField];

输出结果是附带的图像。

enter image description here

我不知道为什么它在角落处断开。请帮助我修复我的文本字段,使其像下面附加的图像一样。

enter image description here

9个回答

30

只需移除此行...

mobileNumberField.borderStyle = UITextBorderStyleRoundedRect;

并且也加入这段代码...

    [mobileNumberField setBackgroundColor:[UIColor whiteColor]];
    [mobileNumberField.layer setBorderColor:[UIColor grayColor].CGColor];
    [mobileNumberField.layer setBorderWidth:1.0];

完全不起作用 - undefined
@Gargo 你是想用Objective C还是尝试用Swift来实现呢?因为这个解决方案已经有10年的历史了。 - undefined
我正在尝试在iOS 13+上使用Swift做同样的事情。我发现当borderWidth == 0borderColor == .clear时会出现这种情况。通常情况下,我会避免直接自定义UITextField。我会将其设置为透明,并嵌入到一个处理背景UI自定义的视图中。 - undefined

11

请在下面更新您的喜欢。

    UITextField *mobileNumberField = [[UITextField alloc] initWithFrame:CGRectMake(10, 195, 300, 41)];
    mobileNumberField.delegate = self;
    mobileNumberField.layer.borderWidth = 1.0f;
    mobileNumberField.layer.borderColor = [UIColor lightGrayColor].CGColor;
    mobileNumberField.
//    mobileNumberField.borderStyle = UITextBorderStyleRoundedRect;
    [mobileNumberField.layer setCornerRadius:14.0f];
    mobileNumberField.placeholder = @"Mobile Number";
    [self.paymentsHomeView addSubview:mobileNumberField];

文本字段默认采用UITextBorderStyleNone。如果我删除上述行,则没有边框。 - iOS
你可以设置 borderColor。 - Paramasivan Samuttiram
尝试设置边框颜色,但因为没有边框,所以无法应用。 - iOS
谢谢!从Joshi的回答中找到了解决方案。 - iOS

8
textField.layer.cornerRadius=textfield.frame.size.height/2;

textField.clipsToBounds=YES;

创建一个圆形文本框。 - Miti

6
剪切角落的原因是因为文本框周围有一个包含视图。当您设置角半径时,应用于该视图,因此内部文本框的角似乎被剪切 - 实际上它们甚至没有改变。
解决方法是将UITextField放在UIView中,将textfield的borderstyle设置为none。然后将边框和角半径规范应用于uiview。请注意borderColor非常接近,如果不是与UITextField borderColor相同。
截至撰写本文时,在Xcode 7.3.1、Swift 2.2、iOS 8和9中测试并且可行。
Swift:
textField.borderStyle = UITextBorderStyle.None
textBorderView.layer.cornerRadius = 5
textBorderView.layer.borderWidth = 1
textBorderView.layer.borderColor = UIColor.lightGrayColor().colorWithAlphaComponent(0.2).CGColor

2
以下是在Swift 5和XCode 11.4中给出的代码结果。肯定可以添加更多功能,我认为这是一个很好的MVP。
    naviTextField = UITextField.init(frame: CGRect(x: 0, y: 0, width: (self.navigationController?.navigationBar.frame.size.width)!, height: 21))
    self.navigationItem.titleView = naviTextField
    naviTextField.becomeFirstResponder()
    naviTextField.placeholder = "Type target name here"
    naviTextField.borderStyle = .roundedRect
    naviTextField.layer.cornerRadius = 5.0
    naviTextField.textAlignment = .center

result


1

这是您问题的解决方案。

UITextField * txtField = [[UITextField alloc]initWithFrame:CGRectMake(0, 0, 200, 50)];

[txtField setBorderStyle:UITextBorderStyleNone];

[txtField.layer setMasksToBounds:YES];
[txtField.layer setCornerRadius:10.0f];
[txtField.layer setBorderColor:[[UIColor lightGrayColor]CGColor]];
[txtField.layer setBorderWidth:1];
[txtField setTextAlignment:UITextAlignmentCenter];
[txtField setContentVerticalAlignment:UIControlContentVerticalAlignmentCenter];
[self.view addSubview:txtField];

它可以工作,但是当我应用它时,占位符文本和 txtField 的前导边框之间没有任何空隙。你知道如何解决这个问题吗(我尝试在占位符的开头放置空格,像这样:" placeholderText"而不是"placeholderText",但是不起作用)? - Dilara Albayrak

0

Swift 解决方案:

textField.layer.borderWidth = anyWidth
textField.layer.borderColor = anyColor
textField.layer.cornerRadius = textField.frame.size.height/2
textField.clipsToBounds = true

0

Swift 3解决方案:

我编写了一个单独的函数来将边框和圆角设置为Swift中的任何图层,您只需传递任何视图的图层、边框宽度、圆角大小和边框颜色给下面的函数

` func setBorderAndCornerRadius(layer: CALayer, width: CGFloat, radius: CGFloat,color : UIColor ) {
        layer.borderColor = color.cgColor
        layer.borderWidth = width
        layer.cornerRadius = radius
        layer.masksToBounds = true
    }

`


0

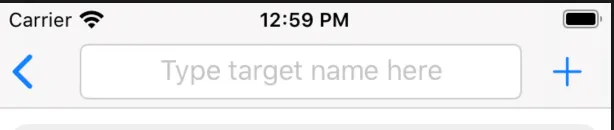
以上所有答案都很好,但是在这里我通过@IBDesignable添加代码。

enter image description here

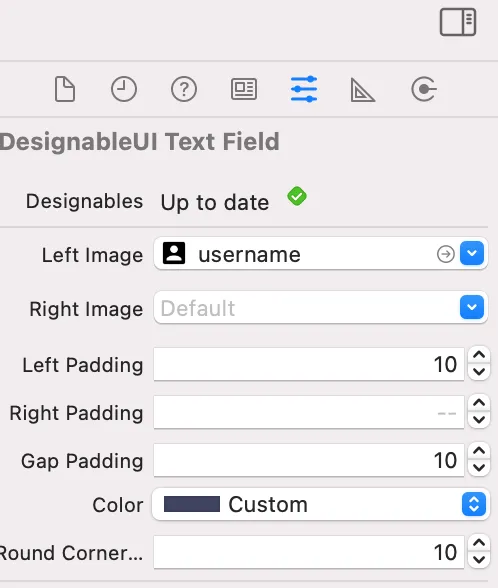
@IBDesignable class DesignableUITextField: UITextField {

// Provides left padding for images
override func leftViewRect(forBounds bounds: CGRect) -> CGRect {
    var textRect = super.leftViewRect(forBounds: bounds)
    textRect.origin.x += leftPadding
    return textRect
}

// Provides right padding for images
override func rightViewRect(forBounds bounds: CGRect) -> CGRect {
    var textRect = super.rightViewRect(forBounds: bounds)
    textRect.origin.x -= rightPadding
    return textRect
}

@IBInspectable var leftImage: UIImage? {
    didSet {
        updateView()
    }
}

@IBInspectable var rightImage: UIImage? {
    didSet {
        updateRightView()
    }
}

@IBInspectable var leftPadding: CGFloat = 0
@IBInspectable var rightPadding: CGFloat = 0
@IBInspectable var gapPadding: CGFloat = 0
@IBInspectable var color: UIColor = UIColor.lightGray {
    didSet {
        updateView()
    }
}
@IBInspectable var cornerRadius: CGFloat = 0
@IBInspectable var borderColor: UIColor? = .lightGray

override func draw(_ rect: CGRect) {
    layer.cornerRadius = cornerRadius
    layer.masksToBounds = true
    layer.borderWidth = 1
    layer.borderColor = borderColor?.cgColor
    
}    

//@IBInspectable var roundCornersRadius: CGFloat = 0 {
  //  didSet{
     //   roundCornersRadiusTextField(radius: roundCornersRadius)
  //  }
// }


func roundCornersRadiusTextField(radius:CGFloat) {
       roundCorners(corners: [UIRectCorner.topLeft, UIRectCorner.topRight, UIRectCorner.bottomLeft, UIRectCorner.bottomRight], radius:radius)
   }

   func roundBottomCornersRadius(radius:CGFloat) {
       roundCorners(corners: [UIRectCorner.topLeft, UIRectCorner.topRight], radius:radius)
   }

func updateView() {
    if let image = leftImage {
        leftViewMode = UITextField.ViewMode.always
        let imageView = UIImageView(frame: CGRect(x: 0, y: 0, width: 20, height: 20))
        imageView.contentMode = .scaleAspectFit
        imageView.image = image
        // Note: In order for your image to use the tint color, you have to select the image in the Assets.xcassets and change the "Render As" property to "Template Image".
        imageView.tintColor = color
        leftView = imageView
    } else {
        leftViewMode = UITextField.ViewMode.never
        leftView = nil
    }
    
    // Placeholder text color
    attributedPlaceholder = NSAttributedString(string: placeholder != nil ?  placeholder! : "", attributes:[NSAttributedString.Key.foregroundColor: color])
}


func updateRightView() {
    if let image = rightImage {
        rightViewMode = UITextField.ViewMode.always
        let imageView = UIImageView(frame: CGRect(x: 0, y: 0, width: 20, height: 20))
        imageView.contentMode = .scaleAspectFit
        imageView.image = image
        // Note: In order for your image to use the tint color, you have to select the image in the Assets.xcassets and change the "Render As" property to "Template Image".
        imageView.tintColor = color
        rightView = imageView
    } else {
        rightViewMode = UITextField.ViewMode.never
        rightView = nil
    }
    
    // Placeholder text color
    attributedPlaceholder = NSAttributedString(string: placeholder != nil ?  placeholder! : "", attributes:[NSAttributedString.Key.foregroundColor: color])
}

func roundCorners(corners:UIRectCorner, radius:CGFloat) {
        let bounds = self.bounds
        
        let maskPath = UIBezierPath(roundedRect: bounds, byRoundingCorners: corners, cornerRadii: CGSize(width: radius, height: radius))
        
        let maskLayer = CAShapeLayer()
        maskLayer.frame = bounds
        maskLayer.path = maskPath.cgPath
        
        self.layer.mask = maskLayer
        
        let frameLayer = CAShapeLayer()
        frameLayer.frame = bounds
        frameLayer.path = maskPath.cgPath
        frameLayer.strokeColor = UIColor.darkGray.cgColor
        frameLayer.fillColor = UIColor.init(red: 247, green: 247, blue: 247, alpha: 0).cgColor
        
        self.layer.addSublayer(frameLayer)
    }

private var textPadding: UIEdgeInsets {
    let p: CGFloat = leftPadding + gapPadding + (leftView?.frame.width ?? 0)
    return UIEdgeInsets(top: 0, left: p, bottom: 0, right: 5)
}
override open func textRect(forBounds bounds: CGRect) -> CGRect {
    return bounds.inset(by: textPadding)
}

override open func placeholderRect(forBounds bounds: CGRect) -> CGRect {
    return bounds.inset(by: textPadding)
}

override open func editingRect(forBounds bounds: CGRect) -> CGRect {
    return bounds.inset(by: textPadding)
}}

网页内容由stack overflow 提供, 点击上面的
可以查看英文原文,
原文链接