如何在Flutter中添加文本和轮播图片?

3

我想添加轮播图和文本, 但是我只知道如何添加图片轮播,不知道如何添加文本。请帮帮我,我是新手。 我希望结果显示的是上面的图片和下面的文字,但是两者需要同时滑动。

我不知道在哪里添加文本字段。我是根据YouTube上的一个示例制作的此轮播图。但是没有轮播图和文本的示例。我手动尝试了一些方法,但都没有成功。 请帮我修复它。谢谢。

  class MyApp extends StatelessWidget {
  @override
  Widget build(BuildContext context) {
    return MaterialApp(
      home: MyHomePage(title: 'Slider'),
    );
  }
}

class MyHomePage extends StatefulWidget {
  MyHomePage({Key key, this.title}) : super(key: key);

  final String title;

  @override
  _MyHomePageState createState() => _MyHomePageState();
}

class _MyHomePageState extends State<MyHomePage> {
  PageController pageController;

  //Images List
  List<String> images = [
    '',
  ];

  @override
  void initState() {
    super.initState();
    pageController = PageController(initialPage: 1, viewportFraction: 0.6);
  }

  @override
  Widget build(BuildContext context) {
    return Scaffold(
        body: PageView.builder(
            controller: pageController,
            itemCount: images.length,
            itemBuilder: (context, position) {
              return imageSlider(position);
            }
        )
    );
  }

  imageSlider(int index) {
    return AnimatedBuilder(
        animation: pageController,
        builder: (context, widget) {
          double value = 1;
          if(pageController.position.haveDimensions){
            value = pageController.page - index;
            value = (1 - (value.abs() * 0.3.clamp(0.0, 1.0)));
          }
          return Center(
            child: SizedBox(
              height: Curves.easeInOut.transform(value) * 400.0,
              width: Curves.easeInOut.transform(value) * 350.0,
              child: widget,
            ),
          );
        },
      child: Container(
        margin: EdgeInsets.all(10.0),
        child: Image.asset(images[index],fit: BoxFit.cover),
      ),
    );
  }
}

enter image description here


1
你没有添加图像来展示你想要实现的内容。 - Mazin Ibrahim
已添加。请检查。 - Ranto Berk
4个回答

1
使用 column 代替 container,只需将此内容替换为:
child: Container(
    margin: EdgeInsets.all(10.0),
    child: Image.asset(images[index],fit: BoxFit.cover),
),

用这个代码:
child: Column(
    // To centralize the children.
    mainAxisAlignment: MainAxisAlignment.center,
    crossAxisAlignment: CrossAxisAlignment.center,
    children: <Widget>[
        // First child
        Container(
          margin: EdgeInsets.all(10.0),
          child: Image.asset(images[index],fit: BoxFit.cover),
        ),
        // Second child
        Text(
          'foo',
          style: TextStyle(
             // Add text's style here
          ),
        ),
    ]
),

如果不想自己构建走马灯,可以使用现成的组件,例如:carousel_sliderflutter_swiper


但是你提供的代码使用静态文本,对吧?但是我需要每个图像都有不同的文本。就像我上面附上的那张图片一样。 - Ranto Berk
是的,我向您展示了这个想法。然后,您可以像处理图像一样使用文本列表。或者,您可以使用地图列表,以便在同一个地图中具有图像的URL和文本。或者,例如创建一个项目类,该类具有两个属性imageUrl和text,然后创建List<Item>...有很多解决方案... - Jehad Nasser
你有没有任何解决方法?我也需要在轮播滑块中带有文字的图片。 - Mahant

0

这是一个完整的工作代码,顶部有图像、文本和点。为此,您需要使用这两个库:"carousel_slider: ^4.1.1","smooth_page_indicator: ^1.0.0+2",请将它们更新到最新版本。

   class MyItem {
    String itemName;
     String path;
  MyItem(this.itemName, this.path);
}

class craouselImage extends StatefulWidget {
  @override
  _craouselImage createState() => _craouselImage();
}

class _craouselImage extends State<craouselImage> {
  int activeIndex = 0;
  List<MyItem> items = [
    MyItem("item 1", 'assets/images/appiconlogo.png'),
    MyItem("item 2", 'assets/images/Mockup4.png'),
  ];

  @override
  Widget build(BuildContext context) {
    return Container(
      child: Column(
        children: [
          CarouselSlider.builder(
            itemCount: items.length,
            options: CarouselOptions(
              height: 400,
              viewportFraction: 1,
              autoPlay: true,
              enlargeCenterPage: true,
              enlargeStrategy: CenterPageEnlargeStrategy.height,
              autoPlayInterval: const Duration(seconds: 1),
              onPageChanged: (index, reason) {
                setState(() {
                  activeIndex = index;
                });
              },
            ),
            itemBuilder: (context, index, realIndex) {
              final imgList = items[index];
              return Column(
                crossAxisAlignment: CrossAxisAlignment.start,
                mainAxisSize: MainAxisSize.min,
                children: [
                  Expanded(child: buildImage(imgList.path, index)),
                  const SizedBox(
                    height: 15,
                  ),
                  buildText(imgList.itemName, index),
                ],
              );
            },
          ),
          const SizedBox(
            height: 22,
          ),
          buildIndicator(),
          const SizedBox(
            height: 22,
          ),

          //buildText(itemName, index),
          // buildText(),
        ],
      ),
    );
  }

  Widget buildImage(String imgList, int index) => Container(
        margin: const EdgeInsets.symmetric(horizontal: 12),
        color: Colors.transparent,
        child: Align(
          alignment: Alignment.center,
          child: Image.asset(
            imgList,
            fit: BoxFit.cover,
          ),
        ),
      );

  buildIndicator() => AnimatedSmoothIndicator(
        activeIndex: activeIndex,
        count: items.length,
        effect: const JumpingDotEffect(
            dotColor: Colors.black,
            dotHeight: 15,
            dotWidth: 15,
            activeDotColor: mRed),
      );

  buildText(String itemName, int index) => Align(
      alignment: FractionalOffset.bottomCenter,
      child: Text(
        itemName,
        style: const TextStyle(
            fontWeight: FontWeight.w700, fontSize: 23, color: mRed),
      ));
}

0

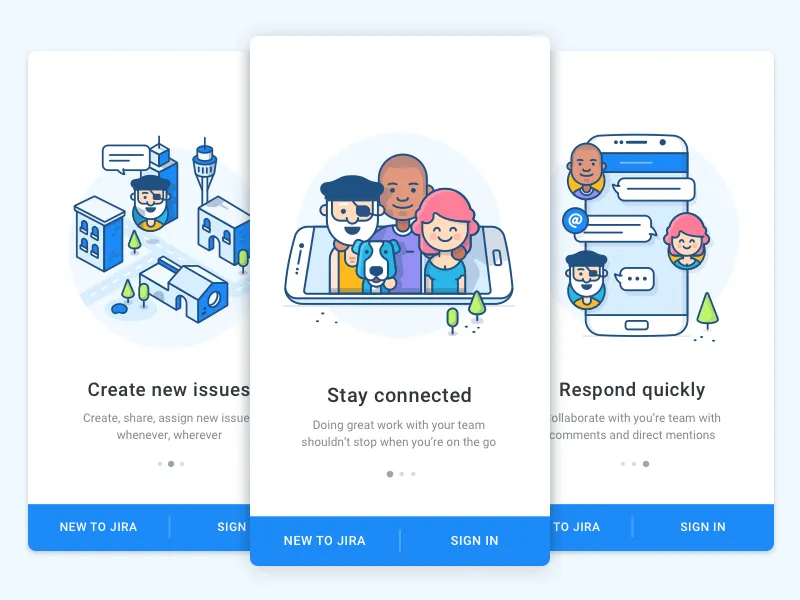
具有上一页和下一页功能的PageView

步骤1:添加PageView小部件

class _WalkThroughState extends State<WalkThrough> {
  final GlobalKey<ScaffoldState> _scaffoldKey = new GlobalKey<ScaffoldState>();
  var height = 0.0;
  var width = 0.0;
  int mCurrentIndex = -1;
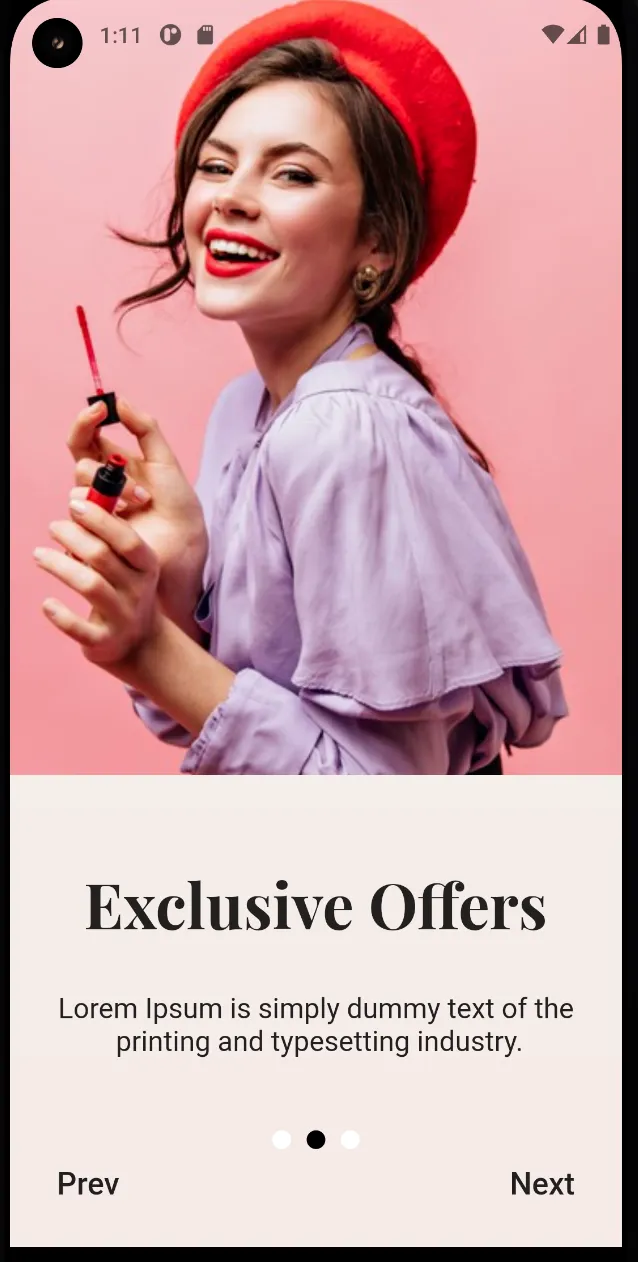
  List<Widget> pages=[PageOne(message: "Beauty Trends",),PageTwo(message: "Exclusive Offers",),PageThree(message: "Make your Kit",)];
  PageController _controller = new PageController();
  static const _kDuration = const Duration(milliseconds: 300);
  static const _kCurve = Curves.ease;

  @override
  void initState() {
    super.initState();
    _controller = PageController();
  }

  @override
  void dispose() {
    _controller.dispose();
    super.dispose();
  }

  @override
  Widget build(BuildContext context) {
    height = MediaQuery.of(context).size.height;
    width = MediaQuery.of(context).size.width;
    return Scaffold(
      extendBodyBehindAppBar: true,
      body: Stack(
        children: [
          Container(
            height: height,
            decoration: BoxDecoration(
                gradient: LinearGradient(
                    begin: Alignment.topCenter,
                    end: Alignment.bottomCenter,
                    colors: [startColorBackground, endColorBackground])),
          ),
          Column(
            children: <Widget>[
              Flexible(
                child: Container(
                    child: PageIndicatorContainer(
                      key: _scaffoldKey,
                      child: PageView.builder(
                        controller: _controller,
                        onPageChanged: _onPageViewChange,
                        itemBuilder: (context, position) {
                          mCurrentIndex = position;
                          return pages[position];
                        },
                        itemCount: 3,
                      ),
                      align: IndicatorAlign.bottom,
                      length: 3,
                      indicatorSpace: 10.0,
                      indicatorColor: Colors.white,
                      indicatorSelectorColor: Colors.black,
                    )),
              ),
              Container(
                child: Row(
                  mainAxisSize: MainAxisSize.max,
                  mainAxisAlignment: MainAxisAlignment.spaceBetween,
                  children: <Widget>[
                    // ignore: invalid_use_of_protected_member
                    mCurrentIndex != 0 ?Padding(
                      padding: const EdgeInsets.only(left: 30.0, bottom: 30.0),
                      child: GestureDetector(
                          onTap: () {
                            _controller.previousPage(
                                duration: _kDuration, curve: _kCurve);
                          },
                          child: Text('Prev', style: TextStyle(fontSize: 20, fontWeight: FontWeight.w500),)),
                    ) : Container(),
                    mCurrentIndex != 2 ? Padding(
                      padding: const EdgeInsets.only(right: 30.0, bottom: 30.0),
                      child: GestureDetector(
                          onTap: () {
                            _controller.nextPage(
                                duration: _kDuration, curve: _kCurve);
                          },
                          child: Text('Next', style: TextStyle(fontSize: 20, fontWeight: FontWeight.w500),)),
                    ) : Container(),
                  ],
                ),
              ),
            ],
          ),
        ],
      ),
    );

  }
  _onPageViewChange(int page) {
    /*print("Current Page: " + page.toString());
    int previousPage = page;
    if(page != 0) previousPage--;
    else previousPage = 2;
    print("Previous page: $previousPage");*/
    setState(() {
      mCurrentIndex = page;
      print(mCurrentIndex);
    });
  }

}

第二步:添加带有数据的页面

页面1

class PageOne extends StatelessWidget {
  final String message;
  var height = 0.0;
  var width = 0.0;

  PageOne({Key key, @required this.message}) : super(key: key);

  @override
  Widget build(BuildContext context) {
    height = MediaQuery.of(context).size.height;
    width = MediaQuery.of(context).size.width;
    return Container(
      height: height - 50,
      child: Align(alignment: Alignment.center, child: Column(
        mainAxisSize: MainAxisSize.max,
        mainAxisAlignment: MainAxisAlignment.spaceAround,
        children: [
          Container(
              margin: EdgeInsets.only(top: 16.0),
              child: Image(image: AssetImage("assets/images/banner_one.png"),)),
          Container(
            margin: EdgeInsets.only(bottom: 16.0),
            child: Column(
              mainAxisSize: MainAxisSize.min,
              children: [
                Text(message, style: TextStyle(fontSize: 40, fontFamily: 'Playfair', fontWeight: FontWeight.bold),),
                SizedBox(height: 30,),
                Text("Lorem Ipsum is simply dummy text of the \n printing and typesetting industry.", textAlign: TextAlign.center, style: TextStyle(fontSize: 18),),
              ],
            ),
          ),
        ],
      ),),
    );
  }
}

第二页

class PageTwo extends StatelessWidget {
  final String message;
  var height = 0.0;
  var width = 0.0;

  PageTwo({Key key, @required this.message}) : super(key: key);

  @override
  Widget build(BuildContext context) {
    height = MediaQuery.of(context).size.height;
    width = MediaQuery.of(context).size.width;
    return Container(
      child: Column(
        children: [
          Expanded(
            flex: 2,
            child: Container(
              width: width,
                child: Image(
                  width: double.infinity,
                  image: AssetImage("assets/images/banner_two.png"),
                  fit: BoxFit.cover,)),
          ),
          Expanded(
            flex: 1,
            child: Container(
              margin: EdgeInsets.only(top: 16),
              child: Column(
                children: [
                  SizedBox(
                    height: 40,
                  ),
                  Text(message, style: TextStyle(fontSize: 40, fontFamily: 'Playfair', fontWeight: FontWeight.bold),),
                  SizedBox(height: 30,),
                  Text("Lorem Ipsum is simply dummy text of the \n printing and typesetting industry.", textAlign: TextAlign.center, style: TextStyle(fontSize: 18),),
                ],
              ),
            ),
          ),
        ],
      ),
    );
  }
}

第三页

class PageThree extends StatelessWidget {
  final String message;
  var height = 0.0;
  var width = 0.0;

  PageThree({Key key, @required this.message}) : super(key: key);

  @override
  Widget build(BuildContext context) {
    height = MediaQuery.of(context).size.height;
    width = MediaQuery.of(context).size.width;
    return  Container(
      child: Column(
        mainAxisAlignment: MainAxisAlignment.spaceBetween,
        children: [
          Expanded(
            flex: 3,
            child: Container(
                width: width,
                child: Image(  width: double.infinity,
                  image: AssetImage("assets/images/banner_three.png"), fit: BoxFit.fill,)),
          ),
          Expanded(
            flex: 1,
            child: Container(
              child: Column(
                children: [
                  Text(message, style: TextStyle(fontSize: 40, fontFamily: 'Playfair', fontWeight: FontWeight.bold),),
                  SizedBox(height: 30,),
                  Text("Lorem Ipsum is simply dummy text of the \n printing and typesetting industry.", textAlign: TextAlign.center, style: TextStyle(fontSize: 18),),
                ],
              ),
            ),
          ),
        ],
      ),
    );
  }
}

您可以添加任意数量的页面。目前,我正在添加三个带有数据的页面。

Colors.dart

import 'package:flutter/material.dart';

const viewColor = Color(0xFFF5D9CE);
const textPinkColor = Color(0xFFF51678);
const buttonPinkColor = Color(0xFFF5147C);
const pinkColor = Color(0xFFF51479);
const pinkBackground = Color(0xFFF5C3C7);
const startColorBackground = Color(0xFFF5F4F2);
const endColorBackground = Color(0xFFF5EAE6);

Page 1

Page 2

Page 3


0

试一下这个

child: Column(
    mainAxisAlignment: MainAxisAlignment.center,
    crossAxisAlignment: CrossAxisAlignment.center,
    children: <Widget>[
      Text(
        heading,
        style: TextStyle(
          color: Colors.white,
          fontSize: 20.0,
          fontWeight: FontWeight.bold,
        ),
      ),
      Padding(
        padding: const EdgeInsets.all(10.0),
        child: Text(
          sub_heading,
          style: TextStyle(
            color: Colors.white,
            fontSize: 15.0,
          ),
          //textAlign: TextAlign.center,
        ),
      ),
    ],
  ),

请详细说明代码应该放置在哪里以及代码如何解决问题。 - Gourango Sutradhar

网页内容由stack overflow 提供, 点击上面的
可以查看英文原文,
原文链接