导航栏右侧按钮项间距

33
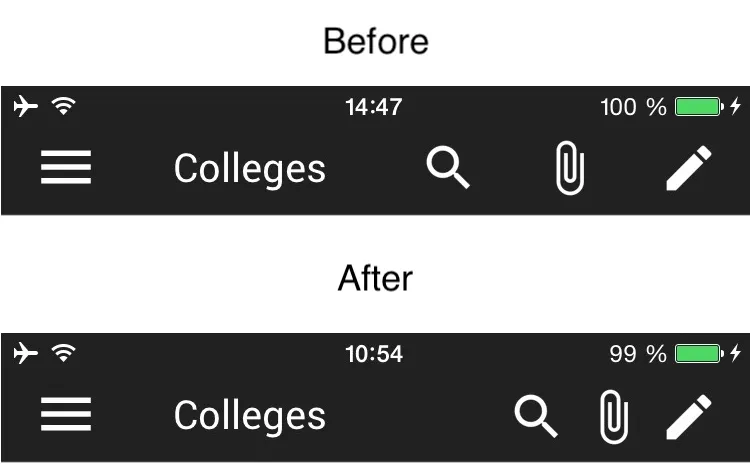
我已经创建了一个包含左侧栏按钮项(从Storyboard添加),以及来自代码的titleView和三个右侧栏按钮项的
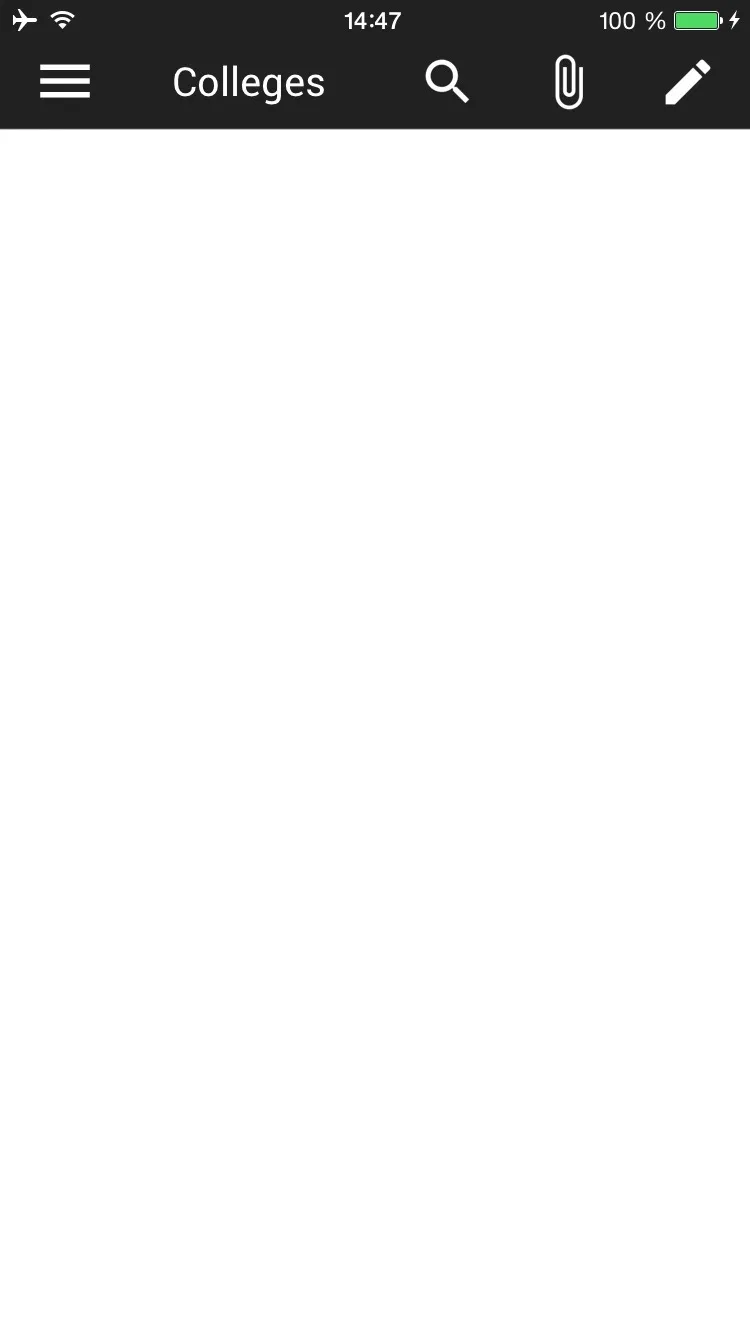
navigation bar
以下是代码:
override func viewDidLoad() {
    super.viewDidLoad()

    var screenWidth = UIScreen.mainScreen().bounds.width
    // custom title view
    var navBarWidth: CGFloat = self.navigationController!.navigationBar.frame.size.width
    let customTitleView = UIView(frame: CGRectMake(0, 0, navBarWidth, 44))
    titleLabel = UILabel(frame: CGRectMake(20, 0, navBarWidth, 40))
    titleLabel.text = conversationName
    if let titleFont = UIFont(name: "Roboto-Regular", size: 20) {
        titleLabel.font = titleFont
    }
    titleLabel.textColor = UIColor.whiteColor()

    customTitleView.addSubview(titleLabel)
    self.navigationItem.titleView = customTitleView

    // right bar buttons
    var searchImage = UIImage(named: "search")!
    var clipImage = UIImage(named: "clip")!
    var pencilImage = UIImage(named: "pencil")!

    var searchBtn = UIBarButtonItem(image: searchImage, style: UIBarButtonItemStyle.Plain, target: self, action: Selector("searchBtnPressed"))
    searchBtn.tintColor = UIColor.whiteColor()
    var clipBtn = UIBarButtonItem(image: clipImage, style: UIBarButtonItemStyle.Plain, target: self, action: Selector("clipBtnPressed"))
    clipBtn.tintColor = UIColor.whiteColor()
    var pencilBtn = UIBarButtonItem(image: pencilImage, style: UIBarButtonItemStyle.Plain, target: self, action: Selector("pencilBtnPressed"))
    pencilBtn.tintColor = UIColor.whiteColor()

    self.navigationItem.setRightBarButtonItems([pencilBtn, clipBtn, searchBtn], animated: false)
}

我的问题是我想改变右侧按钮之间的间距,但我不知道如何做。
我尝试添加一个固定宽度的按钮来分隔它们,但这只会增加现有的空间。
有人可以帮帮我吗?谢谢。

1
导航栏忽略间距。使用UIBarButton containerView初始化器。 - Mousavian
2
在iOS上使用Roboto字体?那简直是异端!;D - Ricardo Sanchez-Saez
@RicardoSánchez-Sáez,这在PRD中已经指定了。 - mkz
10个回答

76

我是这样解决我的问题的:

var searchImage = UIImage(named: "search-selected")!
var clipImage = UIImage(named: "clip")!
var pencilImage = UIImage(named: "pencil")!

let searchBtn: UIButton = UIButton.buttonWithType(UIButtonType.Custom) as! UIButton
searchBtn.setImage(searchImage, forState: UIControlState.Normal)
searchBtn.addTarget(self, action: "searchBtnPressed", forControlEvents: UIControlEvents.TouchUpInside)
searchBtn.frame = CGRectMake(0, 0, 30, 30)
let searchBarBtn = UIBarButtonItem(customView: searchBtn)

let clipBtn: UIButton = UIButton.buttonWithType(UIButtonType.Custom) as! UIButton
clipBtn.setImage(clipImage, forState: UIControlState.Normal)
clipBtn.addTarget(self, action: "clipBtnPressed", forControlEvents: UIControlEvents.TouchUpInside)
clipBtn.frame = CGRectMake(0, 0, 30, 30)
let clipBarBtn = UIBarButtonItem(customView: clipBtn)

let pencilBtn: UIButton = UIButton.buttonWithType(UIButtonType.Custom) as! UIButton
pencilBtn.setImage(pencilImage, forState: UIControlState.Normal)
pencilBtn.addTarget(self, action: "pencilBtnPressed", forControlEvents: UIControlEvents.TouchUpInside)
pencilBtn.frame = CGRectMake(0, 0, 30, 30)
let pencilBarBtn = UIBarButtonItem(customView: pencilBtn)

self.navigationItem.setRightBarButtonItems([pencilBarBtn, clipBarBtn, searchBarBtn], animated: false)

现在看起来很好。

之前和之后的差别

针对Swift 4.1的更新

let testButton : UIButton = UIButton.init(type: .custom)
testButton.setImage(editImage, for: .normal)
testButton.addTarget(self, action: #selector(didTapCameraButton), for: .touchUpInside)
testButton.frame = CGRect(x: 0, y: 0, width: 30, height: 30)
let addButton = UIBarButtonItem(customView: testButton)

你可以使用一个函数来代替重复的所有代码。不过,谢谢,它起作用了! - LaloLoop
一个完美的答案,我喜欢这个。所以下面我将用Objective C给出答案。 - Anup Gupta
正是我所需要的,不过对于我来说设置框架并不必要,所以我把那行代码删掉了。 - balazs630
但是如果那些条形按钮不是自定义的条形按钮,而是由系统提供的,比如“完成”,“相机”或“编辑”,该怎么办呢? - Ashutosh Shukla
仅使用customView初始化器而不是带有image的初始化器给了我正确的结果,因为图像似乎没有插入。 - Skoua
@mkz 这种方法无法设置 tintColor,对于应用 tintColor 有什么想法吗? - iOSDude

7

设置 testButton.frame 是无效的。

这个解决方案对我来说是正确的!

rightButton.imageEdgeInsets = UIEdgeInsets(top: 3, left: 10, bottom: 7, right: 0)

5

对于Swift 3:

let searchBtn: UIButton = UIButton(type: UIButtonType.custom)
searchBtn.setImage(UIImage(named: "search"), for: [])
searchBtn.addTarget(self, action: #selector(ViewController.searchBtnPressed(_:)), for: UIControlEvents.touchUpInside)
searchBtn.frame = CGRect(x: 0, y: 0, width: 30, height: 30)
let searchButton = UIBarButtonItem(customView: searchBtn)

let clipBtn: UIButton = UIButton(type: UIButtonType.custom)
clipBtn.setImage(UIImage(named: "clip"), for: [])
clipBtn.addTarget(self, action: #selector(ViewController.clipBtnPressed(_:)), for: UIControlEvents.touchUpInside)
clipBtn.frame = CGRect(x: 0, y: 0, width: 30, height: 30)
let clipButton = UIBarButtonItem(customView: clipBtn)

let pencilBtn: UIButton = UIButton(type: UIButtonType.custom)
pencilBtn.setImage(UIImage(named: "pencil"), for: [])
pencilBtn.addTarget(self, action: #selector(ViewController.pencilBtnPressed(_:)), for: UIControlEvents.touchUpInside)
pencilBtn.frame = CGRect(x: 0, y: 0, width: 30, height: 30)
let pencilButton = UIBarButtonItem(customView: pencilBtn)

self.navigationItem.rightBarButtonItems = [pencilButton, clipButton, searchButton]

请将ViewController替换为您的视图控制器


3
// create three nav bar buttons
    var searchBtn = UIBarButtonItem(image: searchImage, style: UIBarButtonItemStyle.Plain, target: self, action: Selector("searchBtnPressed"))
    searchBtn.tintColor = UIColor.whiteColor()
    var clipBtn = UIBarButtonItem(image: clipImage, style: UIBarButtonItemStyle.Plain, target: self, action: Selector("clipBtnPressed"))
    clipBtn.tintColor = UIColor.whiteColor()
    var pencilBtn = UIBarButtonItem(image: pencilImage, style: UIBarButtonItemStyle.Plain, target: self, action: Selector("pencilBtnPressed"))
    pencilBtn.tintColor = UIColor.whiteColor()

// create a spacer
  var space = UIBarButtonItem(barButtonSystemItem: .fixedSpace, target: self, action: nil)
  space.width = 10

  var buttons = [pencilBtn, space, clipBtn, space, searchBtn]
  navigationItem?.rightBarButtonItems = buttons

2

这个解决方案是用Objective C编写的。

UIImage *settingImageName = [UIImage imageNamed:@"Menu_Burger_Icon"];
UIButton * settingButton = [UIButton buttonWithType:UIButtonTypeCustom];
[settingButton setImage:settingImageName forState:UIControlStateNormal];
[settingButton addTarget:self action:@selector(settingsBtnClicked) forControlEvents:UIControlEventTouchUpInside];
settingButton.frame = CGRectMake(0, 0, 30, 30);

UIBarButtonItem *settingBarButton = [[UIBarButtonItem alloc] initWithCustomView:settingButton];

UIImage *notificationImageName = [UIImage imageNamed:@"NotificationON"];
UIButton * notificationButton = [UIButton buttonWithType:UIButtonTypeCustom];
[notificationButton setImage:notificationImageName forState:UIControlStateNormal];
[notificationButton addTarget:self action:@selector(notificationButtonClicked) forControlEvents:UIControlEventTouchUpInside];
notificationButton.frame = CGRectMake(0, 0, 30, 30);
UIBarButtonItem *notificationBarButton = [[UIBarButtonItem alloc] initWithCustomView:notificationButton];

self.navigationItem.rightBarButtonItems  = @[settingBarButton,notificationBarButton];

这是@mikle94提供的解决方案参考,他的回答是用Swift编写的。


这段代码在我的环境中可以正常工作,但问题是我想要给按钮应用色调颜色。我尝试了以下代码,但它没有起作用,你能帮忙检查一下吗?settingButton.tintColor = [UIColor blackColor]; settingBarButton.tintColor = [UIColor blackColor]; - iOSDude
无法使用此方法设置tintColor,对于应用tintColor有什么想法吗? - iOSDude

1
let rightActionButton:UIButton = UIButton()

if #available(iOS 11.0, *) {

    let widthConstraint = rightActionButton.widthAnchor.constraint(equalToConstant: 30)
    let heightConstraint = rightActionButton.heightAnchor.constraint(equalToConstant: 30)
    heightConstraint.isActive = true
    widthConstraint.isActive = true
}
else {
    rightActionButton.frame = CGRect.init(x: 0, y: 0, width: 30, height: 30)
}

rightActionButton.setImage(UIImage.init(named: "3-dots-right-button"), for: .normal)
rightActionButton.addTarget(self, action: #selector(handleRightMenu), for: UIControlEvents.touchUpInside)
rightActionButton.setTitle("", for: .normal)
rightActionButton.tintColor = UIColor(hex:K.NODD_GREEN_HEX)


let rightActionBarButton:UIBarButtonItem = UIBarButtonItem(customView: rightActionButton)

let rightBarButtonItem1 = rightActionBarButton
let rightBarButtonItem2 = UIBarButtonItem(barButtonSystemItem: .action, target: self, action: #selector(handleRight2Menu))

self.navigationItem.rightBarButtonItems = [rightBarButtonItem1,rightBarButtonItem2]

0
尝试更改constraintEqualToConstant
[myUIButton.widthAnchor constraintEqualToConstant:24].active = YES;
[myUIButton.heightAnchor constraintEqualToConstant:24].active = YES;

0

你也可以先在Storyboard中将它们连接起来。
我有两个右侧栏按钮项。

(这是Objective-C代码,您可以为Swift进行修改。)

首先在视图控制器中创建对它们的引用。

@interface MyViewController ()
    @property (weak, nonatomic) IBOutlet UIButton *smsButton;
    @property (weak, nonatomic) IBOutlet UIButton *checkoutButton;
@end

然后,在viewDidLoad中,调整它们的宽度和高度。
// Adjust right bar button item spacing.
self.smsButton.frame = CGRectMake(0, 0, 30, 30);
self.lockButton.frame = CGRectMake(0, 0, 30, 30);

0

通过使用函数来减少代码(Swift 4.2.1),由@mkz提供支持的解决方案

将最重要的参数添加到函数中(注意如何将选择器传递给函数),您可能根据需要添加更多参数。

func makeCustomNavigationButton(imageName: String, action: Selector) -> UIBarButtonItem{

    let image = UIImage(named: imageName)!
    let btn: UIButton = UIButton(type: UIButton.ButtonType.custom)
    btn.setImage(image, for: .normal)
    btn.addTarget(self, action: action, for: .touchUpInside)
    btn.frame = CGRect(x: 0, y: 0, width: 30, height: 30)
    let barBtn = UIBarButtonItem(customView: btn)

    return barBtn
}

如何调用:

let search = self.makeCustomNavigationButton(imageName: "search", action: #selector(searchBtnPressed(_:)))
let clip = self.makeCustomNavigationButton(imageName: "clip", action: #selector(clipBtnPressed(_:)))
let pencil = self.makeCustomNavigationButton(imageName: "pencil", action: #selector(pencilBtnPressed(_:)))
self.navigationItem.rightBarButtonItems = [search, clip, pencil]

-3
这是解决问题的其中一种方法。
使用UIBarButtonItem作为空格。
let space = UIBarButtonItem(barButtonSystemItem: .FixedSpace, target: nil, action: nil)
space.width = -20 // adjust as needed
self.navigationItem.rightBarButtonItems = [pencilBtn, clipBtn, searchBtn, space]

网页内容由stack overflow 提供, 点击上面的
可以查看英文原文,
原文链接