在Flutter中为DropDownButton(展开状态)左侧添加图标

28

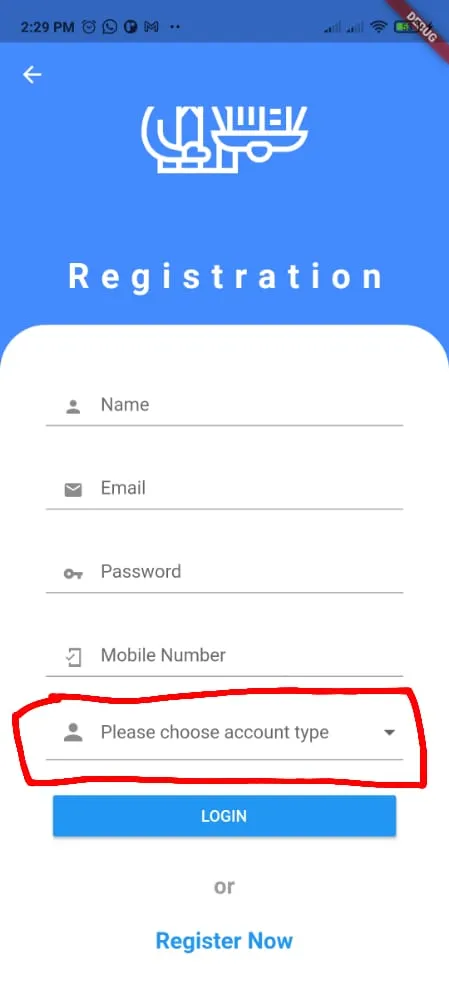
我想在DropDownButton左侧添加图标,但找不到方法来实现。

我想要的效果是这样的:

图片描述

我尝试了以下代码,但它将图标放在了右侧,而且也覆盖了箭头图标:

 `@override
  Widget build(BuildContext context) {
  return Scaffold(
  body: Container(
    margin: EdgeInsets.only(top: 64.0, left: 16.0, right: 16.0),
    color: Colors.white,
    child: DropdownButton(
      icon: Icon(
        Icons.person,
        color: Colors.redAccent,
        size: 20.09,
      ),
      isExpanded: true,
      items: _studentList.map((val) {
        return DropdownMenuItem(
          value: val,
          child: Text(val),
        );
      }).toList(),
      value: _currentSelectedItem,
      onChanged: (value) {
        setState(() {
          _currentSelectedItem = value;
        });
      },
    ),
  ),
);
  }`

上面代码的输出如下:

在此输入图像描述

我还尝试将 Icon()DropDownButton() 放在 Row() 小部件中,但这不允许 DropDownButton() 扩展到全宽。

任何帮助将不胜感激。

谢谢

8个回答

28

使用 DropdownButtonFormField,因为它具有装饰属性。您可以使用 prefixIcon 属性在左侧设置图标。

示例:

DropdownButtonFormField<String>(
         decoration: InputDecoration(
         prefixIcon: Icon(Icons.person),
         ),
         hint: Text('Please choose account type'),
         items: <String>['A', 'B', 'C', 'D'].map((String value) {
         return DropdownMenuItem<String>(
         value: value,
         child: new Text(value),
       );
      }).toList(),
     onChanged: (_) {},
),

结果:

输入图像描述


16

没有特定的属性可以按照您想要的方式添加图标,但是您始终可以在代码周围进行调整。使用以下代码,将 Icon() 放置在 DropDownButton() 按钮之上。

<code>@override
Widget build(BuildContext context) {
return Scaffold(
body: Stack(
  children: <Widget>[
    Container(
      decoration: BoxDecoration(
        color: Colors.white,
        boxShadow: [
          BoxShadow(
            color: Colors.grey,
            blurRadius: 20.0,
            spreadRadius: 0.5,
            offset: Offset(1.0, 1.0),
          ),
        ],
      ),
      padding: EdgeInsets.only(left: 44.0),
      margin: EdgeInsets.only(top: 64.0, left: 16.0, right: 16.0),
      child: DropdownButton(
        isExpanded: true,
        items: your_list.map(
          (val) {
            return DropdownMenuItem(
              value: val,
              child: Text(val),
            );
          },
        ).toList(),
        value: _currentSelectedItem,
        onChanged: (value) {
          setState(() {
            _currentSelectedItem = value;
          });
        },
      ),
    ),
    Container(
      margin: EdgeInsets.only(top: 80.0, left: 28.0),
      child: Icon(
        Icons.person,
        color: Colors.redAccent,
        size: 20.0,
      ),
    ),
  ],
),
  );
}
</code>

谢谢Sameed的回答,我会检查并尽快回复你。 - Muhammad Faizan
@Sameed Shah 如何在图标点击时调用相同的下拉菜单。 - s.j
此答案无法被接受,因为在箭头点击时下拉按钮不会打开。 - ulusoyca

4

请记住,一切都是小部件,所以:

iconSize: 0,
hint: Row(
         children: [
            Container(
                child: Text('Freguesias'),
            ),
            Container(
                child: Icon(Icons.arrow_drop_down),
            ),
          ],
 ),

1

可能已经晚了,但对于即将到来的观众会很有帮助。

我们可以使用DropDownButtonFormField而不是使用DropDownButton。它具有一个decoration属性。通过这个属性,我们可以利用prefixIcon属性在DropDownButton左侧添加图标:

DropDownButtonFormField(
  decoration: InputDecoration(
    prefixIcon: Icon(Icons.person, color: Colors.redAccent),
  ),
  ...
);

0
尝试使用DropdownButtonFormField的装饰属性并使用prefixIcon属性。
DropdownButtonFormField(
      isDense: false,
      itemHeight: 48,
      isExpanded: true,
      decoration: InputDecoration(
        prefixIcon: Icon(Icons.question_answer_rounded),//Add this line
        filled: true,
        ...
        ),
        ...
  )
        

这将在左侧添加一个图标。


0
如果图标确实应该在视觉上成为DropDown组件的一部分,您可以采用以下方法。这有点“hacky”,缺乏响应性,但它是进行更多实验的起点。我添加了一个完整的工作示例,因此您可以将其复制粘贴到可运行的主dart文件中。
简而言之,它使用堆叠布局,因此图标只是放置在下拉组件上方。然后我填充了文本,以便左侧有空间。
void main() => runApp(MyApp());

/// This Widget is the main application widget.
class MyApp extends StatelessWidget {
  static const String _title = 'Flutter Code Sample';

  @override
  Widget build(BuildContext context) {
    return MaterialApp(
      title: _title,
      home: Scaffold(
        appBar: AppBar(title: const Text(_title)),
        body: MyStatefulWidget(),
      ),
    );
  }
}

class MyStatefulWidget extends StatefulWidget {
  MyStatefulWidget({Key key}) : super(key: key);

  @override
  _MyStatefulWidgetState createState() => _MyStatefulWidgetState();
}

class _MyStatefulWidgetState extends State<MyStatefulWidget> {
  String dropdownValue = 'One';

  @override
  Widget build(BuildContext context) {
    return Scaffold(
      body: Center(
        child: Stack(
          children: <Widget>[
            DropdownButton<String>(
              value: dropdownValue,
              //icon: Icon(Icons.arrow_downward),
              iconSize: 24,
              elevation: 16,
              style: TextStyle(color: Colors.deepPurple),
              underline: Container(
                height: 2,
                color: Colors.deepPurpleAccent,
              ),
              onChanged: (String newValue) {
                setState(() {
                  dropdownValue = newValue;
                });
              },
              items: <String>['One', 'Two', 'Free', 'Four']
                  .map<DropdownMenuItem<String>>((String value) {
                return DropdownMenuItem<String>(
                  value: value,
                  child: Padding(
                    padding: const EdgeInsets.only(left: 30.0),
                    child: Text("$value"),
                  ),
                );
              }).toList(),
            ),
            Container(
                margin: EdgeInsets.symmetric(vertical: 10),
                child: Icon(Icons.arrow_downward)),
          ],
        ),
      ),
    );
  }
}

抱歉晚了,我会尽快给你反馈。 - Muhammad Faizan

-1
将您的图标和下拉框小部件包装在行小部件内,嵌套在容器内,就像以下操作一样:
body: Container(
    margin: EdgeInsets.only(top: 64.0, left: 16.0, right: 16.0),
    color: Colors.white,
    child: 
    child: Row(
    children: <Widget>[
      Icon(
        Icons.person,
        color: Colors.redAccent,
        size: 20.09,
     ),
     Expanded(
        flex:1,
        child:DropdownButton(
            isExpanded: true,
            items: _studentList.map((val) {
            return DropdownMenuItem(
              value: val,
              child: Text(val),
            );
        }).toList(),
        value: _currentSelectedItem,
        onChanged: (value) {
         setState(() {
           _currentSelectedItem = value;
         });
      },
     ),
    )
  ]  
)

1
代码应该被正确地格式化。此外,目前括号不匹配。 - fdermishin

-2

实现这个的简单方法是将child prop传递给DropdownMenuItem,然后您可以传递任何小部件,我创建了一行并在行中传递了图标和文本:

items: <String>['George Green School', 'George Blue School', 'George Red School', 'George Yellow School']
                .map<DropdownMenuItem<String>>((String value) {
              return DropdownMenuItem<String>(
                value: value,
                child: Row(
                  children: [
                    Icon(Icons.dangerous),
                    Text(value, style: TextStyle(fontSize : 12),),
                  ],
                ),
              );
            }).toList(),

最佳答案是将下拉菜单和图标包装在 Row() 组件中。 - Muhammad Faizan
不确定您在这里的意思,将图标和整个下拉菜单包装在一行中,会创建一个图标和一个下拉菜单,而不是每个下拉菜单项一个图标。 - Arnab Chatterjee
没错,那正是我想要实现的,当时我还是个初学者,所以遇到了很多问题,但无论如何,感谢您的评论。 - Muhammad Faizan

网页内容由stack overflow 提供, 点击上面的
可以查看英文原文,
原文链接