根据Flutter中动态内容,调整GridView子项的高度

46

如何在Flutter中实现这个复杂的视图?

我正在尝试使用GridView实现一个具有n列的视图,子项应该具有特定的宽高比(例如1.3),但子项的高度应该是自适应的(在Android术语中称为"wrap content")。

我遇到了困难,因为据我所知,GridView的childAspectRatio:1.3(默认值:1)总是以相同的宽高比布局子项,而不是动态内容。

注意:子项应根据图像的高度展开其自身的高度。

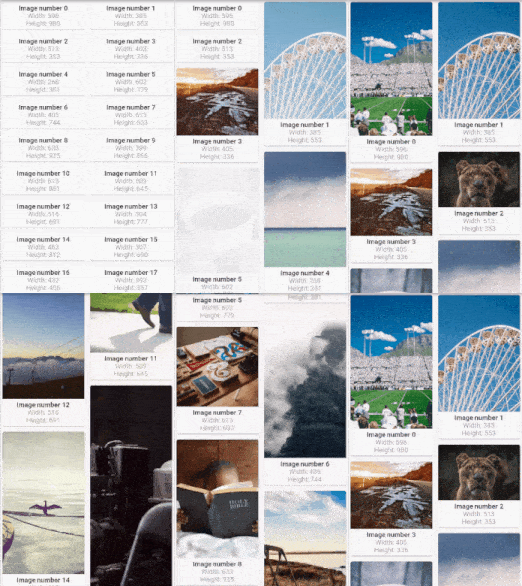
用例:我正在尝试实现下面这样的视图,其中图像被包装成height = wrap content,以便在出现拉伸高度的图像时可以看起来很好,并形成类似于StaggeredGridView的结构。

Sample Image

7个回答

43

编辑:我在0.2.0中添加了StaggeredTile.fit构造函数。有了它,您应该能够构建您的应用程序;-)。

动态瓷砖尺寸

第一条评论: 目前,使用StaggeredGridView,布局和子元素渲染是完全独立的。所以正如@rmtmckenzie所说,您将需要获取图像大小来创建您的tile。 然后,您可以使用StaggeredTile.count构造函数,并为mainAxisCellCount参数提供一个双值:new StaggeredTile.count(x, x*h/w)(其中h是您的图像高度,w是其宽度。这样,瓷砖就具有与您的图像相同的纵横比。

您想要实现的内容需要更多工作,因为您希望在图像下方有一些信息区域。为此,我认为您将需要在创建之前计算出瓦片的实际宽度,并使用StaggeredTile.extent构造函数。

我理解这不是理想的,我正在努力开发一种新的方式来创建布局。我希望它能够帮助您构建像您这样的场景。


谢谢你让我知道。有其他方法吗?或者你能指导我如何构建这个项目吗?根据你的建议,关于图片,我无法提前获取图片,因为渲染图片仍在下载中。所以,无法告诉瓷砖渲染此高度或宽度。 - Vipul Asri
13
您没有添加任何有关如何使用StaggeredTile.fit的示例。 - Aryeetey Solomon Aryeetey
与此同时,它已被包含在示例项目中作为示例8。 - josxha
我使用了CachedNetworkImage插件,当图片加载时,卡片会短暂地失去高度。你知道如何解决这个问题吗? - Dani
如何实现水平滚动? - ASAD HAMEED

13

首先让我告诉你我是如何来到这里的:

在我的应用程序中,我想要一个网格视图来展示广告卡片以及从服务器数据库中获取的所有数据和图片,而图片大小不同且来自服务器。我使用了 FutureBuilder 将这些数据映射到 GridView 上。首先我尝试使用:

double cardWidth = MediaQuery.of(context).size.width / 3.3;
double cardHeight = MediaQuery.of(context).size.height / 3.6;
//....
GridView.count(
  childAspectRatio: cardWidth / cardHeight,
  //..

如你所见,它不会对所有卡片产生动态效果。我和你一样来到这里,尝试使用所有伟大的答案,并且你必须花点时间去理解如何去解决问题,但是没有一个答案完全解决了我的问题。

使用@RomainRastel的答案,以及感谢他的StaggeredGridView包。我必须使用StaggeredGridView.count作为构造函数来映射所有卡片,对于staggeredTiles属性,我必须再次将所有卡片映射并添加每个StaggeredTile.fit(2)

我确定你还是没看懂,所以让我们尝试一个简单的例子,这样你就不需要去其他地方寻找答案:

首先,在pubspec.yaml中添加依赖项,现在版本是0.2.5。你可以在这里查看最新版本。

dependencies:
 flutter_staggered_grid_view: ^0.2.5

如果你从互联网获取数据,或者你将复制粘贴这个示例,你还需要添加这个依赖项:http: ^0.12.0

import 'package:flutter/material.dart';

//this is what you need to have for flexible grid
import 'package:flutter_staggered_grid_view/flutter_staggered_grid_view.dart';

//below two imports for fetching data from somewhere on the internet
import 'dart:convert';
import 'package:http/http.dart' as http;

//boilerplate that you use everywhere
class MyApp extends StatelessWidget {
  @override
  Widget build(BuildContext context) {
    return MaterialApp(
      title: "Flexible GridView",
      home: HomePage(),
    );
  }
}

//here is the flexible grid in FutureBuilder that map each and every item and add to a gridview with ad card
class HomePage extends StatelessWidget {
  //this is should be somewhere else but to keep things simple for you,
  Future<List> fetchAds() async {
    //the link you want to data from, goes inside get
    final response = await http
        .get('https://blasanka.github.io/watch-ads/lib/data/ads.json');

    if (response.statusCode == 200) return json.decode(response.body);
    return [];
  }

  @override
  Widget build(BuildContext context) {
    return Scaffold(
      appBar: AppBar(
        title: Text("Dynamic height GridView Demo"),
      ),
      body: FutureBuilder<List>(
          future: fetchAds(),
          builder: (BuildContext context, AsyncSnapshot snapshot) {
            if (snapshot.hasData) {
              return new Padding(
                padding: const EdgeInsets.all(4.0),
                //this is what you actually need
                child: new StaggeredGridView.count(
                  crossAxisCount: 4, // I only need two card horizontally
                  padding: const EdgeInsets.all(2.0),
                  children: snapshot.data.map<Widget>((item) {
                    //Do you need to go somewhere when you tap on this card, wrap using InkWell and add your route
                    return new AdCard(item);
                  }).toList(),

                  //Here is the place that we are getting flexible/ dynamic card for various images
                  staggeredTiles: snapshot.data
                      .map<StaggeredTile>((_) => StaggeredTile.fit(2))
                      .toList(),
                  mainAxisSpacing: 3.0,
                  crossAxisSpacing: 4.0, // add some space
                ),
              );
            } else {
              return Center(
                  child:
                      new CircularProgressIndicator()); // If there are no data show this
            }
          }),
    );
  }
}

//This is actually not need to be a StatefulWidget but in case, I have it
class AdCard extends StatefulWidget {
  AdCard(this.ad);

  final ad;

  _AdCardState createState() => _AdCardState();
}

class _AdCardState extends State<AdCard> {
  //to keep things readable
  var _ad;
  String _imageUrl;
  String _title;
  String _price;
  String _location;

  void initState() {
    setState(() {
      _ad = widget.ad;
      //if values are not null only we need to show them
      _imageUrl = (_ad['imageUrl'] != '')
          ? _ad['imageUrl']
          : 'https://uae.microless.com/cdn/no_image.jpg';
      _title = (_ad['title'] != '') ? _ad['title'] : '';
      _price = (_ad['price'] != '') ? _ad['price'] : '';
      _location = (_ad['location'] != '') ? _ad['location'] : '';
    });

    super.initState();
  }

  @override
  Widget build(BuildContext context) {
    return Card(
      semanticContainer: false,
      shape: const RoundedRectangleBorder(
        borderRadius: BorderRadius.all(Radius.circular(4.0)),
      ),
      child: Column(
        crossAxisAlignment: CrossAxisAlignment.start,
        children: <Widget>[
          Image.network(_imageUrl),
          Text(_title),
          Text('\$ $_price'),
          Text(_location),
        ],
      ),
    );
  }
}

如果您有任何问题,这里是一个Git存储库中的完整示例

Flutter flexible grid view example

祝你好运!


1
非常有用的,当您与方向组合使用时 staggeredTiles: data .map<StaggeredTile>((_) => StaggeredTile.fit(orien == Orientation.portrait ? 2 : 1)) .toList(), - mamena tech

8
这里有两件事:
  1. 有一个用于执行此类布局的现有软件包

  2. 为了使图像看起来好看,可以在DecorationImage小部件上使用BoxFit.cover

软件包存储库中有大量示例 我只是使用其中一个示例并修改它以包含图片:

enter image description here

class GridViewExample extends StatefulWidget {
  @override
  _GridViewExampleState createState() => new _GridViewExampleState();
}

class _GridViewExampleState extends State<GridViewExample> {
  @override
  Widget build(BuildContext context) {
    return new Scaffold(
      body: new Padding(
        padding: const EdgeInsets.all(8.0),
        child: new StaggeredGridView.countBuilder(
  crossAxisCount: 4,
  itemCount: 8,
  itemBuilder: (BuildContext context, int index) => new Container(
        decoration: new BoxDecoration(
          image: new DecorationImage(
            image: new NetworkImage("https://i.imgur.com/EVTkpZL.jpg"),
            fit: BoxFit.cover
          )
        )

        ),

  staggeredTileBuilder: (int index) =>
      new StaggeredTile.count(2, index.isEven ? 2 : 1),
  mainAxisSpacing: 4.0,
  crossAxisSpacing: 4.0,
),),

    );
  }
}

感谢您的输入,但是对于高度动态的图像,这个库总是需要我输入 mainAxisCount 值,而这个值事先是不知道的。 - Vipul Asri

3
对于比较简单的方法(即不需要深入了解Flutter布局如何工作),在构建任何内容之前,您都需要获取图像的尺寸。这个答案描述了如何使用ImageProvierImageStream进行操作。
一旦您知道图像的基本尺寸,您可以使用@aziza的flutter_staggered_grid_view示例。
另一种选择是在存储图像/ URL列表的地方存储图像大小或至少长宽比(我不知道您如何填充图像列表,因此无法提供帮助)。
如果您希望完全基于图像的大小而不是网格状,您可能可以使用Flow小部件来实现。但是,需要注意的是,Flow无法处理大量项目,因为每次都需要对所有子项进行布局,但我可能对此有所误解。如果项目数量不多,您可以使用Flow +SingleChildScrollView来滚动。
如果您将拥有大量项目(和/或想要执行新项目的动态加载等操作),则可能需要使用CustomMultiChildLayout进行某些操作-我认为它会更有效率,但您仍然需要了解图像的大小。
最后一种可能的解决方案(虽然我不确定它如何工作)是将两个可滚动视图并排放置并同步它们的位置。您必须设置shrinkwrap = true,以便进行滚动,并且仍然必须知道每个图像的高度,以便决定将每个图像放在哪一侧。希望这能帮助你起步!

如果考虑到RenderBox的存在,那么这个答案大部分是错误的。 - Rémi Rousselet
好的,如果你真的深入了解Flutter的内部工作原理,我相信可以做很多事情。我很想听听你如何使用RenderBox来实现它。 不过,如果我没记错的话,无论你是否使用RenderBox,如果你要使用Flow,仍然需要提前知道尺寸大小。 - rmtmckenzie
为什么要使用Flow?RenderBox知道它们想要的大小。Widget什么也不做,它们只是使用RenderBox更简单的方式。 - Rémi Rousselet
因为如果有人不熟悉Flutter布局系统的工作方式(即使我已经稍微了解一下),他们相对容易理解和实现Flow。如果您对Flutter布局系统有足够深入的了解,能够实现这一点,我非常有兴趣看看您会如何处理。 - rmtmckenzie
1
好的,我确实链接了一个答案,展示了如何从图像中获取宽度和高度。 - rmtmckenzie
显示剩余2条评论

2
crossAxisCount: 

这定义了表格中有多少列,

StaggeredTile.fit(value)

代表垂直方向上一列可以容纳多少个孩子

示例:

crossAxisCount: 2,
staggeredTileBuilder: (int index) => new StaggeredTile.fit(1),

会给您以上所期望的输出结果


1
这可能有点晚了,但是我通过@Romani letsar和他的flutter_staggered_grid_view包成功实现了这一点。每个人都已经解释过这个库的工作原理,我会直接点出要点。
我能够使StaggeredTiles的高度与图片类似,但是我必须在其下方添加额外的内容,这就是为什么我在计算高度时添加了额外的0.5高度。幸运的是,我正在使用的API返回了带有高度和宽度属性的图像。

快速简单的计算。
crossAxisCount: 4//这里我定义了我想要的列数。

StaggeredTile.count(2, 高度 + 0.5); //这个构造函数有两个参数,第一个参数是每个tile应该占据多少列(因为我有4列,想要每行放2个tile,所以第一个参数是2。换句话说,1个tile占据2列)。 第二个参数是高度,我想让高度与tile宽度成比例(即2列)。

我使用了简单的公式:
tile宽度/tile高度=图片宽度/图片高度
//这里我将tile宽度设为2,因为它占据2列。 我加上硬编码值0.5来计算tile高度,目前看起来很有效。

以下是我的代码:

class _MyHomePageState extends State<MyHomePage> {
      @override
      Widget build(BuildContext context) {
        return Scaffold(
          body: Container(
            child: FutureBuilder(
              future: NetworkHelper.getData(),
              builder: (BuildContext context, AsyncSnapshot snapshot) {
                if (snapshot.data == null)
                  return Center(child: CircularProgressIndicator());
                else {
                  var data = snapshot.data;
                  print(data);
                  List<dynamic> jsonData = jsonDecode(snapshot.data);
                  return StaggeredGridView.countBuilder(
                    crossAxisCount: 4,
                    itemCount: jsonData.length,
                    itemBuilder: (BuildContext context, int index) {
                      JsonModelClass models =
                          JsonModelClass.fromJson(jsonData[index]);
                      String url = models.urls.regular;
                      return GestureDetector(
                        onTap: () {
                          print(url);
                        },
                        child: Card(
                          child: Column(
                            mainAxisAlignment: MainAxisAlignment.spaceEvenly,
                            children: [
                              Image.network(url),
                              Container(
                                child: Row(
                                  mainAxisAlignment: MainAxisAlignment.spaceEvenly,
                                  crossAxisAlignment: CrossAxisAlignment.center,
                                  children: [
                                    Text("${models.user.name}"),
                                    Card(
                                      child: Padding(
                                        padding: const EdgeInsets.all(3.0),
                                        child: Row(
                                          mainAxisAlignment:
                                              MainAxisAlignment.spaceEvenly,
                                          children: [
                                            Icon(
                                              Icons.favorite,
                                              color: Colors.red,
                                            ),
                                            SizedBox(
                                              width: 6,
                                            ),
                                            Text("${models.likes}")
                                          ],
                                        ),
                                      ),
                                    ),
                                  ],
                                ),
                              )
                            ],
                          ),
                        ),
                      );
                    },
                    staggeredTileBuilder: (int index) {
                      JsonModelClass models =
                          JsonModelClass.fromJson(jsonData[index]);
                      var height = (models.height * 2) /
                          models.width; //calculating respective 'height' of image in view, 'model.height' is image's original height received from json.
                      return StaggeredTile.count(
                          2,
                          height +
                              0.5); //Adding extra 0.5 space for other content under the image
                    },
                    mainAxisSpacing: 4,
                    crossAxisSpacing: 4,
                  );
                }
              },
            ),
          ),
        );
      }
    }

我的最终输出:My Final Output

0

这个问题的简单解决方案是添加“key:列数”的参数。我正在使用版本为StaggeredGridview 0.4.0的组件。你只需要添加Key参数即可。当你调整浏览器窗口大小时,该小部件将重新加载。你可以在这里找到示例代码。

例如,浏览器处于全宽状态,你调整了窗口大小。我还使用响应式设计来检测屏幕大小(小屏幕下的小部件 <800,中等大小屏幕(>800&<1200),大屏幕(>1200))。

StaggeredGridView.countBuilder(
      primary: false,
      shrinkWrap: true,
      key: ObjectKey(ResponsiveWidget.isSmallScreen(context) ? 2 :4), // **add this line**
      crossAxisCount: ResponsiveWidget.isSmallScreen(context) ? 4 : 8,
      itemCount: ResponsiveWidget.isSmallScreen(context) ? 4 : _productsList.length,
      itemBuilder: (BuildContext context, int index) {
        BannersResult product = _productsList.elementAt(index);
        return Home_CustBanner_twobytwo_Item(
          home_banner_list_item: product,
          heroTag: 'categorized_products_grid',
        );
      },

      staggeredTileBuilder: (int index) => new StaggeredTile.fit(2),
      mainAxisSpacing: 15.0,
      crossAxisSpacing: 15.0,
    ),

网页内容由stack overflow 提供, 点击上面的
可以查看英文原文,
原文链接