以下有两种可能的方法和一种校正扭曲文本的方法:
方法 #1: 形态学操作 + 轮廓过滤
获取二值图像。 加载图像,灰度化,然后使用大津阈值法二值化。
删除文本轮廓。 用cv2.getStructuringElement()创建一个矩形核,然后进行形态学操作以去除噪声。
过滤并去除小的噪点。 查找轮廓并使用轮廓面积进行过滤以去除小粒子。我们通过用cv2.drawContours()填充轮廓来有效地去除噪声。
进行OCR。 我们反转图像,然后应用轻微的高斯模糊。然后我们使用Pytesseract进行OCR,使用--psm 6配置选项将图像视为单个文本块。可以查看Tesseract improve quality了解其他提高检测率的方法,以及Pytesseract配置选项了解其他设置。
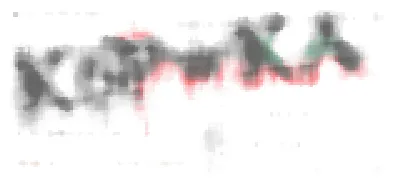
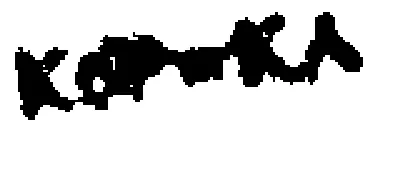
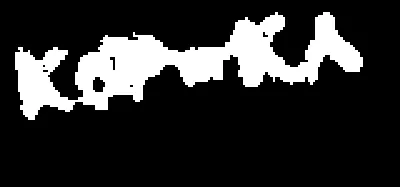
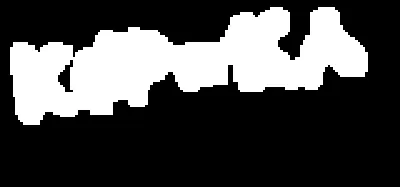
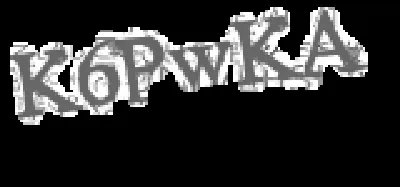
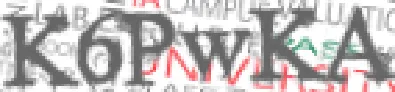
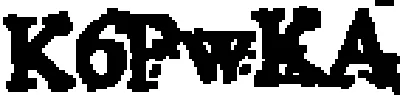
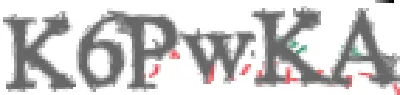
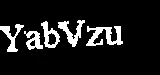
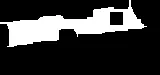
输入图像 -> 二值化 -> 形态学开运算

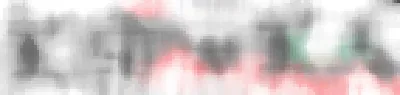
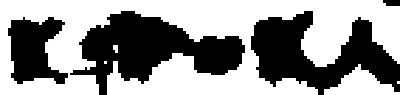
轮廓面积过滤 -> 反转 -> 应用模糊以获得结果


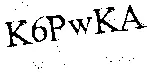
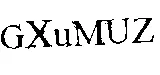
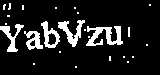
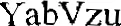
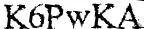
OCR结果
YabVzu
代码
import cv2
import pytesseract
import numpy as np
pytesseract.pytesseract.tesseract_cmd = r"C:\Program Files\Tesseract-OCR\tesseract.exe"
image = cv2.imread('2.png')
gray = cv2.cvtColor(image, cv2.COLOR_BGR2GRAY)
thresh = cv2.threshold(gray, 0, 255, cv2.THRESH_BINARY_INV + cv2.THRESH_OTSU)[1]
kernel = cv2.getStructuringElement(cv2.MORPH_RECT, (2,2))
opening = cv2.morphologyEx(thresh, cv2.MORPH_OPEN, kernel, iterations=1)
cnts = cv2.findContours(opening, cv2.RETR_EXTERNAL, cv2.CHAIN_APPROX_SIMPLE)
cnts = cnts[0] if len(cnts) == 2 else cnts[1]
for c in cnts:
area = cv2.contourArea(c)
if area < 50:
cv2.drawContours(opening, [c], -1, 0, -1)
result = 255 - opening
result = cv2.GaussianBlur(result, (3,3), 0)
data = pytesseract.image_to_string(result, lang='eng', config='--psm 6')
print(data)
cv2.imshow('thresh', thresh)
cv2.imshow('opening', opening)
cv2.imshow('result', result)
cv2.waitKey()
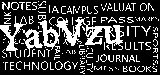
方法二:颜色分割
观察到所需提取的文本与图像中的噪声有明显的对比,我们可以使用颜色阈值分割来隔离文本。这个想法是将图像转换为HSV格式,然后使用上下限颜色范围进行颜色阈值分割以获取掩码。然后我们使用相同的过程使用Pytesseract进行OCR。
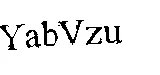
输入图像 -> 掩码 -> 结果


代码
import cv2
import pytesseract
import numpy as np
pytesseract.pytesseract.tesseract_cmd = r"C:\Program Files\Tesseract-OCR\tesseract.exe"
image = cv2.imread('2.png')
hsv = cv2.cvtColor(image, cv2.COLOR_BGR2HSV)
lower = np.array([0, 0, 0])
upper = np.array([100, 175, 110])
mask = cv2.inRange(hsv, lower, upper)
invert = 255 - mask
data = pytesseract.image_to_string(invert, lang='eng', config='--psm 6')
print(data)
cv2.imshow('mask', mask)
cv2.imshow('invert', invert)
cv2.waitKey()
修正扭曲的文字
OCR在图像水平时效果最佳。为了确保文本以OCR理想格式出现,我们可以进行透视变换。在去除所有噪声以隔离文本后,我们可以执行形态闭合来将单个文本轮廓合并成一个轮廓。从这里开始,我们可以使用cv2.minAreaRect找到旋转边界框,然后使用四点透视变换和imutils.perspective.four_point_transform。继续使用清理后的掩码,下面是结果:
掩码 -> 形态闭合 -> 检测到的旋转边界框 -> 结果


使用另一张图片的输出
更新的代码包含透视变换
import cv2
import pytesseract
import numpy as np
from imutils.perspective import four_point_transform
pytesseract.pytesseract.tesseract_cmd = r"C:\Program Files\Tesseract-OCR\tesseract.exe"
image = cv2.imread('1.png')
hsv = cv2.cvtColor(image, cv2.COLOR_BGR2HSV)
lower = np.array([0, 0, 0])
upper = np.array([100, 175, 110])
mask = cv2.inRange(hsv, lower, upper)
kernel = cv2.getStructuringElement(cv2.MORPH_RECT, (5,5))
close = cv2.morphologyEx(mask, cv2.MORPH_CLOSE, kernel, iterations=3)
cnts = cv2.findContours(close, cv2.RETR_EXTERNAL, cv2.CHAIN_APPROX_SIMPLE)
cnts = cnts[0] if len(cnts) == 2 else cnts[1]
rect = cv2.minAreaRect(cnts[0])
box = cv2.boxPoints(rect)
box = np.int0(box)
cv2.drawContours(image,[box],0,(36,255,12),2)
warped = four_point_transform(255 - mask, box.reshape(4, 2))
data = pytesseract.image_to_string(warped, lang='eng', config='--psm 6')
print(data)
cv2.imshow('mask', mask)
cv2.imshow('close', close)
cv2.imshow('warped', warped)
cv2.imshow('image', image)
cv2.waitKey()
Note: 该颜色阈值范围是使用此HSV阈值脚本确定的
import cv2
import numpy as np
def nothing(x):
pass
image = cv2.imread('2.png')
cv2.namedWindow('image')
cv2.createTrackbar('HMin', 'image', 0, 179, nothing)
cv2.createTrackbar('SMin', 'image', 0, 255, nothing)
cv2.createTrackbar('VMin', 'image', 0, 255, nothing)
cv2.createTrackbar('HMax', 'image', 0, 179, nothing)
cv2.createTrackbar('SMax', 'image', 0, 255, nothing)
cv2.createTrackbar('VMax', 'image', 0, 255, nothing)
cv2.setTrackbarPos('HMax', 'image', 179)
cv2.setTrackbarPos('SMax', 'image', 255)
cv2.setTrackbarPos('VMax', 'image', 255)
hMin = sMin = vMin = hMax = sMax = vMax = 0
phMin = psMin = pvMin = phMax = psMax = pvMax = 0
while(1):
hMin = cv2.getTrackbarPos('HMin', 'image')
sMin = cv2.getTrackbarPos('SMin', 'image')
vMin = cv2.getTrackbarPos('VMin', 'image')
hMax = cv2.getTrackbarPos('HMax', 'image')
sMax = cv2.getTrackbarPos('SMax', 'image')
vMax = cv2.getTrackbarPos('VMax', 'image')
lower = np.array([hMin, sMin, vMin])
upper = np.array([hMax, sMax, vMax])
hsv = cv2.cvtColor(image, cv2.COLOR_BGR2HSV)
mask = cv2.inRange(hsv, lower, upper)
result = cv2.bitwise_and(image, image, mask=mask)
if((phMin != hMin) | (psMin != sMin) | (pvMin != vMin) | (phMax != hMax) | (psMax != sMax) | (pvMax != vMax) ):
print("(hMin = %d , sMin = %d, vMin = %d), (hMax = %d , sMax = %d, vMax = %d)" % (hMin , sMin , vMin, hMax, sMax , vMax))
phMin = hMin
psMin = sMin
pvMin = vMin
phMax = hMax
psMax = sMax
pvMax = vMax
cv2.imshow('image', result)
if cv2.waitKey(10) & 0xFF == ord('q'):
break
cv2.destroyAllWindows()