一个fieldset中的两个传奇

9

在给定的fieldset中,您不能有两个图例,但是否有一种方法可以在不使用<legend>标签的情况下实现图例效果?

<!-- left legend -->
<fieldset>
    <legend>
        Some Text
    </legend>
</fieldset>

我可以在图例标签上添加 
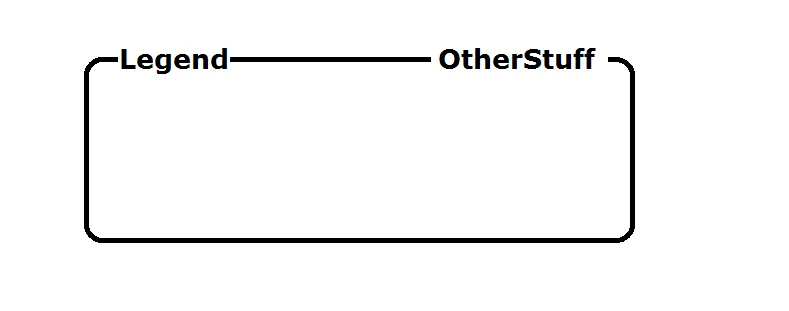
align=right 使其位于右侧,但是我不能有两个图例。我想要一个图例在左侧,以及类似于右侧图例的东西。像下面的图片一样。

如何使用 HTMLCSS 实现这一点? 这里是一个Fiddle,我基本上想要将这两个结合起来。在左侧是常规图例文本,在右侧可能是一个下拉菜单,如果需要的话。

Fieldset with 2 legends

更新

以下是我正在使用的一些代码:

#shifter {
  position: relative;
}
#cataright {
  position: absolute;
  top: -25px;
  right: 20px;
  font-weight: bold;
}
.grey {
  padding: 15px;
  padding-left: 30px;
  padding-right: 30px;
  border: solid black 3px;
  border-radius: 7px;
  background-color: #DDDDDD;
}
<fieldset class="grey" id="shifter">
  <legend>
    Title
  </legend>
  <div id="cataright">
    Sort by
    <select id="sort" onchange="sort();">
      <option value="original">Release Date</option>
      <option value="popularity">Popularity</option>
      <option value="rating">Highest Rated</option>
    </select>
  </div>
</fieldset>


这个问题的答案在 https://dev59.com/c2sz5IYBdhLWcg3wrJ6-#57279326 中已经回答了。 - Mahdi Bashirpour
5个回答

9
你可以通过添加一个额外的元素并将其绝对定位在 <fieldset> 中来实现这一点:

fieldset {
  position: relative;
}
.legend2 {
  position: absolute;
  top: -0.2em;
  right: 20px;
  background: #fff;
  line-height:1.2em;
}
<fieldset>
  <legend>
    Some Text
  </legend>
  <div class="legend2">Some other Text</div>
</fieldset>


2
再次强调,没有支持(父级)背景图像,一切都变得如此简单。 - King King
3
如果fieldset的父元素需要添加一些图片(或渐变)背景,legend2的实心背景(白色)将会显示出来,这当然是不可接受的。具体情况还要看使用场景。尝试将相应的背景应用到legend2中,并设置适当的background-position可能会有所帮助。 - King King
1
只是纯白色。颜色并不重要,我更关心如何实现它而不是实际实现它。一步一个障碍。感谢您的帮助! - gator
1
@riista,我明白问题所在了,这个用例不同,需要另一种方法。我现在没有时间去找到一个解决方案,但你可以针对这个特定的用例提出另一个问题,我相信其他人可以找到一个解决方案。 - web-tiki
2
@riista 如果 fieldset 的父元素只是纯色背景(白色),我相信你可以使用此答案提供的解决方案,这不就是你想要的吗?http://jsfiddle.net/viphalongpro/qTT8X/1/? - King King
显示剩余9条评论

3
您可以使用:after伪类选择器来实现此功能。查看演示。这样,您就不必使用任何其他的HTML标签。
fieldset {
    position: relative;
}

fieldset:after {
    content: "Some Text";
    position: absolute;
    margin-top: -25px;
    right: 10px;
    background: #fff;
    padding: 0 5px;
}

2
在Chrome中正确对齐是 top: -3px;,而在Firefox中似乎是 top: -20px; - SubjectCurio
1
已更新我的答案。现在,它适用于FF和Chrome。请检查Fiddle。http://jsfiddle.net/JPjP3/6/ - Dhiraj
好主意,但它只允许右侧使用纯文本(无HTML元素)。 - taiji123

2

我曾经也遇到过同样的问题,但是这里的答案并没有让我满意。因此,我开发了自己的解决方案。
我的解决方案基于div标签。只需调整legend标签和div标签的宽度即可。此外,您还可以设置更多的文本。
下面是三个不同的示例。

<fieldset style="border: 1px solid black; width: 500px; height: 100px; margin: 1em auto;">
 <legend style="width: 100%; padding: 0;">
  <div style="display: inline-block; line-height: 1.2;">
   <div style="float: left; padding: 0 5px;">Legend</div>
   <div style="float: left; height: 1px; background-color: black; width: 359px;  margin-top: 11px;"></div>
   <div style="float: left; padding: 0 5px;">Other Stuff</div>
  </div>
 </legend> 
</fieldset>
<fieldset style="border: 1px solid black; width: 500px; height: 100px; margin: 1em auto;">
 <legend style="width: 81%; padding: 0;">
  <div style="display: inline-block; line-height: 1.2;">
   <div style="float: left; height: 1px; background-color: black; width: 78px;  margin-top: 11px;"></div>
   <div style="float: left; padding: 0 5px;">Legend</div>
   <div style="float: left; height: 1px; background-color: black; width: 186px;  margin-top: 11px;"></div>
   <div style="float: left; padding: 0 5px;">Other Stuff</div>
  </div>
 </legend> 
</fieldset>
<fieldset style="border: 1px solid black; width: 500px; height: 100px; margin: 1em auto;">
 <legend style="width: 90%; padding: 0;">
  <div style="display: inline-block; line-height: 1.2;">
   <div style="float: left; height: 1px; background-color: black; width: 39px;  margin-top: 11px;"></div>
   <div style="float: left; padding: 0 5px;">Legend</div>
   <div style="float: left; height: 1px; background-color: black; width: 88px;  margin-top: 11px;"></div>
   <div style="float: left; padding: 0 5px;">More Stuff</div>     
   <div style="float: left; height: 1px; background-color: black; width: 102px;  margin-top: 11px;"></div>
   <div style="float: left; padding: 0 5px;">Other Stuff</div>
  </div>
 </legend> 
</fieldset>   

注意:为了跨浏览器兼容性,必须使用display inline-block和line-height: 1.2。

1

好的,我已经成功地完成了它,没有使用背景颜色“hack”,也没有使用fieldset标签。 唯一的注意事项是尝试获得圆角可能有点棘手。

基本上我们的“面板”将是一个框,我们在其中绘制其左侧、底部和右侧边框。 然后我们的“panel-title”元素将被绝对定位在面板顶部。

每个面板跨度占据了恰好50%的面板宽度,并使用display flex来实现魔法。对于第一个跨度,我们使用before元素从左侧绘制1em宽的边框,然后after元素我们设置“flex-grow: 1”告诉它占用其余空间。

然后我们为最后一个跨度做完全相同的事情,只是将宽度和flex-grow属性反转。 即最后一个跨度的before元素将被设置为flex-grow: 1,其after元素的宽度为1em。

无论如何,请查看下面的片段。

* { 
  box-sizing: border-box;
}
body {
  background:url(https://4.bp.blogspot.com/_AQ0vcRxFu0A/S9shDGGyMTI/AAAAAAAAAYk/kn3WTkY2LoQ/s1600/IMG_0714.JPG);
  background-size:cover;
  background-position:center center;
  background-attachment:fixed;
  margin: 0;
  font-family: 'Roboto Slab';
}

.panel {
  background: rgba(0,0,0,0.8);
  width: 75vw;
  height: -webkit-max-content;
  height: max-content;
  position: absolute;
  top: 50%;
  left: 50%;
  transform: translate(-50%, -50%);
  color: #fff;
  padding: 0.5em 1em;
  border-left: 1px solid #fff;
  border-bottom: 1px solid #fff;
  border-right: 1px solid #fff;
  
}
.panel-title {
  display: flex;
  position: absolute;
  left: 0;
  right: 0;
  top: -25px;
  height: 30px;
  line-height:30px;
  font-size: 30px;
  white-space: nowrap;
  text-shadow: 2px 2px 1px rgba(0,0,0,0.8);
}
.panel-title > span {
  display: flex;
  width: 50%;
}
.panel-title > span:before,
.panel-title > span:after {
  content: '';
  border-bottom:1px solid #fff;
  margin-bottom:5px;
  align-self:flex-end;
}
.panel-title > span:first-child:before {
  width: 1em;
  margin-right: 5px;
}
.panel-title > span:first-child:after {
  margin-left: 5px;
  flex-grow: 1;
}
.panel-title > span:last-child:before {
  flex-grow: 1;
  margin-right: 5px;
}
.panel-title > span:last-child:after {
  width: 1em;
  margin-left: 5px;
}
<link href='https://fonts.googleapis.com/css?family=Roboto+Slab:400,700' rel='stylesheet' type='text/css'>

<div class='panel'>
  <DIV class='panel-title'>
    <SPAN>Foo Bar</SPAN>
    <SPAN>Snee</SPAN>
  </DIV>
  <P>Lorem ipsum dolor sit amet, consectetur adipiscing elit. Praesent posuere tempus mauris at tincidunt.</P>
  <P>Phasellus facilisis leo tortor, nec molestie purus dignissim non. Integer massa turpis, porta sed erat sed.</P>
</div>


0

这里是使用 Bootstrap 的响应式版本。

自定义 CSS 将第二个图例推到适当的位置。

.legend {
  position: relative;
  top: -3.4em;
  margin-bottom: -3.4em;
}
<link href="https://cdn.jsdelivr.net/npm/bootstrap@5.0.2/dist/css/bootstrap.min.css" rel="stylesheet" integrity="sha384-EVSTQN3/azprG1Anm3QDgpJLIm9Nao0Yz1ztcQTwFspd3yD65VohhpuuCOmLASjC" crossorigin="anonymous">

<fieldset class="container border">
  <legend class="float-none w-auto p-2">Legend 1</legend>
  <div class="row legend">
    <div class="col-12">
      <span class="p-2 bg-white float-end">
          Legend 2
          <select></select>
        </span>
    </div>
  </div>
</fieldset>


网页内容由stack overflow 提供, 点击上面的
可以查看英文原文,
原文链接