针对一个视频图像处理项目,我必须旋转输入的YUV图像数据,以便数据不是水平显示,而是垂直显示。我使用了this项目,这让我深入了解如何将YUV图像数据转换为ARGB,以便在实时处理中进行处理。该项目唯一的缺点是它只支持横向模式。没有纵向模式选项(我不知道Google的人为什么只提供一个处理横向方向的例子)。因此,我决定使用自定义的YUV到RGB脚本来旋转数据,以便它出现在纵向模式中。以下GIF演示了在应用任何旋转之前该应用程序如何显示数据。
 要旋转横向定向帧,我们必须重新组织字段。这是我对草图(如上所示)进行的映射,它显示了横向模式下单个帧
实际上,发生的情况是第一列变成了新的第一行,第二列变成了新的第二行,以此类推。
从映射中可以看出,我们可以得出以下结论:
这种方法似乎有效,但是存在一个小错误,如下图所示。相机预览处于纵向模式,但是在相机预览的左侧有非常奇怪的彩色线条。为什么会出现这种情况?(请注意,我使用的是后置摄像头):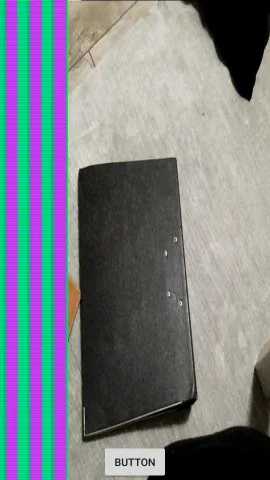 如果有任何解决此问题的建议,将不胜感激。我已经处理了这个问题(将从横向到纵向的YUV旋转),并且这是我自己能够得到的最佳解决方案。我希望有人能帮助改进代码,以便在左侧也消除奇怪的彩色线条。
更新:
我在代码中做出的分配如下:
一些其他的辅助函数:
呼叫自定义的渲染脚本和内存分配:
最后但并非最不重要的是输入图像的大小。你所看到的方法中的x和y坐标是基于预览大小,即mPreviewSize。
 要旋转横向定向帧,我们必须重新组织字段。这是我对草图(如上所示)进行的映射,它显示了横向模式下单个帧
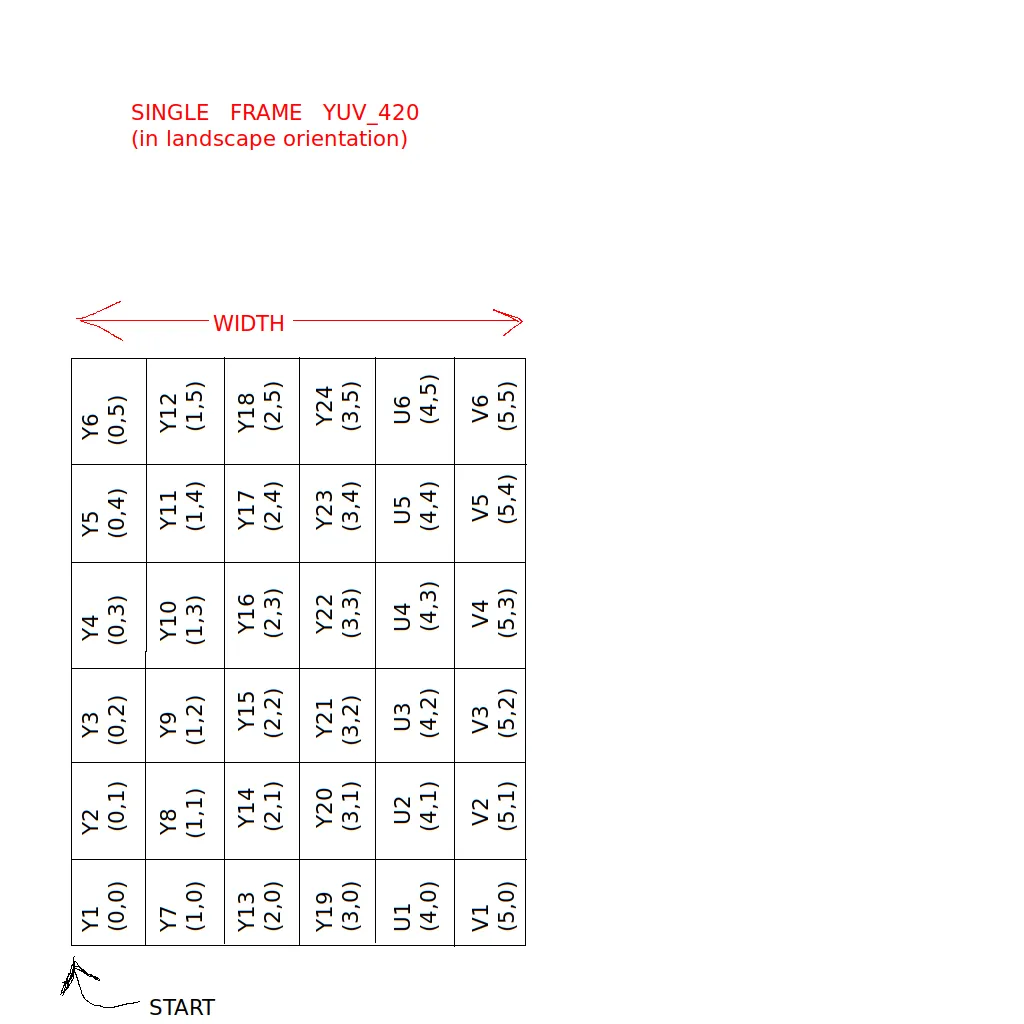
yuv_420。这些映射应该将帧旋转90度:first column starting from the bottom-left corner and going upwards:
(0,0) -> (0,5) // (0,0) should be at (0,5)
(0,1) -> (1,5) // (0,1) should be at (1,5)
(0,2) -> (2,5) // and so on ..
(0,3) -> (3,5)
(0,4) -> (4,5)
(0,5) -> (5,5)
2nd column starting at (1,0) and going upwards:
(1,0) -> (0,4)
(1,1) -> (1,4)
(1,2) -> (2,4)
(1,3) -> (3,4)
(1,4) -> (4,4)
(1,5) -> (5,4)
and so on...
实际上,发生的情况是第一列变成了新的第一行,第二列变成了新的第二行,以此类推。
从映射中可以看出,我们可以得出以下结论:
- 结果的
x坐标始终等于左侧的y坐标。因此,我们可以说x = y。 - 我们总是可以观察到,对于结果的 y 坐标,以下方程必须成立:
y = width - 1 - x。(我测试了草图中的所有坐标,它总是正确的)。
#pragma version(1)
#pragma rs java_package_name(com.jon.condino.testing.renderscript)
#pragma rs_fp_relaxed

rs_allocation gCurrentFrame;
int width;

uchar4 __attribute__((kernel)) yuv2rgbFrames(uint32_t x,uint32_t y)
{

    uint32_t inX = y;             // 1st observation: set x=y
    uint32_t inY = width - 1 - x; // 2nd observation: the equation mentioned above

    // the remaining lines are just methods to retrieve the YUV pixel elements, converting them to RGB and outputting them as result

    // Read in pixel values from latest frame - YUV color space
    // The functions rsGetElementAtYuv_uchar_? require API 18
    uchar4 curPixel;
    curPixel.r = rsGetElementAtYuv_uchar_Y(gCurrentFrame, inX, inY);
    curPixel.g = rsGetElementAtYuv_uchar_U(gCurrentFrame, inX, inY);
    curPixel.b = rsGetElementAtYuv_uchar_V(gCurrentFrame, inX, inY);

    // uchar4 rsYuvToRGBA_uchar4(uchar y, uchar u, uchar v);
    // This function uses the NTSC formulae to convert YUV to RBG
    uchar4 out = rsYuvToRGBA_uchar4(curPixel.r, curPixel.g, curPixel.b);

    return out;
}
这种方法似乎有效,但是存在一个小错误,如下图所示。相机预览处于纵向模式,但是在相机预览的左侧有非常奇怪的彩色线条。为什么会出现这种情况?(请注意,我使用的是后置摄像头):
如果有任何解决此问题的建议,将不胜感激。我已经处理了这个问题(将从横向到纵向的YUV旋转),并且这是我自己能够得到的最佳解决方案。我希望有人能帮助改进代码,以便在左侧也消除奇怪的彩色线条。更新:
我在代码中做出的分配如下:
// yuvInAlloc will be the Allocation that will get the YUV image data
// from the camera
yuvInAlloc = createYuvIoInputAlloc(rs, x, y, ImageFormat.YUV_420_888);
yuvInAlloc.setOnBufferAvailableListener(this);

// here the createYuvIoInputAlloc() method
public Allocation createYuvIoInputAlloc(RenderScript rs, int x, int y, int yuvFormat) {
    return Allocation.createTyped(rs, createYuvType(rs, x, y, yuvFormat),
            Allocation.USAGE_IO_INPUT | Allocation.USAGE_SCRIPT);
}

// the custom script will convert the YUV to RGBA and put it to this Allocation
rgbInAlloc = RsUtil.createRgbAlloc(rs, x, y);

// here the createRgbAlloc() method
public Allocation createRgbAlloc(RenderScript rs, int x, int y) {
    return Allocation.createTyped(rs, createType(rs, Element.RGBA_8888(rs), x, y));
}


// the allocation to which we put all the processed image data
rgbOutAlloc = RsUtil.createRgbIoOutputAlloc(rs, x, y);

// here the createRgbIoOutputAlloc() method
public Allocation createRgbIoOutputAlloc(RenderScript rs, int x, int y) {
    return Allocation.createTyped(rs, createType(rs, Element.RGBA_8888(rs), x, y),
                Allocation.USAGE_IO_OUTPUT | Allocation.USAGE_SCRIPT);
}
一些其他的辅助函数:
public Type createType(RenderScript rs, Element e, int x, int y) {
        if (Build.VERSION.SDK_INT >= 21) {
            return Type.createXY(rs, e, x, y);
        } else {
            return new Type.Builder(rs, e).setX(x).setY(y).create();
        }
    }

    @RequiresApi(18)
    public Type createYuvType(RenderScript rs, int x, int y, int yuvFormat) {
        boolean supported = yuvFormat == ImageFormat.NV21 || yuvFormat == ImageFormat.YV12;
        if (Build.VERSION.SDK_INT >= 19) {
            supported |= yuvFormat == ImageFormat.YUV_420_888;
        }
        if (!supported) {
            throw new IllegalArgumentException("invalid yuv format: " + yuvFormat);
        }
        return new Type.Builder(rs, createYuvElement(rs)).setX(x).setY(y).setYuvFormat(yuvFormat)
                .create();
    }

    public Element createYuvElement(RenderScript rs) {
        if (Build.VERSION.SDK_INT >= 19) {
            return Element.YUV(rs);
        } else {
            return Element.createPixel(rs, Element.DataType.UNSIGNED_8, Element.DataKind.PIXEL_YUV);
        }
    }
呼叫自定义的渲染脚本和内存分配:
// see below how the input size is determined
customYUVToRGBAConverter.invoke_setInputImageSize(x, y);
customYUVToRGBAConverter.set_inputAllocation(yuvInAlloc);

// receive some frames
yuvInAlloc.ioReceive();


// performs the conversion from the YUV to RGB
customYUVToRGBAConverter.forEach_convert(rgbInAlloc);

// this just do the frame manipulation , e.g. applying a particular filter
renderer.renderFrame(mRs, rgbInAlloc, rgbOutAlloc);


// send manipulated data to output stream
rgbOutAlloc.ioSend();
最后但并非最不重要的是输入图像的大小。你所看到的方法中的x和y坐标是基于预览大小,即mPreviewSize。
int deviceOrientation = getWindowManager().getDefaultDisplay().getRotation();
int totalRotation = sensorToDeviceRotation(cameraCharacteristics, deviceOrientation);
// determine if we are in portrait mode
boolean swapRotation = totalRotation == 90 || totalRotation == 270;
int rotatedWidth = width;
int rotatedHeigth = height;

// are we in portrait mode? If yes, then swap the values
if(swapRotation){
      rotatedWidth = height;
      rotatedHeigth = width;
}

// determine the preview size
mPreviewSize = chooseOptimalSize(
                  map.getOutputSizes(SurfaceTexture.class),
                  rotatedWidth,
                  rotatedHeigth);
因此,在我的情况下,x将是mPreviewSize.getWidth(),而y将是mPreviewSize.getHeight()。