高级XAML动画效果。脉冲、行进蚂蚁、旋转。警报。

17

我有一个警报列表。当警报被激活时,要求使它们更加显眼。当警报状态发生变化时,我希望在该项周围创建一个脉动的外发光,持续几秒钟,然后让其消失。

我遇到的问题是,似乎无法仅在需要时显示DropShadowEffect。 我尝试将不透明度设置为0,颜色设置为透明,但这似乎会禁用动画。 我考虑使用Style Trigger添加效果,但是我不确定动画完成后如何删除它?

有关如何实现此功能的建议吗?

<Rectangle Grid.Column="1" Grid.Row="0">    
    <Rectangle.Effect>
        <DropShadowEffect ShadowDepth="0" BlurRadius="0" Opacity="0" Color="White"    /> 
    </Rectangle.Effect>   
<Rectangle.Style>
<Style>
    <Style.Triggers>
        <DataTrigger Binding="{Binding Value, Converter={StaticResource AlarmConverter}, IsAsync=True}" Value="true">
            <DataTrigger.EnterActions>
               <BeginStoryboard>
                   <Storyboard FillBehavior="Stop" >
                       <DoubleAnimation Storyboard.TargetProperty="Effect.Opacity" To="1" FillBehavior="Stop" />
                        <ColorAnimation Storyboard.TargetProperty="Effect.Color" To="White" FillBehavior="Stop" />
                        <DoubleAnimation Storyboard.TargetProperty="Effect.BlurRadius" From="0" To="20" RepeatBehavior="3x" FillBehavior="Stop" />                                                            
                   </Storyboard>
              </BeginStoryboard>
          </DataTrigger.EnterActions>
      </DataTrigger>

更新 这是屏幕某一部分的示例,由于安全问题我不得不删除了截图中的文字和其他细节,对此我深感抱歉,并将大部分替换为通用文本以提供背景。还有一件事需要注意的是,一般情况下这不会在普通显示器上运行。它通常与其他屏幕一起显示在非常长、非常大的视频墙旁边。

screenshot

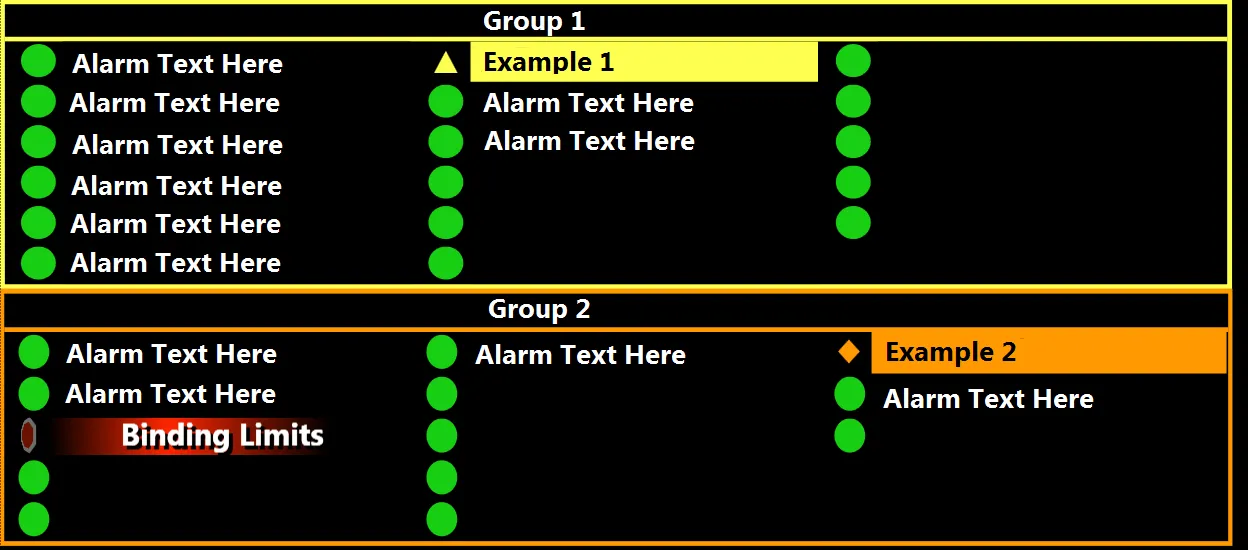
带有“Binding Limits”字样的警报(第一个词已被删除,文本通常不会放置在那里)具有合理的动态滚动渐变,取代了简单的闪烁。此外,在该情况下,警报状态会导致形状旋转。

反馈意见是,当警报状态首次更改(从绿色到黄色或从橙色到红色等)时,他们希望能有一些额外的指示。我有几个不同的想法。我的第一个想法是尝试动画化文本,使其稍微扩展一下,几乎像是跳动。然而,当我尝试扩展时,它仅向右和向下显着扩展,并没有真正给我希望的“膨胀”效果。

另一个想法,我在这里询问,是可能围绕警报项目动画发光边框。当状态改变时,某些东西会在3或4次时变得明亮然后暗淡。不过,我也接受其他想法。我非常喜欢WPF中的动画能力,但我发现很难使用它来表达我的想法。(我认为这需要时间)

更新 尝试将Stroke和StrokeThickness以及效果进行动画处理,虽然有助于使发光效果更加突出,但边框太硬,太明显,特别是当警报颜色为红色时。

<BeginStoryboard>
     <Storyboard FillBehavior="Stop">
         <DoubleAnimation Storyboard.TargetProperty="StrokeThickness" To="2"   />
         <ColorAnimation Storyboard.TargetProperty="Stroke.Color" To="White"  />
         <DoubleAnimation Storyboard.TargetProperty="Effect.Opacity" To="30"   />
         <ColorAnimation Storyboard.TargetProperty="Effect.Color" To="White"  />
         <DoubleAnimation Storyboard.TargetProperty="Effect.BlurRadius" From="0" To="100" AutoReverse="True"  Duration="00:00:02" RepeatBehavior="3x" />                                                            
     </Storyboard>
</BeginStoryboard>

更新 为整个闹钟演示了一个外发光效果,但被认为太过微妙。目前正在考虑用跳舞的7up小点代替...(并不是真的)


如果你的投影想法在使用重型企业应用程序时会导致性能问题,那么你不希望这样。如果可以的话,你能展示一个“警报”视觉效果吗?这样我们就可以想象你的意思,或许我们还能为你提供更高效的用户体验。反正我平常也喜欢做这些事情。 - Chris W.
@ChrisW。非常抱歉让您等了这么久才发布更新。我必须完成一些工作才能够发布它。 - jrandomuser
你是如何设置这些东西的?它只是像listbox的itemtemplate一样吗?目前是一个图标和一个彩色矩形吗?如果你展示一下你是如何使用它的,我可以向你展示一些让它更酷的方法。 - Chris W.
@ChrisW。警报显示在使用StackPanel作为项主机的ItemsControl中。该形状实际上是一条路径,我不得不施展一些困难的技巧才能使其旋转,因为WPF没有PlaneProjection类。文本块实际上位于一个矩形形状内,但看起来我可能可以使用边框代替。 - jrandomuser
好的,现在我知道我要处理什么了,稍后我会试一试。你就得等到星期五了,哈哈 ;) - Chris W.
显示剩余3条评论
2个回答

54

嗨,朋友,今天早上我花了大约15-20分钟时间,随意做了几个我过去在通知类型的内容中使用过的样式示例。我猜你展示的模拟只是一个非常简单的示例,所以不太清楚它看起来像什么,很难像设计师想要的那样匹配样式。

不过,我认为你可以使用这些示例来启发灵感,探索如何和采取什么路线,同时可以快速轻松地实现一些功能。如果你需要更漂亮/精确的示例,就需要分享真正的屏幕等信息。动画之类的东西也可以应用于其他对象,如图标等,但是对于这个示例,我只是将它们放在了一些框里。

这些都是我自己的技巧,随意使用,如果你还想了解更多不同的技术,我也可以向你展示,但是如果我们涉及得太深入的话,这种详细建议就是我谋生的方式,所以可能至少要收你一箱啤酒之类的费用;)

总之,把这个放在一个窗口中,我刚刚用一个新的快速wpf项目做到了这一点。你只需将它们粘贴并运行,它们就会在加载时启动。

我发现需要避免的主要事情是在大量动画中严重干扰渐变和各种像素着色器之类的东西。不过像这样的东西似乎做得很好。

输出(以断断续续的.gif动画样式呈现,仅作为视觉示例):

输入图像描述

魔法如下:

<Window
    xmlns="http://schemas.microsoft.com/winfx/2006/xaml/presentation"
    xmlns:x="http://schemas.microsoft.com/winfx/2006/xaml"
    xmlns:i="http://schemas.microsoft.com/expression/2010/interactivity" xmlns:ei="http://schemas.microsoft.com/expression/2010/interactions" x:Class="MainWindow"
    Title="MainWindow" Height="450" Width="250">
    <Window.Resources>

        <!-- Marching Ants -->
        <Storyboard x:Key="MarchingAnts">
                <DoubleAnimation BeginTime="00:00:00"
                                Storyboard.TargetName="AlertBox"
                                Storyboard.TargetProperty="StrokeThickness"
                                To="4"
                                Duration="0:0:0.25" />
                           <!-- If you want to run counter-clockwise, just swap the 'From' and 'To' values. -->
                <DoubleAnimation BeginTime="00:00:00" RepeatBehavior="Forever" Storyboard.TargetName="AlertBox" Storyboard.TargetProperty="StrokeDashOffset" 
                                Duration="0:3:0" From="1000" To="0"/>
        </Storyboard>

        <!-- Pulse -->
        <Storyboard x:Key="Pulse" RepeatBehavior="Forever">
            <DoubleAnimationUsingKeyFrames Storyboard.TargetProperty="(UIElement.RenderTransform).(TransformGroup.Children)[0].(ScaleTransform.ScaleX)" Storyboard.TargetName="PulseBox">
                <EasingDoubleKeyFrame KeyTime="0:0:0.5" Value="1.15"/>
                <EasingDoubleKeyFrame KeyTime="0:0:1" Value="1"/>
            </DoubleAnimationUsingKeyFrames>
            <DoubleAnimationUsingKeyFrames Storyboard.TargetProperty="(UIElement.RenderTransform).(TransformGroup.Children)[0].(ScaleTransform.ScaleY)" Storyboard.TargetName="PulseBox">
                <EasingDoubleKeyFrame KeyTime="0:0:0.5" Value="1.15"/>
                <EasingDoubleKeyFrame KeyTime="0:0:1" Value="1"/>
            </DoubleAnimationUsingKeyFrames>
        </Storyboard>

        <!-- Flipper -->
        <Storyboard x:Key="Flipper" RepeatBehavior="Forever">
            <PointAnimationUsingKeyFrames Storyboard.TargetProperty="(UIElement.RenderTransformOrigin)" Storyboard.TargetName="FlipperBox">
                <EasingPointKeyFrame KeyTime="0:0:1" Value="0.5,0.5"/>
                <EasingPointKeyFrame KeyTime="0:0:2" Value="0.5,0.5"/>
            </PointAnimationUsingKeyFrames>
            <DoubleAnimationUsingKeyFrames Storyboard.TargetProperty="(UIElement.RenderTransform).(TransformGroup.Children)[0].(ScaleTransform.ScaleY)" Storyboard.TargetName="FlipperBox">
                <EasingDoubleKeyFrame KeyTime="0:0:1" Value="-1"/>
                <EasingDoubleKeyFrame KeyTime="0:0:2" Value="1"/>
            </DoubleAnimationUsingKeyFrames>
        </Storyboard>


        <!-- Elasic Lines -->
        <Storyboard x:Key="ElasticLines" RepeatBehavior="Forever" AutoReverse="True">
            <PointAnimationUsingKeyFrames Storyboard.TargetProperty="(Shape.Fill).(LinearGradientBrush.EndPoint)" Storyboard.TargetName="ElasticBox">
                <EasingPointKeyFrame KeyTime="0:0:4" Value="12,8"/>
            </PointAnimationUsingKeyFrames>
        </Storyboard>

        <!-- Knight Rider -->
        <Storyboard x:Key="KnightRider" RepeatBehavior="Forever" AutoReverse="True">
            <DoubleAnimationUsingKeyFrames Storyboard.TargetProperty="(UIElement.RenderTransform).(TransformGroup.Children)[3].(TranslateTransform.X)" Storyboard.TargetName="KRBox">
                <EasingDoubleKeyFrame KeyTime="0:0:1" Value="-50"/>
                <EasingDoubleKeyFrame KeyTime="0:0:2" Value="50"/>
                <EasingDoubleKeyFrame KeyTime="0:0:3" Value="0"/>
            </DoubleAnimationUsingKeyFrames>
        </Storyboard>

    </Window.Resources>
    <Window.Triggers>
        <EventTrigger RoutedEvent="FrameworkElement.Loaded">
            <BeginStoryboard Storyboard="{StaticResource Pulse}"/>
            <BeginStoryboard Storyboard="{StaticResource MarchingAnts}"/>
            <BeginStoryboard Storyboard="{StaticResource Flipper}"/>
            <BeginStoryboard Storyboard="{StaticResource ElasticLines}"/>
            <BeginStoryboard Storyboard="{StaticResource KnightRider}"/>
        </EventTrigger>
    </Window.Triggers>

    <Grid HorizontalAlignment="Center" VerticalAlignment="Center">
        <Grid.Resources>
            <Style TargetType="{x:Type TextBlock}">
                <Setter Property="Foreground" Value="White"/>
                <Setter Property="FontWeight" Value="Bold"/>
                <Setter Property="FontSize" Value="35"/>
                <Setter Property="HorizontalAlignment" Value="Center"/>
                <Setter Property="VerticalAlignment" Value="Center"/>
                <Setter Property="Text" Value="ALERT"/>
            </Style>
            <Style TargetType="{x:Type Grid}">
                <Setter Property="Margin" Value="0,10"/>                
            </Style>
            <Style TargetType="{x:Type Rectangle}">
                <Setter Property="Height" Value="50"/>
                <Setter Property="Width" Value="150"/>
            </Style>
        </Grid.Resources>

        <StackPanel>

        <!-- Marching Ants -->
        <Grid>

            <Rectangle x:Name="AlertBox"
                      Stroke="Red" 
                       StrokeDashOffset="2" StrokeDashArray="5" Margin="5">
                <Rectangle.Fill>
                    <LinearGradientBrush StartPoint="0,0" EndPoint="6,4" MappingMode="Absolute" SpreadMethod="Repeat">
                        <GradientStop Color="Red" Offset="0.25"/>
                        <GradientStop Color="#00000000" Offset="0.15"/>
                    </LinearGradientBrush>
                </Rectangle.Fill>
            </Rectangle>

            <TextBlock/>

        </Grid>
        <!-- End Marching Ants -->


        <!-- Pulse : Will not skew other elements location like width/height animations would. -->
        <Grid>
            <Border x:Name="PulseBox"
                        Background="Red" RenderTransformOrigin="0.5,0.5">
                <Border.RenderTransform>
                    <TransformGroup>
                        <ScaleTransform/>
                        <SkewTransform/>
                        <RotateTransform/>
                        <TranslateTransform/>
                    </TransformGroup>
                </Border.RenderTransform>

                <TextBlock/>

            </Border>
        </Grid>
        <!-- End Pulse -->


        <!-- Flipper -->
        <Grid>
            <Border x:Name="FlipperBox"
                        Background="Red">
                <Border.RenderTransform>
                    <TransformGroup>
                        <ScaleTransform/>
                        <SkewTransform/>
                        <RotateTransform/>
                        <TranslateTransform/>
                    </TransformGroup>
                </Border.RenderTransform>

                <TextBlock/>

            </Border>
        </Grid>
        <!-- End Flipper -->


        <!-- Elastic Lines -->
        <Grid>
            <Rectangle x:Name="ElasticBox"
                      Stroke="Red" StrokeThickness="5" Margin="5">
                <Rectangle.Fill>
                    <LinearGradientBrush StartPoint="0,0" EndPoint="6,4" MappingMode="Absolute" SpreadMethod="Repeat">
                        <GradientStop Color="Red" Offset="0.25"/>
                        <GradientStop Color="#00000000" Offset="0.15"/>
                    </LinearGradientBrush>
                </Rectangle.Fill>
            </Rectangle>

            <TextBlock/>

        </Grid>
        <!-- End Elastic Box -->


        <!-- Knight Rider -->
        <Grid>
            <Rectangle Fill="Red"/>
            <Rectangle x:Name="KRBox" Width="50" Fill="White" RenderTransformOrigin="0.5,0.5">
                <Rectangle.RenderTransform>
                    <TransformGroup>
                        <ScaleTransform/>
                        <SkewTransform/>
                        <RotateTransform/>
                        <TranslateTransform/>
                    </TransformGroup>
                </Rectangle.RenderTransform>
            </Rectangle>

            <TextBlock Foreground="Red"/>

        </Grid>
        <!-- End Knight Rider -->

        </StackPanel>

    </Grid>
</Window>

这太棒了!我的心智还被震撼到了许多层面。这些是我一直试图做的有趣动画和效果类型!真正让我感到谦卑的是,它们所需的工作量非常少(即效率)。你不知道这对我有多大帮助。你有博客或其他可以关注的东西吗?很抱歉昨天错过了这个,因为我母亲出了事故。 - jrandomuser
1
A. 永远不要因为把家庭放在首位而道歉!我希望您的妈妈没事!B. XAML 经常被无知的人忽视,他们并不了解它的妙处,但实际上你可以通过它单独做一些非常酷的东西。至于博客之类的东西,可能我应该写一篇吧?不管怎样,如果您还在寻找完美的答案,请告诉我,我们可以离线交流,为您排忧解难。 - Chris W.
1
这里有一个例子可以让你开怀大笑。我想让我的形状在它们的X轴上旋转(就像一个硬币在桌子上旋转)。我成功地做到了,但是需要(我不是开玩笑)1000多行代码在自定义类中和大约100行XAML样式。现在将其与您上面的Flipper示例进行比较,只需更改Target X Axis的几个值,它就可以使用仅10行XAML完成相同的操作!这真是令人印象深刻!您推荐专注于WPF中效果和动画功能的任何资源吗? - jrandomuser
没关系,兄弟,我们都曾经历过这个阶段。至于资源,没有什么特别的,但是你提到博客的问题让我想到也许我应该写一些? :/ 就我个人而言,我是通过实践学习的。先有一个想法,打开 Blend,然后不断尝试,直到你掌握了 XAML 方面的知识,剩下的就像吃蛋糕一样简单了,或者说是一块谦逊派……我也曾经历过更多的失败,所以干杯 :) - Chris W.
3
Stack Overflow上最被低估的答案 - mylogon

1
我正在使用TextBox添加一个测试场景。
<Grid>
    <Grid.Resources>
        <SolidColorBrush x:Key="BlackColor" Color="Black" />
        <SolidColorBrush x:Key="WhiteColor" Color="White" />
    </Grid.Resources>
    <TextBox Text="{Binding Test}" Width="150" Height="25">
        <TextBox.Effect>
            <DropShadowEffect ShadowDepth="0" BlurRadius="0" Opacity="0" Color="White"    />
        </TextBox.Effect>
        <TextBox.Style>
            <Style TargetType="TextBox">
                <Style.Triggers>
                    <EventTrigger RoutedEvent="TextChanged">
                        <EventTrigger.Actions>
                            <BeginStoryboard>
                                <Storyboard>
                                    <ThicknessAnimation Storyboard.TargetProperty="BorderThickness" From="1" To="2" Duration="0:0:2" AutoReverse="True"/>
                                    <DoubleAnimation Storyboard.TargetProperty="Effect.Opacity" To="1" />
                                    <ColorAnimation Storyboard.TargetProperty="Effect.Color" From="Red" To="Purple" Duration="0:0:2" RepeatBehavior="2x" AutoReverse="True" />
                                    <DoubleAnimation Storyboard.TargetProperty="Effect.ShadowDepth" From="0" To="1" Duration="0:0:2" RepeatBehavior="2x" AutoReverse="True"/>
                                    <DoubleAnimation Storyboard.TargetProperty="Effect.BlurRadius" From="0" To="30" Duration="0:0:2" AutoReverse="True" RepeatBehavior="2x" />
                                    <ObjectAnimationUsingKeyFrames Storyboard.TargetProperty="Background">
                                        <DiscreteObjectKeyFrame KeyTime="0:0:0" Value="{StaticResource BlackColor}" />
                                        <DiscreteObjectKeyFrame KeyTime="0:0:1" Value="{StaticResource WhiteColor}" />
                                        <DiscreteObjectKeyFrame KeyTime="0:0:2" Value="{StaticResource BlackColor}" />
                                        <DiscreteObjectKeyFrame KeyTime="0:0:3" Value="{StaticResource WhiteColor}" />
                                        <DiscreteObjectKeyFrame KeyTime="0:0:4" Value="{StaticResource BlackColor}" />
                                        <DiscreteObjectKeyFrame KeyTime="0:0:5" Value="{StaticResource WhiteColor}" />
                                        <DiscreteObjectKeyFrame KeyTime="0:0:6" Value="{StaticResource BlackColor}" />
                                        <DiscreteObjectKeyFrame KeyTime="0:0:7" Value="{StaticResource WhiteColor}" />
                                    </ObjectAnimationUsingKeyFrames>
                                    <ObjectAnimationUsingKeyFrames Storyboard.TargetProperty="Foreground">
                                        <DiscreteObjectKeyFrame KeyTime="0:0:0" Value="{StaticResource WhiteColor}" />
                                        <DiscreteObjectKeyFrame KeyTime="0:0:1" Value="{StaticResource BlackColor}" />
                                        <DiscreteObjectKeyFrame KeyTime="0:0:2" Value="{StaticResource WhiteColor}" />
                                        <DiscreteObjectKeyFrame KeyTime="0:0:3" Value="{StaticResource BlackColor}" />
                                        <DiscreteObjectKeyFrame KeyTime="0:0:4" Value="{StaticResource WhiteColor}" />
                                        <DiscreteObjectKeyFrame KeyTime="0:0:5" Value="{StaticResource BlackColor}" />
                                        <DiscreteObjectKeyFrame KeyTime="0:0:6" Value="{StaticResource WhiteColor}" />
                                        <DiscreteObjectKeyFrame KeyTime="0:0:7" Value="{StaticResource BlackColor}" />
                                    </ObjectAnimationUsingKeyFrames>
                                </Storyboard>
                            </BeginStoryboard>
                        </EventTrigger.Actions>
                    </EventTrigger>
                </Style.Triggers>
            </Style>
        </TextBox.Style>
    </TextBox>
</Grid>

增加了一些动画效果,用于 背景前景


我之前并没有意识到我也可以使用实际文本更改的事件来触发。以后我可能会在各个地方开始使用类似这样的方法,而不是数据触发器。 - jrandomuser
我不确定为什么,但当我将这种类型的动画放在文本本身上时,它几乎不可见。可能是因为文本本身是黑色的。 - jrandomuser
然后你可以尝试将“Text”的颜色从“Black”更改为“White”。 - Sandesh

网页内容由stack overflow 提供, 点击上面的
可以查看英文原文,
原文链接