Python中的ASCII艺术

17

我对Python还很陌生,只是把它作为一种兴趣爱好来学习,通过一些搜索,我在《计算实践》中找到了一些练习题。其中有一个要求绘制ASCII图像,就像下面所示的图像。

ascii cross

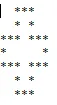
这似乎是一个简单的练习,但我无法理解如何使用数字来绘制它。练习指出上面的图案是通过使用数字“1”绘制的。

它还指出,不能使用小于0或大于100的数字来创建ASCII图形。
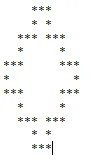
这里还有另一个例子:

输入的数字是“2”。

bigger ascii cross

我已经找到了一种方法来呈现第一幅图像,但并没有以任何方式使用给定的数字,只是在while循环中使用了一个简单的“else”,因此我可以过滤掉小于等于0和大于等于100的数字。

我遇到了瓶颈。

我的代码如上所述,并未使用变量number来创建第一个图形:

while True:
s = input("Give me a number to make a drawing with that is between 0 and 100: ")


if not s.isdigit():
    print ("Error, only numbers will make this program run.")
    continue #Try Again but with a number this time

if int(s) >= 100:
    print ("The number is bigger than or equal to 100 and won't work. \nDo try again.")
    continue #try again

if int(s) <= 0:
    print ("The number is smaller than or equal to 0 and won't work. \nDo try again.")
    continue #try again

else:
    print ("%5s" %("*" *3),"\n"'%5s' %("* *"),"\n" '%7s' %("*** ***"),"\n" '%7s' %("*     *"),"\n" '%7s' %("*** ***"),"\n" '%5s' %("* *"),"\n" '%5s' %("*" *3))


    print ('Want to make another drawing ?')
    continue #make another drawing

练习说明如下:

一个大小为 $n$ 的 ASCII 图形由一行或多行组成。每行只允许空格和星号(*),在每个星号之后不允许有空格,因此您应该以 "\n" 或换行符结束。然后是上述示例。

我的新代码示例取决于变量输入: 此外,在此代码示例中,当输入为1时设置触发,我仍然在增加输入数字时遇到问题,无法“放大”整个图形。

    while True:

 A = input("Give me a number to make a drawing with that is between 0 and 100: ")
 b = "***"
 c = "*"
 d = " "


 if not A.isdigit():
        print ("Error, only numbers will make this program run.")
        continue #Try Again but with a number this time

 if int(A) >= 100:
        print ("The number is bigger than or equal to 100 and won't work. \nDo try again.")
        continue #try again

 if int(A) <= 0:
        print ("The number is smaller than or equal to 0 and won't work. \nDo try again.")
        continue #try again


 else :
  range(1,99)
 if int(A) == (1) :
  print ((d *((int(A))*2)) + b,)
  print ((d *((int(A))*2))+ c + d + c,)
  print ((d *((int(A))*0))+ b + d + b,)
  print ((d *((int(A))*0))+ c + d*5 + c,)
  print ((d *((int(A))*0))+ b + d + b,)
  print ((d *((int(A))*2))+ c + d + c,)
  print ((d *((int(A))*2)) + b,)

  continue #try again

但是我仍然有一个问题,就是如何在ASCII图形内“增加”空格的数量,随着1到2的增加。

我还有一个问题是第3行,因为它需要在控制台的两侧表示出来,所以它应该从一侧开始没有间距,但是随着数字2的增加,它必须增加到2个间距。


1
我认为如果我们做整个练习会更有帮助。 - Sindre Johansen
练习说明如下:大小为$n$的ASCII图形由一条或多条线组成。每行只允许空格和星号(*),在每个星号后面不允许有空格,因此您应该以"\n"或换行符结束。然后是上述示例。 - Beaver
我找到了一个制作横幅的网址 this。还有另一个网址在这里:here - f p
@fp:有关横幅,请参见是否有Python库可以轻松打印ASCII艺术文本?。但这与当前问题无关。 - jfs
@fp 是的,我以前找到过那些,但其中一个在“tabl”中似乎有语法错误,另一个则与我的不太相同。但是,任何帮助或提示仍然会受到赞赏。 - Beaver
@Beaver:你肯定需要一些for循环来使这个工作。我在你的代码中没有看到任何一个,你熟悉它们吗? - Junuxx
3个回答

14

思考1和2之间的区别。尝试手绘3和4应该看起来像什么,以使序列正常工作。将其视为其中一个问题,其中给出了序列的开头,您必须找出其余部分。

例如:

0 1 1 2 3 5 8 13

如果您没有立即认出它,那是斐波那契数列。一旦您找到模式,就可以编写任意长度的值序列。

并且考虑这个简单的ASCII序列:

1)

#

2)

##
#

3)

###
##
#

4)看起来是什么样子?

或者是另一个ASCII序列:

1)

#

2)

 #
# #
 #

3)

  #
 # #
#   #
 # #
  #

(4)是什么?

如果还不清楚,请试着设计几个与你试图弄清的形状相似的递归形状(也许是我第二个例子类似的东西)。现在不用担心如何编写代码,只需要考虑输出应该是什么。然后观察模式并得出算法。


是的,这很容易理解,但我的练习顺序似乎一次又一次地使我困惑,我感觉就在手边。此外,让我不爽的是如何“增加”星号之间的间距以适应“2”。 - Beaver
我的附加示例有帮助吗? - jmh
很遗憾,不行。我只是卡在了使用变量数字创建那些空格和星号的前提上,我的意思是我不知道如何创建,在第一个“星号”之前放置那些空格,然后在这些空格后面放置一个“星号”,例如您的数字2。 - Beaver
我的例子有意义吗?如果是的话,就试着再发挥一些自己的创意,直到你理解问题的例子。否则,你可能需要好好想一想再做决定。 - jmh
我已经进一步了解并找到了一种使算法依赖的方法,很蠢我没有想到只需将星号命名为空格作为字符串,并使用该字符串而不是 ,所以我使用 a = ""。 我已经更新了我的帖子,但当出现更大的数字时,我仍然无法添加这些空格,我看不出两个星星之间空格增加和数字1到2的增加之间有明显的相关性。 - Beaver

3
首先,逐行分析图形以识别不同类型的模式。
  • 帽子,仅出现在顶部和底部行上。它是任意数量的空格,后跟三个星号。
  • 墙壁,形成图形的垂直部分。它是任意数量的空格,后跟一个星号,后跟任意数量的空格,后跟一个星号。
  • 地板,形成图形的水平部分。它是任意数量的空格,后跟三个星号,后跟任意数量的空格,后跟三个星号。
我们可以编写一个打印每个模式的函数。
def cap(spacesBefore):
    print " " * spacesBefore + "***"

def wall(spacesBefore, spacesBetween):
    print " " * spacesBefore + "*" + " " * spacesBetween + "*"

def floor(spacesBefore, spacesBetween):
    print " " * spacesBefore + "***" + " " * spacesBetween + "***"

接下来,编写代码以显示大小为0、1和2的图形。这将使您了解如何显示任何大小的图形。

#size 0
cap(0)
wall(0,1)
cap(0)

print "\n"

#size 1
cap(2)
wall(2, 1)
floor(0, 1)
wall(0, 5)
floor(0, 1)
wall(2, 1)
cap(2)

print "\n"

#size 2
cap(4)
wall(4, 1)
floor(2, 1)
wall(2, 5)
floor(0, 5)
wall(0, 9)
floor(0, 5)
wall(2, 5)
floor(2, 1)
wall(4, 1)
cap(4)

输出:

***
* *
***


  ***
  * *
*** ***
*     *
*** ***
  * *
  ***


    ***
    * *
  *** ***
  *     *
***     ***
*         *
***     ***
  *     *
  *** ***
    * *
    ***

分析用于制作这些图形的代码,一些模式变得明显。对于大小为 N 的图形:
  • 两端帽子都有 N*2 个前导空格。
  • 有 2*N+1 条壁线。
  • 有 2*N 条底线。
  • 图形的前半部分和后半部分是镜像关系。
  • 每个壁线的前导空格数量从 N*2 开始,然后每次减少两个,直到达到零;然后再增加两个,直到再次达到 N*2。
  • 壁之间的空格数从 1 开始,每次增加 4,直到达到 4*N+1;然后再减少四个,直到再次达到 1。
  • 每个底部的前导空格数量从 2N-2 开始,然后每次减少两个,直到达到零;然后再增加两个,直到再次达到 2N-2。
  • 底部之间的空格数从 1 开始,每次增加 4,直到达到 4*N-3;然后再减少四个,直到再次达到 1。

所有模式都以线性速率增长和缩小,然后以线性速率收缩和增长。这意味着我们应该使用两个具有相反条件的 for 循环,并加入一些额外代码以制作帽子和中央墙。

def draw(N):
    cap(2*N)
    for i in range(N):              #loop from 0 to N-1
        wall(2*(N-i), 1+(4*i))
        floor(2*(N-i-1), 1+(4*i))
    wall(0, 4*N+1)
    for i in range(N-1, -1, -1):    #loop from N-1 to 0
        floor(2*(N-i-1), 1+(4*i))
        wall(2*(N-i), 1+(4*i))
    cap(2*N)

现在测试代码。

for i in range(7,10):
    draw(i)
    print "\n"

输出:

              ***
              * *
            *** ***
            *     *
          ***     ***
          *         *
        ***         ***
        *             *
      ***             ***
      *                 *
    ***                 ***
    *                     *
  ***                     ***
  *                         *
***                         ***
*                             *
***                         ***
  *                         *
  ***                     ***
    *                     *
    ***                 ***
      *                 *
      ***             ***
        *             *
        ***         ***
          *         *
          ***     ***
            *     *
            *** ***
              * *
              ***


                ***
                * *
              *** ***
              *     *
            ***     ***
            *         *
          ***         ***
          *             *
        ***             ***
        *                 *
      ***                 ***
      *                     *
    ***                     ***
    *                         *
  ***                         ***
  *                             *
***                             ***
*                                 *
***                             ***
  *                             *
  ***                         ***
    *                         *
    ***                     ***
      *                     *
      ***                 ***
        *                 *
        ***             ***
          *             *
          ***         ***
            *         *
            ***     ***
              *     *
              *** ***
                * *
                ***


                  ***
                  * *
                *** ***
                *     *
              ***     ***
              *         *
            ***         ***
            *             *
          ***             ***
          *                 *
        ***                 ***
        *                     *
      ***                     ***
      *                         *
    ***                         ***
    *                             *
  ***                             ***
  *                                 *
***                                 ***
*                                     *
***                                 ***
  *                                 *
  ***                             ***
    *                             *
    ***                         ***
      *                         *
      ***                     ***
        *                     *
        ***                 ***
          *                 *
          ***             ***
            *             *
            ***         ***
              *         *
              ***     ***
                *     *
                *** ***
                  * *
                  ***

2
要找出图案,你可以想象一下海龟会如何画它。例如,要画出:
***
* *
***

海龟可以按照以下指令操作:
  • 向右转,向前移动
  • 向右转,向前移动
  • 向右转,向前移动
  • 向右转,向前移动

作为 Python 程序:

import turtle

turtle.right(90); turtle.forward(50)
turtle.exitonclick() # leave GUI open until a click

如果我们把“向右转”缩写为'r',把“向前移动”缩写为"f",那么指令就是:
'rfrfrfrf'

很容易看出这是'rf' * 4。按照同样的步骤进行:
  ***  
  * *  
*** ***
*     *
*** ***
  * *  
  ***

指令为 'rflfrfrflfrfrflfrfrflfrf''rflfrf' * 4,其中 'l' 表示“向左转”。
对于 n 等于 01 的情况,描述这两种情况的规则是:
("rf" + "lfrf" * n) * 4

即,如果 n = 0,那么它是 'rf' * 4,如果 n = 1,那么它是 ('rf' + 'lfrf') * 4。要检查公式,您可以为 n = 2 绘制它并将其与已知答案进行比较:
    ***    
    * *    
  *** ***  
  *     *  
***     ***
*         *
***     ***
  *     *  
  *** ***  
    * *    
    ***    

作为一个Python程序:
from turtle import Turtle

def get_romb_program(n):
    assert n >= 0
    side = "rf" + "lfrf" * n
    program = side * 4  # romb has 4 sides
    return program


def draw(turtle, n):
    assert 0 <= n < 101
    commands = {'r': lambda t: t.right(90),  # turn right
       'l': lambda t: t.left(90),  # turn left
       'f': lambda t: t.forward(2)
    }
    run(get_romb_program(n), turtle, commands)

def run(program, t, commands):
    for c in program:
        commands[c](t)

n = 2
t = Turtle()
scr = t.getscreen()
scr.xscale, scr.yscale = [101 // (n + 1)] * 2
draw(t, n)
scr.exitonclick()

要将它打印成 ASCII 艺术,你可以使用 AsciiTurtle 替代 turtle.Turtle
class AsciiTurtle(object):
    def __init__(self):
        self.path = [(0, 0)]
        self.direction = (1, 0)

    def forward(self, distance):
        x, y = self.path[-1]
        for i in range(1, distance + 1):
            self.path.append((x + self.direction[0] * i,
                              y + self.direction[1] * i))

    def right(self, angle_ignored):  # 90 degree turn right
        self.direction = self.direction[1], -self.direction[0]

    def left(self, angle_ignored):  # 90 degree turn left
        self.direction = -self.direction[1], self.direction[0]

    def show(self):
        minx, maxx, maxy, miny = [f(xy[i] for xy in self.path)
                                  for i in [0, 1] for f in [min, max]]
        miny, maxy = -miny, -maxy  # upside-down
        board = [[' '] * (maxx - minx + 1) for _ in range(maxy - miny + 1)]
        for x, y in self.path:
            board[-y - miny][x - minx] = '*'
        print('\n'.join(''.join(row) for row in board))

例子

n = 5
t = AsciiTurtle()
draw(t, n) # defined above
t.show()

输出

          ***          
          * *          
        *** ***        
        *     *        
      ***     ***      
      *         *      
    ***         ***    
    *             *    
  ***             ***  
  *                 *  
***                 ***
*                     *
***                 ***
  *                 *  
  ***             ***  
    *             *    
    ***         ***    
      *         *      
      ***     ***      
        *     *        
        *** ***        
          * *          
          ***          

网页内容由stack overflow 提供, 点击上面的
可以查看英文原文,
原文链接