核心图像CIHueAdjust滤镜提供错误的颜色。

6
我正在使用Dondragmer在此问题中提供的“旋转色调”示例代码:如何以编程方式更改UIImage的色调? 
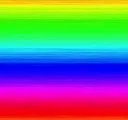
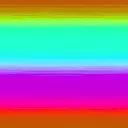
然而,我的结果与预期非常不同。我希望改变色调会产生类似于在Photoshop中改变色调的效果,但实际上这些变化并不相似。
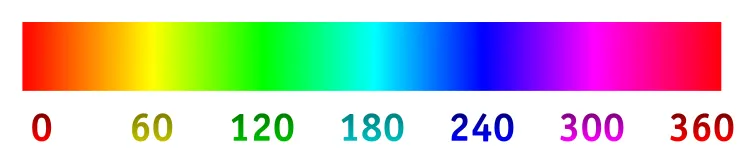
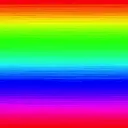
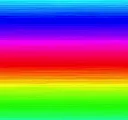
为了说明问题,我使用了这张源图像:

source image

在Photoshop中进行pi/4旋转会得到这个结果:

45 degree rotation Photoshop

使用Dondragmer的代码我得到:

45 degree rotation CIHueAdjust

同样地,在Photoshop中进行180度旋转会得到以下结果:

180 degree rotation Photoshop

但CIHueAdjust滤镜会产生:

180 degree rotation CIHueAdjust

我的代码:

- (CGImageRef)changeHueOfImage(CGImageRef)source By:(NSInteger)angle
{
    CIImage *image = [CIImage imageWithCGImage:source];

    // Convert degrees to radians
    CGFloat angleRadians = GLKMathDegreesToRadians(angle);

    // Use the Core Image CIHueAdjust filter to change the hue
    CIFilter *hueFilter = [CIFilter filterWithName:@"CIHueAdjust"];
    [hueFilter setDefaults];
    [hueFilter setValue:image forKey:@"inputImage"];
    [hueFilter setValue:[NSNumber numberWithFloat:angleRadians] forKey:@"inputAngle"];
    image = [hueFilter outputImage];

    // Save the modified image
    CIContext *context = [CIContext contextWithOptions:nil];
    CGImageRef result = [context createCGImage:image fromRect:[image extent]];

    return result;
}

我的问题:

  1. 我是否误解了CIHueAdjust滤镜的作用?
  2. 我需要考虑亮度和饱和度如何影响滤镜吗?
  3. 我该如何复制Photoshop的行为?
  4. 总的来说,为什么结果会如此不同?

1
我的问题是,为什么你不展示一行代码呢?你传递给CIHueAdjust的是什么类型的数字? - El Tomato
3个回答

4

当我试图更新CIImage的亮度时,遇到了类似的问题。问题在于CoreImageRGB空间中工作,而修改色调、饱和度或亮度应该在HSV空间中完成。

我最终采取的方法是使用我在这里找到的代码片段来操作每个像素。可能有更好的方法,但我创建了一个UIColor,其中包含每个像素的RGB值,从该颜色获取HSV值,更新所需更新的组件,创建一个新的UIColor并使用该颜色的RGB值来修改图像。

CGImageRef imageRef = [img CGImage];
uint width = CGImageGetWidth(imageRef);
uint height = CGImageGetHeight(imageRef);
unsigned char *pixels = malloc(height*width*4); //1d array with size for every pixel. Each pixel has the components: Red,Green,Blue,Alpha

CGColorSpaceRef colorSpaceRef = CGColorSpaceCreateDeviceRGB();
CGContextRef context = CGBitmapContextCreate(pixels, width, height, 8, 4*width, colorSpaceRef, kCGImageAlphaPremultipliedLast); //our quartz2d drawing env
CGColorSpaceRelease(colorSpaceRef);

CGContextDrawImage(context, CGRectMake(0, 0, width, height), imageRef);

for (int y=0;y<height;++y){
    for (int x=0;x<width;++x){
        int idx = (width*y+x)*4; //the index of pixel(x,y) in the 1d array pixels

        //Pixel manipulation here

        //red = pixels[idx]
        //green = piexls[idx+1]
        //blue = pixels[idx+2]
        //alpha = pixels[idx+3]

        //pixels[idx] = NEW_RED_VALUE

        //Please note that this assumes an image format with alpha stored in the least significant bit.
        //See kCGImageAlphaPremultipliedLast for more info. 
        //Change if needed and also update bitmapInfo provided to CGBitmapContextCreate
    }
}


imageRef = CGBitmapContextCreateImage(context);
CGContextRelease(context);
free(pixels);

//load our new image
UIImage* newImg = [UIImage imageWithCGImage:imageRef];

注意:我并没有编写这段代码,我在这里找到了它,并将其粘贴在这里以防gist被删除。所有的功劳都归于bjorndagerman@github

如果您自己实现RGB -> HSV -> RGB转换,则可能会获得更好的性能,如果您尝试每秒执行此滤镜多次,则会看到性能下降,但这是我的最佳建议,我找不到一种方法来在CoreImage中使用HSV空间修改色调、饱和度或亮度。

更新:正如评论中@dfd所提到的,您还可以编写一个自定义内核来进行这些计算的过滤器,它会快得多,但您需要搜索如何将RGB转换为HSV和反向转换。


"CoreImage 在 RGB 空间中工作,修改色相、饱和度或亮度应在 HSV 空间中完成。如果您自己实现 RGB -> HSV -> RGB 转换,可能会获得更好的性能。" "啥?你完全错了。" - El Tomato
@ElTomato 能否详细说明一下?我的意思是,如果他自己计算而不是像我一样为每个像素创建两个UIColor,那么他会获得更好的性能。 - EmilioPelaez
他或她的问题可能是将度数而非弧度数传递给CIHueAdjust函数。此外,你展示的内容毫无意义。为什么有人想要将RGB颜色转换为HSV,然后再转回RGB颜色呢?你只需要改变颜色空间即可。 - El Tomato
@ElTomato 无法将角度转换为弧度是一个好的猜测,但正如您所看到的,我在使用该值之前进行了转换。(我承认我在第一次尝试编写此代码时犯了这个错误,但我早在发布之前就解决了这个问题 :-) 那么让我们听听您的下一个想法! - Rob Lyman
@EmilioPelaez 我怀疑我的问题确实与我如何使用颜色空间有关,所以我认为你是正确的轨道 - 但我已经尝试向核心图像提供各种颜色空间选项,但没有找到任何有效的解决方案。碰巧,在阅读了您的帖子后,我手动实现了逐像素转换并获得了所需的输出; 但此时此刻,我真的想知道使用Core Image的正确方法,这应该是处理这种工作更快的方法。 - Rob Lyman
显示剩余4条评论

1
我从未找到我的问题的答案:为什么CIHueAdjust没有给出预期的结果。但是我确实找到了替代代码,可以给我想要的结果:
#define Mask8(x) ( (x) & 0xFF )
#define R(x) ( Mask8(x) )
#define G(x) ( Mask8(x >> 8 ) )
#define B(x) ( Mask8(x >> 16) )
#define A(x) ( Mask8(x >> 24) )
#define RGBAMake(r, g, b, a) ( Mask8(r) | Mask8(g) << 8 | Mask8(b) << 16 | Mask8(a) << 24 )

- (CGImageRef)changeHueForImage:(CGImageRef)image by:(NSInteger)angle
{
    // Get size and allocate array of UIColors
    NSInteger width = CGImageGetWidth(image);
    NSInteger height = CGImageGetHeight(image);
    NSInteger count = width * height;

    // Draw image into pixel buffer
    CGColorSpaceRef colorSpace = CGColorSpaceCreateDeviceRGB();

    NSInteger bytesPerPixel = 4;
    NSInteger bitsPerComponent = 8;

    NSInteger bytesPerRow = bytesPerPixel * width;

    UInt32 *bitmapPixels = (UInt32 *)calloc(count, sizeof(UInt32));

    CGContextRef context = CGBitmapContextCreate(bitmapPixels, width, height,
                                                 bitsPerComponent, bytesPerRow, colorSpace,
                                                 kCGImageAlphaPremultipliedLast | kCGBitmapByteOrder32Big);

    CGContextDrawImage(context, CGRectMake(0, 0, width, height), image);

    // Shift hue of every pixel
    for (int i = 0; i < count; i++) {
        // Get pixel
        UInt32 pixel = bitmapPixels[i];

        // Convert to HSBA
        UIColor *color = [UIColor colorWithRed:R(pixel)/255.0 green:G(pixel)/255.0 blue:B(pixel)/255.0 alpha:A(pixel)/255.0];
        CGFloat h, s, br, a;
        [color getHue:&h saturation:&s brightness:&br alpha:&a];

        // Shift by angle
        CGFloat angleRadians = GLKMathDegreesToRadians(angle);
        angleRadians /= 2.0f*M_PI;
        h += angleRadians;
        if (h > 1.0f || h < 0.0f) {
            h -= floor(h);
        }

        // Make new color
        UIColor *newColor = [UIColor colorWithHue:h saturation:s brightness:br alpha:a];

        // Convert back to RGBA
        CGFloat r, g, b;
        [newColor getRed:&r green:&g blue:&b alpha:&a];

        // Set pixel
        bitmapPixels[i] = RGBAMake((UInt32)(r * 255.0), (UInt32)(g * 255.0), (UInt32)(b * 255.0), (UInt32)(a * 255.0));
    }

    // Create the new image and clean up
    CGImageRef newImg = CGBitmapContextCreateImage(context);
    CGColorSpaceRelease(colorSpace);
    CGContextRelease(context);
    free(bitmapPixels);

    return newImg;
 }

我对这个解决方案并不满意;特别是,几乎肯定有比依赖于为每个像素创建新的UIColor更有效的方法。但它按预期改变了图像的色调。


不要忘记 CGImageRelease(newImg); - Albert Renshaw
另外,您的 alpha 空间使用的是 225 而不是 255;我已经为您编辑了! - Albert Renshaw
最后,HSV空间从0-1移动而不是0-2π,因此使用弧度不是你想要的,而是弧度/2π;并且你也可以通过添加来超出边界,因此你需要使用模数策略进行包装。我已经对这两个进行了编辑。感谢您的帖子,它帮助我节省了大量时间。 - Albert Renshaw

0

hue的输入参数以弧度表示。

enter image description here

以下代码允许您输入一个浮点数,范围从0.0到1.0,表示0到360度。
extension UIImage {

    // CIHueAdjust
    
    func withHueAdjustment(hue: CGFloat) -> UIImage {
        
        // angle
        
        let angle = deg2rad(hue * 360)
                
        // cgImage
        
        guard let cgImage = self.cgImage else { return self }
    
        // filter
        
        guard let filter = CIFilter(name: "CIHueAdjust") else { return self }
    
        filter.setValue(CIImage(cgImage: cgImage), forKey: kCIInputImageKey)
        
        // Hue
        
        filter.setValue(angle, forKey: kCIInputAngleKey)
    
        // result
        
        guard let result = filter.value(forKey: kCIOutputImageKey) as? CIImage else { return self }
    
        guard let newCgImage = CIContext(options: nil).createCGImage(result, from: result.extent) else { return self }
    
        return UIImage(cgImage: newCgImage, scale: self.scale, orientation: imageOrientation)
    
    }
    
    func deg2rad(_ number: CGFloat) -> CGFloat {
        
        return (number * .pi) / 180
    
    }

}

使用方法

    let myImage = UIImage.init(named: "someImage")
    
    let hueAdjustedImage = myImage?.withHueAdjustment(hue: 0.4)

网页内容由stack overflow 提供, 点击上面的
可以查看英文原文,
原文链接