我对图像处理非常陌生。我需要在我的iPhone应用程序项目中实现色调效果。因此,我需要改变UIImage的色调。请提供任何关于此的示例代码或教程链接。
先行致谢
我对图像处理非常陌生。我需要在我的iPhone应用程序项目中实现色调效果。因此,我需要改变UIImage的色调。请提供任何关于此的示例代码或教程链接。
先行致谢
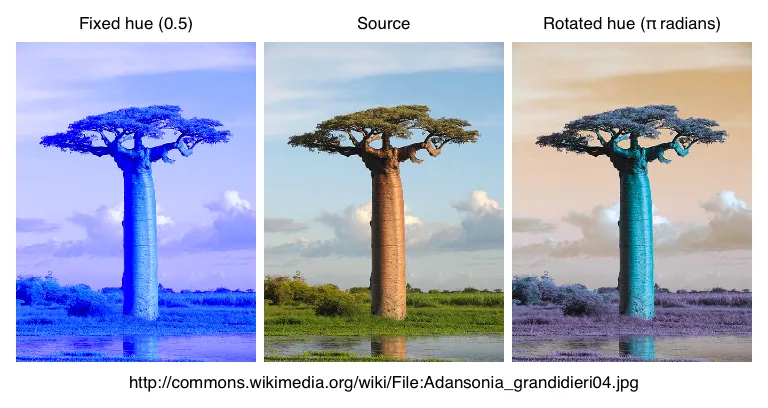
首先,您需要决定是将图像设置为固定色调还是旋转现有的色调。下面分别展示了这两种情况的示例。
使用标准绘图工具可以实现固定色调 - 只需确保混合模式设置为kCGBlendModeHue,并使用适当的色调进行绘制即可。这种方法源自Nitish的解决方案,尽管我发现将饱和度设为小于1.0会导致结果不一致。该方法允许改变alpha,但对于真正的非100%饱和度,您可能需要进行第二轮绘制。
- (UIImage*) imageWithImage:(UIImage*) source fixedHue:(CGFloat) hue alpha:(CGFloat) alpha;
// Note: the hue input ranges from 0.0 to 1.0, both red.  Values outside this range will be clamped to 0.0 or 1.0.
{
    // Find the image dimensions.
    CGSize imageSize = [source size];
    CGRect imageExtent = CGRectMake(0,0,imageSize.width,imageSize.height);

    // Create a context containing the image.
    UIGraphicsBeginImageContext(imageSize);
    CGContextRef context = UIGraphicsGetCurrentContext();
    [source drawAtPoint:CGPointMake(0,0)];

    // Draw the hue on top of the image.
    CGContextSetBlendMode(context, kCGBlendModeHue);
    [[UIColor colorWithHue:hue saturation:1.0 brightness:1 alpha:alpha] set];
    UIBezierPath *imagePath = [UIBezierPath bezierPathWithRect:imageExtent];
    [imagePath fill];

    // Retrieve the new image.
    UIImage *result = UIGraphicsGetImageFromCurrentImageContext();
    UIGraphicsEndImageContext();

    return result;
}
为了旋转色调,你需要使用Core Image滤镜。 下面的代码将UIImage转换为CIImage,然后将结果再次转换为UIImage以供显示。根据图像的来源,您可以避免其中一个或两个步骤。
方便的是,《Core Image编程指南:使用Core Image滤镜》中的第一个示例就使用了CIHueAdjust滤镜。
// #import <CoreImage/CoreImage.h>
// Partially from https://developer.apple.com/library/mac/#documentation/graphicsimaging/conceptual/CoreImaging/ci_tasks/ci_tasks.html
- (UIImage*) imageWithImage:(UIImage*) source rotatedByHue:(CGFloat) deltaHueRadians;
{
    // Create a Core Image version of the image.
    CIImage *sourceCore = [CIImage imageWithCGImage:[source CGImage]];

    // Apply a CIHueAdjust filter
    CIFilter *hueAdjust = [CIFilter filterWithName:@"CIHueAdjust"];
    [hueAdjust setDefaults];
    [hueAdjust setValue: sourceCore forKey: @"inputImage"];
    [hueAdjust setValue: [NSNumber numberWithFloat: deltaHueRadians] forKey: @"inputAngle"];
    CIImage *resultCore = [hueAdjust valueForKey: @"outputImage"];

    // Convert the filter output back into a UIImage.
    // This section from https://dev59.com/6msz5IYBdhLWcg3wmo9a#7797578
    CIContext *context = [CIContext contextWithOptions:nil];
    CGImageRef resultRef = [context createCGImage:resultCore fromRect:[resultCore extent]];
    UIImage *result = [UIImage imageWithCGImage:resultRef];
    CGImageRelease(resultRef);

    return result;
}
- (void) changeToHue:(float)hue saturation:(float)saturation {
    UIGraphicsBeginImageContext(self.bounds.size);
    CGContextRef context = UIGraphicsGetCurrentContext();
    UIView *hueBlend = [[UIView alloc] initWithFrame:self.bounds];
    hueBlend.backgroundColor = [UIColor colorWithHue:hue saturation:saturation brightness:1 alpha:1];
    CGContextDrawImage(context, self.bounds, self.image.CGImage);
    CGContextSetBlendMode(context, kCGBlendModeHue);
    [hueBlend.layer renderInContext:context];
    self.image = UIGraphicsGetImageFromCurrentImageContext();
    UIGraphicsEndImageContext();
}
func applyHue(source: UIImage) -> UIImage {
    // Create a place to render the filtered image
    let context = CIContext(options: nil)

    // Create an image to filter
    let inputImage = CIImage(image: source)

    // Create a random color to pass to a filter
    let randomColor = [kCIInputAngleKey: (Double(arc4random_uniform(314)) / 100)]

    // Apply a filter to the image
    let filteredImage = inputImage!.imageByApplyingFilter("CIHueAdjust", withInputParameters: randomColor)

    // Render the filtered image
    let renderedImage = context.createCGImage(filteredImage, fromRect: filteredImage.extent)

    // Return a UIImage
    return UIImage(CGImage: renderedImage)
}
- (UIImage*) imageWithImage:(NSString *)name fixedHue:(CGFloat) hue alpha:(CGFloat) alpha;
// Note: the hue input ranges from 0.0 to 1.0, both red.  Values outside this range will be clamped to 0.0 or 1.0.
{
    UIImage *source = [UIImage imageNamed:name];

    // Find the image dimensions.
    CGSize imageSize = [source size];
    CGRect imageExtent = CGRectMake(0,0,imageSize.width,imageSize.height);

    // Create a context containing the image.
    UIGraphicsBeginImageContext(imageSize);
    CGContextRef context = UIGraphicsGetCurrentContext();

    [source drawAtPoint:CGPointMake(0,0)];

    // Setup a clip region using the image
    CGContextSaveGState(context);
    CGContextTranslateCTM(context, 0, source.size.height);
    CGContextScaleCTM(context, 1.0, -1.0);
    CGContextClipToMask(context, imageExtent, source.CGImage);

    //[[UIColor colorWithHue:hue saturation:1.0 brightness:1 alpha:alpha] set];
    CGContextFillRect(context, imageExtent);

    // Draw the hue on top of the image.
    CGContextDrawImage(context, imageExtent, source.CGImage);
    CGContextSetBlendMode(context, kCGBlendModeHue);
    [[UIColor colorWithHue:hue saturation:1.0 brightness:1 alpha:alpha] set];
    UIBezierPath *imagePath = [UIBezierPath bezierPathWithRect:imageExtent];
    [imagePath fill];

    CGContextRestoreGState(context); // remove clip region

    // Retrieve the new image.
    UIImage *result = UIGraphicsGetImageFromCurrentImageContext();
    UIGraphicsEndImageContext();

    return result;
}
感谢以下贡献者:
UIGraphicsBeginImageContext(imageSize) 更改为 UIGraphicsBeginImageContextWithOptions(imageSize, NO, 0.0),以便在不同设备上维护图像缩放比例。当然,如果需要,不透明度布尔值可以不同。 - BFeherDondragmer的上述旋转代码的Swift版本
// Convert the filter output back into a UIImage.
// This section from https://dev59.com/6msz5IYBdhLWcg3wmo9a#7797578
func imageWithImage(source: UIImage, rotatedByHue: CGFloat) -> UIImage {
    // Create a Core Image version of the image.
    let sourceCore = CIImage(CGImage: source.CGImage)
    // Apply a CIHueAdjust filter
    let hueAdjust = CIFilter(name: "CIHueAdjust")
    hueAdjust.setDefaults()
    hueAdjust.setValue(sourceCore, forKey: "inputImage")
    hueAdjust.setValue(CGFloat(rotatedByHue), forKey: "inputAngle")
    let resultCore  = hueAdjust.valueForKey("outputImage") as CIImage!
    let context = CIContext(options: nil)
    let resultRef = context.createCGImage(resultCore, fromRect: resultCore!.extent())
    let result = UIImage(CGImage: resultRef)
    return result!
}
针对Swift 5.0,更新自@JonLoard
 func changeHue(_ image: UIImage, hueValue:CGFloat)->UIImage?{
    if let sourceCGImage = image.cgImage{
        let sourceCore = CIImage(cgImage: sourceCGImage)
        // Apply a CIHueAdjust filter
        let hueAdjust = CIFilter(name: "CIHueAdjust")
        hueAdjust?.setDefaults()
        hueAdjust?.setValue(sourceCore, forKey: "inputImage")
        hueAdjust?.setValue(CGFloat(hueValue), forKey: "inputAngle")
        if let resultCore  = hueAdjust?.value(forKey: "outputImage") as? CIImage{
            let context = CIContext(options: nil)
            if let resultRef = context.createCGImage(resultCore, from: resultCore.extent){
                let result = UIImage(cgImage: resultRef,scale: 1,orientation: image.imageOrientation)
                return result
            }
        }

    }
    return image
}