泛洪填充算法 - 排除边缘

3

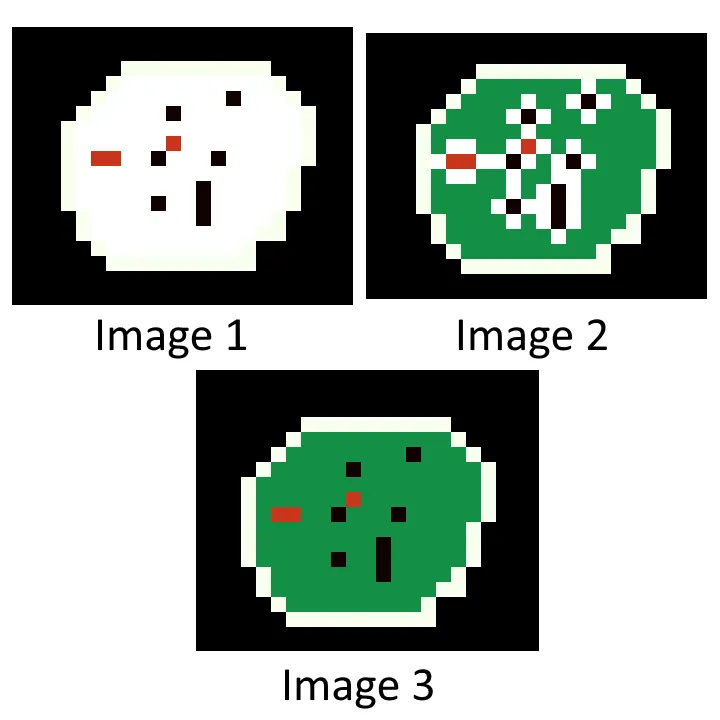
到目前为止,我已经实现了一个泛洪填充算法。我想要调整它,使它不包括边缘。为了演示这个问题,我上传了一张图片:

Image

图1是我要修改的图片。图3是我的算法应该完成的效果。图2是当前的结果。

因此,在这种情况下,目标颜色是白色,替换颜色是绿色;

以下是我迄今为止所做的伪代码。

doFloodFill(x,y,targetColor,replacementcolor) {

    if (x and y not in bounds of image) {
       return
    }

    if (color(x,y) IS NOT targetColor) {
       return
    }

    if (color(x+1, y) IS NOT targetColorOfFloodFill AND color(x+1, y) IS NOT replacementColor OR
        color(x-1, y) IS NOT targetColorOfFloodFill AND color(x-1, y) IS NOT replacementColor OR
        color(x, y+1) IS NOT targetColorOfFloodFill AND color(x, y+1) IS NOT replacementColor OR
        color(y, y-1) IS NOT targetColorOfFloodFill AND color(x, y-1) IS NOT replacementColor) {
        return;
    }

    image.setColor(x, y, replacementColor)

    doFloodFill(x+3,y,targetcolor,replacementcolor)
    doFloodFill(x-3,y,targetcolor,replacementcolor)
    doFloodFill(x,y+3,targetcolor,replacementcolor)
    doFloodFill(x,y-3,targetcolor,replacementcolor)
}

这个调整已经应用到我的泛洪填充算法中。如果省略它,将得到一个没有问题的泛洪填充算法。实际上的问题是:如何区分边缘像素和区域内不同颜色的像素?
P.S:我们可以假设x、y从区域内部开始。

1
color(x+1) 是什么?你是不是想写 color(x+1,y) - Cris Luengo
是的,那就是它的意思,我会进行编辑。 - man420
3
如果您发布实际、可工作和完整的代码,您将获得最佳回复。伪代码和代码片段很难处理。参见[mre]。 - Cris Luengo
你说图像2是期望的结果,而图像3是实际的结果。也许你是想说反过来吧?不是说一定是这样,但这样可能更有意义(虽然我可能会误解)。另外,如上所述,一个自包含的示例会很有帮助。(你可以将输出打印到控制台以最小化依赖关系。) - scg
是的,对不起,你是正确的。2 是期望的结果。我现在已经添加了我的泛洪填充方法,这应该会更有见地。 - man420
1
一个可能的解决方案是对感兴趣区域(例如你的例子中的黑色外部区域)进行泛洪填充。每当泛洪填充停止(例如由于白色像素),将停止泛洪填充的像素标记为边缘像素。然后对内部进行泛洪填充,并在到达标记为边缘像素的像素时停止。也许其他人会提供更好的方法,但这是我首先想到的。 - scg
2个回答

3

首先,以图像1左上角的像素为起点,使用一种您还没有使用过的颜色(例如紫色)或在填充期间构建掩模来填充黑色外部区域。

然后,像往常一样对中心对象中的白色区域进行普通洪水填充,无需调整算法。

最后,遍历第二次填充中的所有像素,并将与第一次填充相邻的像素再次变为白色。

您已经达到了目标。如果您没有使用掩模,请确保将第一次填充的区域重新涂黑。

不需要调整洪水填充算法。


1
scg之前已经有了相同或非常相似的想法,并在问题下面发布了评论。在发布这个答案之前,我没有看过它,但当然应该给他以荣誉。 - Trilarion

3

我建议采用填充反色的方法。

还有另一个想法:

  • 像通常一样使用Floodfill进行填充
  • 跟踪边缘中的一个像素:例如最上方的像素
  • 然后像寻找出口的老鼠一样沿着边缘走,将其重新变为白色。

const canvas = document.querySelector('canvas');

const M = `
00000000000000000000
00000110011111110000
00001111111110000000
00011111111111100000
00111111111101110010
01111111101111110010
01111111111111110110
01111111111111111110
01111111111111111100
01111111111111111100
01111111111111111100
01111111111111111000
00111111111111111000
00111111111111110000
00011111111111100000
00000000000000000000
`.trim().split('\n').map(x=>x.trim().split('').map(x=>parseInt(x)))

const mat = ({ x, y }, v) => {
  if (v) {
    M[y][x] = v
  }
  return M[y][x]
}
const left = ({x,y}) => ({ x: y, y: -x })
const right = ({x,y}) => ({ x: -y, y: x })
const back = ({x, y}) => ({ x: -x, y: -y})
const front = (pos, { x, y }) => ({ x: pos.x + x, y: pos.y + y })
const splinter = { 
  pos: {
    x: 5, 
    y: 1
  },
  orig: {
    x: 5,
    y: 1
  },
  dir: { x: 1, y: 0 },
  atStart() {
    return this.pos.x === this.orig.x && this.pos.y === this.orig.y
  },
  move () {
    if (this.atStart() && mat(this.pos) === 2) { return false }
    // wall on left
    if (mat(front(this.pos, left(this.dir))) === 0) {
      // wall on front
      if (mat(front(this.pos, this.dir)) === 0) {
        // wall on right
        if (mat(front(this.pos, right(this.dir))) === 0) {
          this.dir = back(this.dir)
        } else {
          this.dir = right(this.dir)
        }
      }
      this.poop()
    } else {
      this.dir = left(this.dir)
    }
    this.moveForward()
    return true
  },
  moveForward () {
    this.pos.x += this.dir.x
    this.pos.y += this.dir.y
  },
  poop () {
    mat({ x: this.pos.x, y: this.pos.y }, 2)
  },
  sprite () {
    if (this.atStart()) { return 'X' }
    if (this.dir.x === -1 && this.dir.y === 0) { return '←' }
    if (this.dir.x === 1 && this.dir.y === 0) { return '→'}
    if (this.dir.x === 0 && this.dir.y === 1) { return '↓' }
    if (this.dir.x === 0 && this.dir.y === -1) { return '↑' }
  }
}

function redraw () {
  const ctx = canvas.getContext('2d')
  const dw = canvas.width / M[0].length
  const dh = canvas.height / M.length
  const fill = ({ x, y }, color) => {
    ctx.fillStyle = color
    ctx.fillRect(x * dw, y * dh, dw, dh)
  }
  const colors = {
    1: 'green',
    0: 'black',
    2: 'white'
  }
  M.forEach((row, i) => {
    row.forEach((el, j) => {
      fill({ x: j, y: i }, colors[el])
    })
  })
  const char = splinter.sprite()
  ctx.strokeText(char, (splinter.pos.x + 0.1) * dw, (splinter.pos.y + 0.8) * dh)
}
redraw()
document.querySelector('button').onclick = _ => {
  splinter.move(); redraw()
}
document.querySelector('button.allmoves').onclick = _ => {
  while(splinter.move()){}
  redraw()
}
canvas{background:#eeeeee;}
<canvas width="160" height="160"></canvas>
<button>move, rat</button>
<button class="allmoves">move for your life, rat</button>

好主意。第二步有一个小缺口。你怎么才能从外边框开始获取单个像素? - Trilarion
1
@Trilarion 当进行泛洪填充(在操作中:image.setColor(x,y))时,我们只需要保持最顶部:topPixel = topPixel.x < x? topPixel: {x, y} - grodzi
谢谢,这就是我最终实现的。非常感谢你。 - man420
1
很高兴能够帮到你!我建议你考虑使用Tilarion提出的方法,原因是已经存在现有的泛洪算法,所以你不必自己实现任何算法(即使要考虑更多像素,也有现有的低级实现可以让它更快!)。另外,可能1像素的腐蚀就能解决问题(尽管我没有测试过)。 - grodzi
有一个问题。当鼠标经过宽度为1像素的通道时,似乎会卡住,你知道如何解决吗? - man420
如果你看一下我的回答,这是一个应该由鼠标解决的场景,但正如你所看到的,它并没有起作用。 - man420

网页内容由stack overflow 提供, 点击上面的
可以查看英文原文,
原文链接