据我所知,目前无法以这种方式使用对齐指南。希望不久将来能够实现,但在此期间,我们可以通过一些填充和叠加技巧来实现所需效果。
注意事项:
- 您需要有某种检索字体度量的方法——我正在使用
CTFont初始化我的
Font实例并通过此方式检索度量。
- 就我所知,Playgrounds并不能总是代表SwiftUI布局在设备上的布局方式,并且会出现某些不一致之处。我已经确定的一个问题是,在playgrounds甚至预览中,默认情况下未正确设置
displayScale环境值(以及派生的
pixelLength值)。因此,在这些环境中,如果您想要一个代表性的布局(FB7280058),则必须手动设置它。
概述:
我们将结合一些SwiftUI功能来实现所需结果。具体来说,是变换、叠加和
GeometryReader视图。
首先,我们将使字形的基线与视图的基线对齐。如果我们有字体度量,我们可以使用字体的“下降”将我们的字形向下移动一点,使其与基线齐平——我们可以使用
padding视图修饰符来帮助我们完成此操作。
接下来,我们将用重复视图覆盖我们的字形视图。为什么?因为在叠加中,我们能够获取底部视图的精确度量。实际上,我们的叠加将是用户看到的唯一视图,原始视图只用于其度量。
一些简单的变换将把我们的覆盖层定位到我们想要的位置,然后隐藏底下的视图以完成效果。
步骤1:设置
首先,我们需要一些额外的属性来帮助我们进行计算。在一个正式的项目中,您可以将其组织成视图修饰符或类似的内容,但为了简洁起见,我们将它们添加到现有视图中。
@Environment(\.pixelLength) var pixelLength: CGFloat
@Environment(\.displayScale) var displayScale: CGFloat
我们还需要将字体初始化为
CTFont,以便我们可以获取其指标:
let baseFont: CTFont = {
    let desc = CTFontDescriptorCreateWithNameAndSize("SFProDisplay-Medium" as CFString, 0)
    return CTFontCreateWithFontDescriptor(desc, 48, nil)
}()
然后进行一些计算。这些计算会为文本视图计算一些EdgeInsets,从而将文本视图的基线移动到包含填充视图的底部边缘:
var textPadding: EdgeInsets {
    let baselineShift = (displayScale * baseFont.descent).rounded(.down) / displayScale
    let baselineOffsetInsets = EdgeInsets(top: baselineShift, leading: 0, bottom: -baselineShift, trailing: 0)
    return baselineOffsetInsets
}
我们还将向CTFont添加一些辅助属性:
extension CTFont {
    var ascent: CGFloat { CTFontGetAscent(self) }
    var descent: CGFloat { CTFontGetDescent(self) }
}
最后,我们创建一个新的辅助函数来生成我们的文本视图,该函数使用我们上面定义的CTFont:
private func glyphView(for text: String) -> some View {
    Text(verbatim: text)
        .font(Font(baseFont))
}
步骤二:在主体body中使用我们的glyphView(_:)
这一步很简单,让我们使用我们上面定义的glyphView(_:)辅助函数:
var body: some View {
ZStack {
ForEach(locations) { run in
self.glyphView(for: run.string)
.border(Color.green, width: self.pixelLength)
.position(run.point)
Circle()
.frame(maxWidth: 5)
.foregroundColor(.red)
.position(run.point)
}
}
}
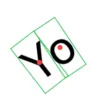
这将带我们到这里:
步骤三:基线偏移
接下来,我们将文本视图的基线偏移,使其与包含填充视图的底部对齐。这只需要在我们新的glyphView(_:)函数中添加一个填充修饰符,利用我们上面定义的填充计算即可。
private func glyphView(for text: String) -> some View {
Text(verbatim: text)
.font(Font(baseFont))
.padding(textPadding)
}
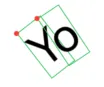
注意到字形现在与其所属视图的底部对齐。
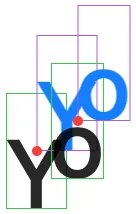
第四步:添加覆盖
我们需要获取字形的度量,以便能够准确地放置它。但是,在布局视图之前,我们无法获取这些指标。解决这个问题的一种方法是复制我们的视图并使用一个作为度量来源但又隐藏的视图,然后呈现一个重复的视图,我们使用已收集的指标来定位它。
我们可以使用覆盖修饰符和
GeometryReader视图来实现此目的。我们还将添加紫色边框并使我们的覆盖文本蓝色以区分它与前一步骤。
self.glyphView(for: run.string)
    .border(Color.green, width: self.pixelLength)
    .overlay(GeometryReader { geometry in
        self.glyphView(for: run.string)
            .foregroundColor(.blue)
            .border(Color.purple, width: self.pixelLength)
    })
    .position(run.point)
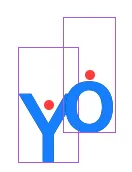
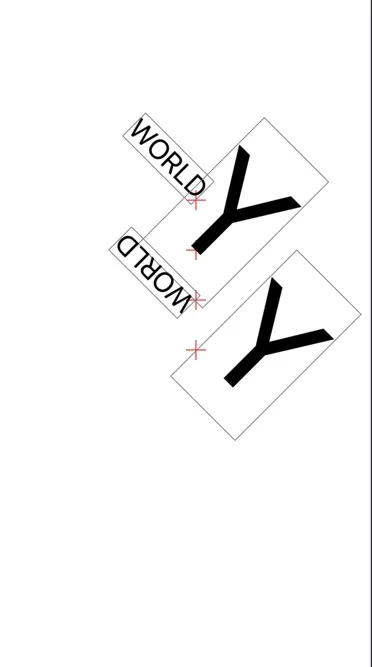
步骤五:翻译
利用我们现在可以使用的指标,我们可以将叠加层向上和向右移动,以便字形视图的左下角位于我们的红色定位点上方。
self.glyphView(for: run.string)
    .border(Color.green, width: self.pixelLength)
    .overlay(GeometryReader { geometry in
        self.glyphView(for: run.string)
            .foregroundColor(.blue)
            .border(Color.purple, width: self.pixelLength)
            .transformEffect(.init(translationX: geometry.size.width / 2, y: -geometry.size.height / 2))
    })
    .position(run.point)
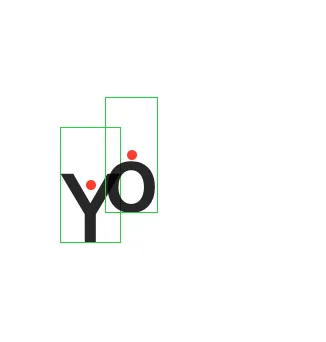
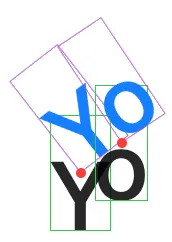
步骤6:旋转
现在我们的视图已经就位,我们终于可以进行旋转了。
self.glyphView(for: run.string)
    .border(Color.green, width: self.pixelLength)
    .overlay(GeometryReader { geometry in
        self.glyphView(for: run.string)
            .foregroundColor(.blue)
            .border(Color.purple, width: self.pixelLength)
            .transformEffect(.init(translationX: geometry.size.width / 2, y: -geometry.size.height / 2))
            .rotationEffect(.radians(run.angle))
    })
    .position(run.point)
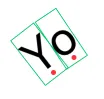
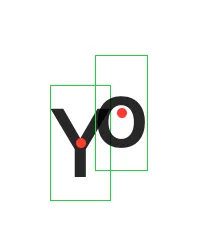
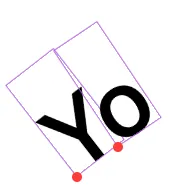
步骤七:隐藏我们的操作过程
最后一步是隐藏我们的源代码视图,并将覆盖层图标设置为其适当的颜色:
self.glyphView(for: run.string)
    .border(Color.green, width: self.pixelLength)
    .hidden()
    .overlay(GeometryReader { geometry in
        self.glyphView(for: run.string)
            .foregroundColor(.black)
            .border(Color.purple, width: self.pixelLength)
            .transformEffect(.init(translationX: geometry.size.width / 2, y: -geometry.size.height / 2))
            .rotationEffect(.radians(run.angle))
    })
    .position(run.point)
最终代码
import SwiftUI
import PlaygroundSupport
struct Location: Identifiable {
let id = UUID()
let point: CGPoint
let angle: Double
let string: String
}
let locations = [
Location(point: CGPoint(x: 54.48386479999999, y: 296.4645408), angle: -0.6605166885682314, string: "Y"),
Location(point: CGPoint(x: 74.99159120000002, y: 281.6336352), angle: -0.589411952788817, string: "o"),
]
struct ContentView: View {
@Environment(\.pixelLength) var pixelLength: CGFloat
@Environment(\.displayScale) var displayScale: CGFloat
let baseFont: CTFont = {
let desc = CTFontDescriptorCreateWithNameAndSize("SFProDisplay-Medium" as CFString, 0)
return CTFontCreateWithFontDescriptor(desc, 48, nil)
}()
var textPadding: EdgeInsets {
let baselineShift = (displayScale * baseFont.descent).rounded(.down) / displayScale
let baselineOffsetInsets = EdgeInsets(top: baselineShift, leading: 0, bottom: -baselineShift, trailing: 0)
return baselineOffsetInsets
}
var body: some View {
ZStack {
ForEach(locations) { run in
self.glyphView(for: run.string)
.border(Color.green, width: self.pixelLength)
.hidden()
.overlay(GeometryReader { geometry in
self.glyphView(for: run.string)
.foregroundColor(.black)
.border(Color.purple, width: self.pixelLength)
.transformEffect(.init(translationX: geometry.size.width / 2, y: -geometry.size.height / 2))
.rotationEffect(.radians(run.angle))
})
.position(run.point)
Circle()
.frame(maxWidth: 5)
.foregroundColor(.red)
.position(run.point)
}
}
}
private func glyphView(for text: String) -> some View {
Text(verbatim: text)
.font(Font(baseFont))
.padding(textPadding)
}
}
private extension CTFont {
var ascent: CGFloat { CTFontGetAscent(self) }
var descent: CGFloat { CTFontGetDescent(self) }
}
PlaygroundPage.current.setLiveView(
ContentView()
.environment(\.displayScale, NSScreen.main?.backingScaleFactor ?? 1.0)
.frame(width: 640, height: 480)
.background(Color.white)
)
就是这样。虽然不完美,但在SwiftUI提供允许我们使用对齐锚点来锚定转换的API之前,它可能会帮助我们解决问题!