我以
http://tympanus.net/codrops/2014/10/30/resizing-cropping-images-canvas/这个教程为例,在纯JS中完成了相同的操作。它可能需要一些重构,但它可以工作(至少在我的Windows笔记本电脑上使用Chrome浏览器)。
一个HTML文件:
<!DOCTYPE html>
<html lang="en">
<head>
<meta charset="UTF-8">
<meta name="viewport" content="width=device-width, initial-scale=1.0">
<title>Document</title>
<style>
* {
margin: 0;
padding: 0;
box-sizing: border-box;
}
.resize-container {
position: relative;
display: inline-block;
cursor: move;
margin: 0 auto;
top: 0;
left: 0;
}
.resize-container img {
display: block
}
.resize-container:hover img,
.resize-container:active img {
outline: 2px dashed rgba(222,60,80,.9);
}
.resize-handle-ne,
.resize-handle-se,
.resize-handle-nw,
.resize-handle-sw {
position: absolute;
display: block;
width: 10px;
height: 10px;
background: rgba(222, 60, 80, .9);
z-index: 999;
}
.resize-handle-nw {
top: -5px;
left: -5px;
cursor: nw-resize;
}
.resize-handle-sw {
bottom: -5px;
left: -5px;
cursor: sw-resize;
}
.resize-handle-ne {
top: -5px;
right: -5px;
cursor: ne-resize;
}
.resize-handle-se {
bottom: -5px;
right: -5px;
cursor: se-resize;
}
.overlay {
position: absolute;
left: 50%;
top: 50%;
margin-left: -100px;
margin-top: -100px;
z-index: 999;
width: 200px;
height: 200px;
border: solid 2px rgba(222,60,80,.9);
box-sizing: content-box;
pointer-events: none;
}
.overlay:after,
.overlay:before {
content: '';
position: absolute;
display: block;
width: 204px;
height: 40px;
border-left: dashed 2px rgba(222,60,80,.9);
border-right: dashed 2px rgba(222,60,80,.9);
}
.overlay:before {
top: 0;
margin-left: -2px;
margin-top: -40px;
}
.overlay:after {
bottom: 0;
margin-left: -2px;
margin-bottom: -40px;
}
.overlay-inner:after,
.overlay-inner:before {
content: '';
position: absolute;
display: block;
width: 40px;
height: 204px;
border-top: dashed 2px rgba(222,60,80,.9);
border-bottom: dashed 2px rgba(222,60,80,.9);
}
.overlay-inner:before {
left: 0;
margin-left: -40px;
margin-top: -2px;
}
.overlay-inner:after {
right: 0;
margin-right: -40px;
margin-top: -2px;
}
.btn-crop {
position: absolute;
vertical-align: bottom;
right: 5px;
bottom: 5px;
padding: 6px 10px;
z-index: 999;
background-color: rgb(222,60,80);
border: none;
border-radius: 5px;
color: #FFF;
}
#result {
position: absolute;
top: 0;
left: 0;
width: 100vw;
height: 150vh;
z-index: -1;
display: flex;
align-items: flex-end;
}
</style>
</head>
<body>
<div id="resize-container" class="resize-container">
<span class="resize-handle resize-handle-nw"></span>
<span class="resize-handle resize-handle-ne"></span>
<span class="resize-handle resize-handle-sw"></span>
<span class="resize-handle resize-handle-se"></span>
<img id="img" class="resize-image" src="image.png" alt="Image" />
</div>
<div id="overlay" class="overlay">
<div class="overlay-inner">
</div>
</div>
<button id="js-crop" class="btn-crop">Crop</button>
<div id="result"></div>
<script>
const resizeableImage = image_target => {
let constrain = false
const overlay = document.getElementById('overlay')
const cropBtn = document.getElementById('js-crop')
const container = document.getElementById('resize-container')
const orig_src = new Image()
const event_state = {}
const min_width = 60
const min_height = 60
const max_width = 800
const max_height = 900
const resize_canvas = document.createElement('canvas')
const resizeImage = (width, height) => {
resize_canvas.width = width
resize_canvas.height = height
resize_canvas.getContext('2d').drawImage(orig_src, 0, 0, width, height)
image_target.src = resize_canvas.toDataURL("image/png")
}
const resizing = e => {
let width, height, left, top
const rec = container.getBoundingClientRect()
const offset = {
top: rec.top + window.scrollY,
left: rec.left + window.scrollX
}
const mouse = {
x: (e.clientX || e.pageX || e.originalEvent.touches[0].clientX) + window.screenLeft,
y: (e.clientY || e.pageY || e.originalEvent.touches[0].clientY) + window.screenTop
}
const eTargetClass = event_state.evnt.target.classList[1]
if (eTargetClass === 'resize-handle-se') {
width = mouse.x - event_state.container_left
height = mouse.y - event_state.container_top
left = event_state.container_left
top = event_state.container_top
} else if (eTargetClass === 'resize-handle-sw') {
width = event_state.container_width - (mouse.x - event_state.container_left)
height = mouse.y - event_state.container_top
left = mouse.x
top = event_state.container_top
} else if (eTargetClass === 'resize-handle-ne') {
width = mouse.x - event_state.container_left
height = event_state.container_height - (mouse.y - event_state.container_top)
left = event_state.container_left
top = mouse.y
if(constrain || e.shiftKey){
top = mouse.y - ((width / orig_src.width * orig_src.height) - height)
}
} else if (eTargetClass === 'resize-handle-nw') {
width = event_state.container_width - (mouse.x - event_state.container_left)
height = event_state.container_height - (mouse.y - event_state.container_top)
left = mouse.x
top = mouse.y
if(constrain || e.shiftKey){
top = mouse.y - ((width / orig_src.width * orig_src.height) - height)
}
}
if (constrain || e.shiftKey) {
height = width / orig_src.width * orig_src.height
}
if (width > min_width && height > min_height && width < max_width && height < max_height) {
container.style.top = `${top}px`
container.style.left = `${left}px`
resizeImage(width, height)
}
}
const saveEventState = e => {
event_state.container_width = container.getBoundingClientRect().width
event_state.container_height = container.getBoundingClientRect().height
event_state.container_left = container.offsetLeft
event_state.container_top = container.offsetTop
event_state.mouse_x = (e.clientX || e.pageX || e.originalEvent.touches[0].clientX) + window.screenLeft,
event_state.mouse_y = (e.clientY || e.pageY || e.originalEvent.touches[0].clientY) + window.screenTop,
event_state.evnt = e
}
const startResize = e => {
e.preventDefault()
e.stopPropagation()
saveEventState(e)
document.addEventListener('mousemove', resizing)
document.addEventListener('mouseup', endResize)
}
const endResize = e => {
e.preventDefault()
document.removeEventListener('mousemove', resizing)
document.removeEventListener('touchend', resizing)
document.removeEventListener('mouseup', endResize)
document.removeEventListener('touchmove', endResize)
}
const moving = e => {
const mouse = {
x: (e.clientX || e.pageX) + window.screenLeft,
y: (e.clientY || e.pageY) + window.screenTop
}
container.style.left = `${mouse.x - (event_state.mouse_y - event_state.container_top)}px`
container.style.top = `${mouse.y - (event_state.mouse_y - event_state.container_top)}px`
}
const startMoving = e => {
e.preventDefault()
e.stopPropagation()
saveEventState(e)
document.addEventListener('mousemove', moving)
document.addEventListener('mouseup', endMoving)
}
const endMoving = e => {
e.preventDefault()
document.removeEventListener('mouseup', endMoving)
document.removeEventListener('mousemove', moving)
}
const crop = e => {
const left = overlay.offsetLeft - container.offsetLeft
const top = overlay.offsetTop - container.offsetTop
const width = overlay.getBoundingClientRect().width
const height = overlay.getBoundingClientRect().height
const crop_canvas = document.createElement('canvas')
crop_canvas.width = width
crop_canvas.height = height
crop_canvas.getContext('2d').drawImage(image_target, left, top, width, height, 0, 0, width, height)
const croppedImage = document.createElement('img')
croppedImage.src = crop_canvas.toDataURL("image/png")
document.querySelector('#result').appendChild(croppedImage)
}
const init = () => {
orig_src.src = image_target.src
container.addEventListener('mousedown', startResize)
image_target.addEventListener('mousedown', startMoving)
cropBtn.addEventListener('click', crop)
}
init()
}
const image = document.getElementById('img')
resizeableImage(image)
</script>
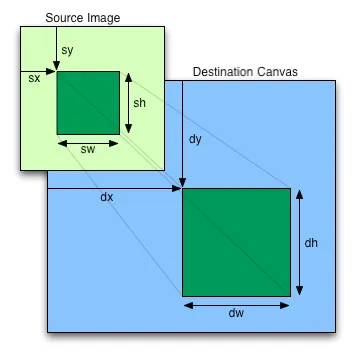
O画布被裁剪后,如何将其调整为20x20尺寸? - LewisdrawImage调用的最后两个参数中设置大小(例如,在我最后一个示例中,100, 100是所需的宽度/高度)。 - Cerbrus