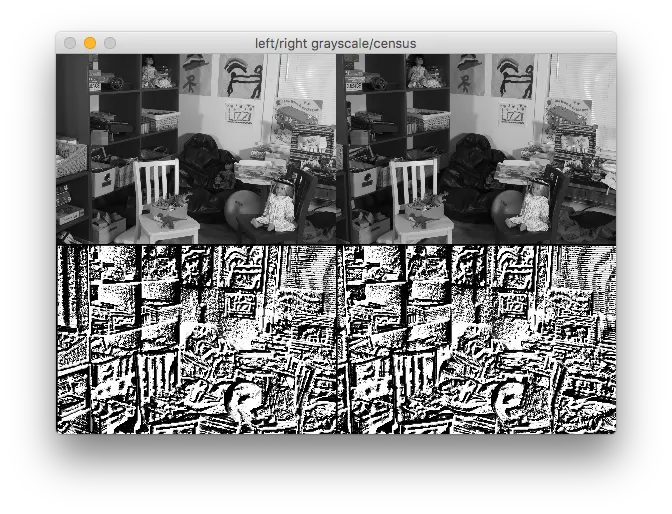
使用numpy和OpenCV的Python 3代码。增加了处理不同窗口大小和生成立体图像之间成本差异的能力。下面是在Middlebury 2014立体图像集(Playroom-perfect)上展示的转换示例。
import numpy as np
import cv2
def transform(image, window_size=3):
"""
Take a gray scale image and for each pixel around the center of the window generate a bit value of length
window_size * 2 - 1. window_size of 3 produces bit length of 8, and 5 produces 24.
The image gets border of zero padded pixels half the window size.
Bits are set to one if pixel under consideration is greater than the center, otherwise zero.
:param image: numpy.ndarray(shape=(MxN), dtype=numpy.uint8)
:param window_size: int odd-valued
:return: numpy.ndarray(shape=(MxN), , dtype=numpy.uint8)
>>> image = np.array([ [50, 70, 80], [90, 100, 110], [60, 120, 150] ])
>>> np.binary_repr(transform(image)[0, 0])
'1011'
>>> image = np.array([ [60, 75, 85], [115, 110, 105], [70, 130, 170] ])
>>> np.binary_repr(transform(image)[0, 0])
'10011'
"""
half_window_size = window_size // 2
image = cv2.copyMakeBorder(image, top=half_window_size, left=half_window_size, right=half_window_size, bottom=half_window_size, borderType=cv2.BORDER_CONSTANT, value=0)
rows, cols = image.shape
census = np.zeros((rows - half_window_size * 2, cols - half_window_size * 2), dtype=np.uint8)
center_pixels = image[half_window_size:rows - half_window_size, half_window_size:cols - half_window_size]
offsets = [(row, col) for row in range(half_window_size) for col in range(half_window_size) if not row == half_window_size + 1 == col]
for (row, col) in offsets:
census = (census << 1) | (image[row:row + rows - half_window_size * 2, col:col + cols - half_window_size * 2] >= center_pixels)
return census
def column_cost(left_col, right_col):
"""
Column-wise Hamming edit distance
Also see https://www.youtube.com/watch?v=kxsvG4sSuvA&feature=youtu.be&t=1032
:param left: numpy.ndarray(shape(Mx1), dtype=numpy.uint)
:param right: numpy.ndarray(shape(Mx1), dtype=numpy.uint)
:return: numpy.ndarray(shape(Mx1), dtype=numpy.uint)
>>> image = np.array([ [50, 70, 80], [90, 100, 110], [60, 120, 150] ])
>>> left = transform(image)
>>> image = np.array([ [60, 75, 85], [115, 110, 105], [70, 130, 170] ])
>>> right = transform(image)
>>> column_cost(left, right)[0, 0]
2
"""
return np.sum(np.unpackbits(np.bitwise_xor(left_col, right_col), axis=1), axis=1).reshape(left_col.shape[0], left_col.shape[1])
def cost(left, right, window_size=3, disparity=0):
"""
Compute cost difference between left and right grayscale images. Disparity value can be used to assist with evaluating stereo
correspondence.
:param left: numpy.ndarray(shape=(MxN), dtype=numpy.uint8)
:param right: numpy.ndarray(shape=(MxN), dtype=numpy.uint8)
:param window_size: int odd-valued
:param disparity: int
:return:
"""
ct_left = transform(left, window_size=window_size)
ct_right = transform(right, window_size=window_size)
rows, cols = ct_left.shape
C = np.full(shape=(rows, cols), fill_value=0)
for col in range(disparity, cols):
C[:, col] = column_cost(
ct_left[:, col:col + 1],
ct_right[:, col - disparity:col - disparity + 1]
).reshape(ct_left.shape[0])
return C
def norm(image):
return cv2.normalize(image, dst=None, alpha=0, beta=255, norm_type=cv2.NORM_MINMAX).astype(np.uint8)
if __name__ == "__main__":
resize_pct = 0.1
ndisp = 330
ndisp *= resize_pct
left = cv2.imread('Playroom-perfect-left.png', 0)
right = cv2.imread('Playroom-perfect-right.png', 0)
left = cv2.resize(left, dsize=(0,0), fx=resize_pct, fy=resize_pct)
right = cv2.resize(right, dsize=(0, 0), fx=resize_pct, fy=resize_pct)
window_size = 5
ct_left = norm(transform(left, window_size))
ct_right = norm(transform(right, window_size))
ct_costs = []
for exponent in range(0, 6):
import math
disparity = int(ndisp / math.pow(2, exponent))
print(math.pow(2, exponent), disparity)
ct_costs.append(norm(cost(left, right, window_size, disparity)))
cv2.imshow('left/right grayscale/census', np.vstack([np.hstack([left, right]), np.hstack([ct_left, ct_right])]))
cv2.imshow('costs', np.vstack(ct_costs))
cv2.waitKey(0)

