我需要精确对齐两个图像。为此,我使用了增强相关系数(ECC)。这给了我很好的结果,除了旋转角度较大的图像。例如,如果参考图像(基本图像)和测试图像(我想对齐的图像)旋转了90度,则ECC方法无法工作,这是根据findTransformECC()文档的说明正确的。
因此,我必须使用特征点对齐方法进行一些粗略的对齐。我尝试了SIFT和ORB,但在两者中都遇到了同样的问题。它适用于某些图像,而对于其他图像,得到的变换会向错误的方向移动或旋转。
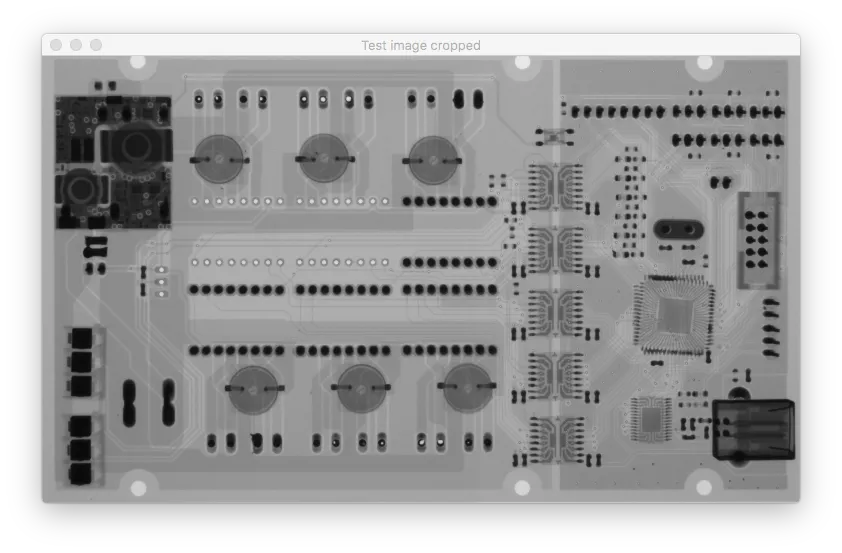
这些是输入图像: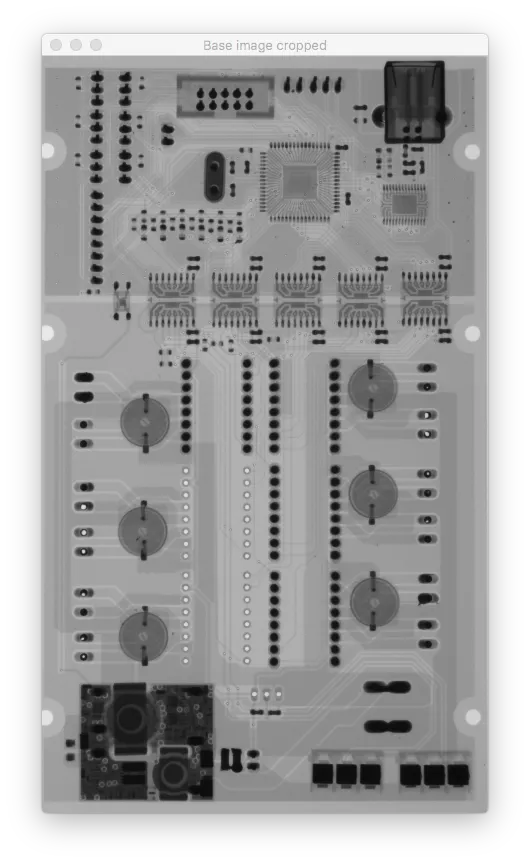
 我认为问题是由错误的匹配引起的,但如果我只使用10个关键点并缩小距离,那么所有关键点似乎都是好的匹配(当我使用100个关键点时,我得到完全相同的结果)。
这是匹配的结果: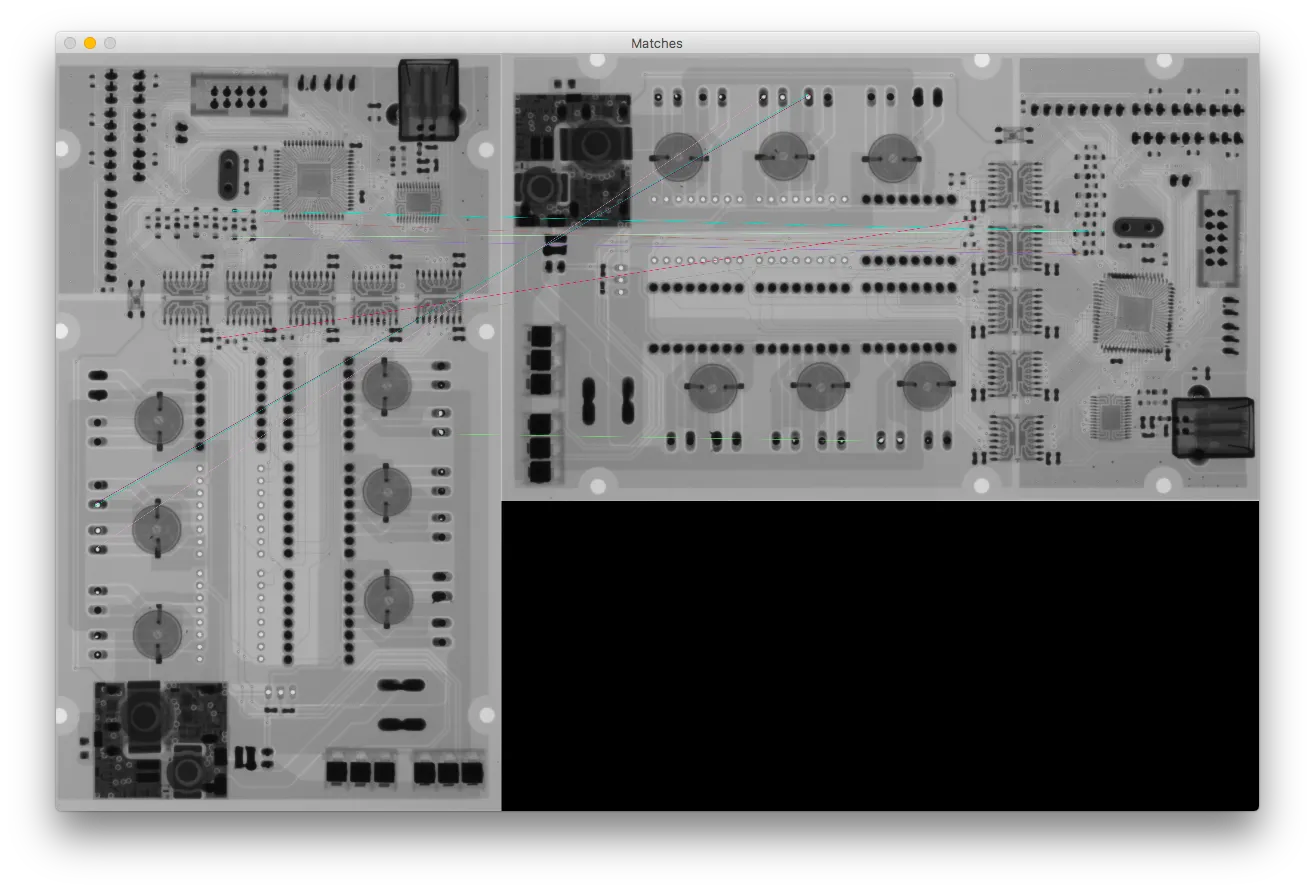 这是结果:
这是结果:
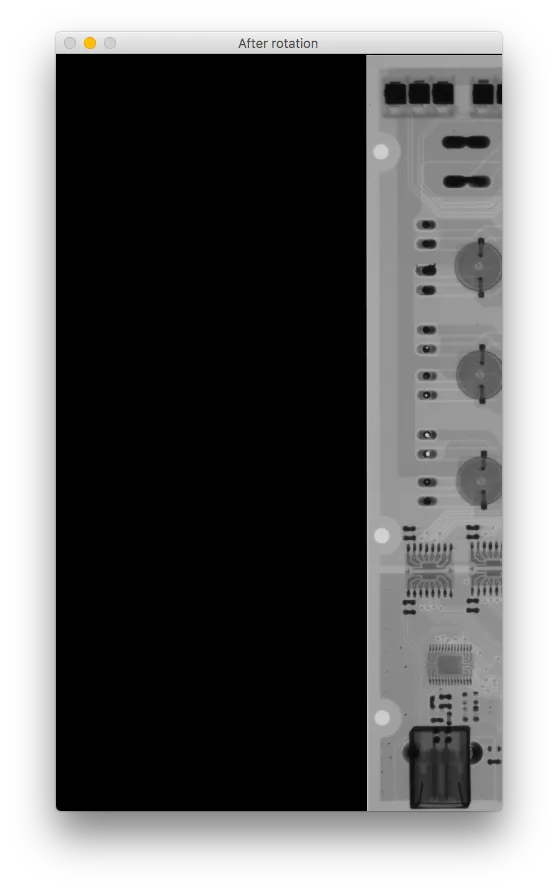 如果您比较旋转后的图像,它会向右移动并且上下颠倒。
我错过了什么?
如果您比较旋转后的图像,它会向右移动并且上下颠倒。
我错过了什么?
这是我的代码:
因此,我必须使用特征点对齐方法进行一些粗略的对齐。我尝试了SIFT和ORB,但在两者中都遇到了同样的问题。它适用于某些图像,而对于其他图像,得到的变换会向错误的方向移动或旋转。
这些是输入图像:
我认为问题是由错误的匹配引起的,但如果我只使用10个关键点并缩小距离,那么所有关键点似乎都是好的匹配(当我使用100个关键点时,我得到完全相同的结果)。这是匹配的结果:
这是结果:
如果您比较旋转后的图像,它会向右移动并且上下颠倒。
我错过了什么?这是我的代码:
        # Initiate detector
    orb = cv2.ORB_create()

    # find the keypoints with ORB
    kp_base = orb.detect(base_gray, None)
    kp_test = orb.detect(test_gray, None)

    # compute the descriptors with ORB
    kp_base, des_base = orb.compute(base_gray, kp_base)
    kp_test, des_test = orb.compute(test_gray, kp_test)

    # Debug print
    base_keypoints = cv2.drawKeypoints(base_gray, kp_base, color=(0, 0, 255), flags=0, outImage=base_gray)
    test_keypoints = cv2.drawKeypoints(test_gray, kp_test, color=(0, 0, 255), flags=0, outImage=test_gray)

    output.debug_show("Base image keypoints",base_keypoints, debug_mode=debug_mode,fxy=fxy,waitkey=True)
    output.debug_show("Test image keypoints",test_keypoints, debug_mode=debug_mode,fxy=fxy,waitkey=True)

    # find matches
    # create BFMatcher object
    bf = cv2.BFMatcher(cv2.NORM_HAMMING, crossCheck=True)
    # Match descriptors.
    matches = bf.match(des_base, des_test)
    # Sort them in the order of their distance.
    matches = sorted(matches, key=lambda x: x.distance)


    # Debug print - Draw first 10 matches.
    number_of_matches = 10
    matches_img = cv2.drawMatches(base_gray, kp_base, test_gray, kp_test, matches[:number_of_matches], flags=2, outImg=base_gray)
    output.debug_show("Matches", matches_img, debug_mode=debug_mode,fxy=fxy,waitkey=True)

    # calculate transformation matrix
    base_keypoints = np.float32([kp_base[m.queryIdx].pt for m in matches[:number_of_matches]]).reshape(-1, 1, 2)
    test_keypoints = np.float32([kp_test[m.trainIdx].pt for m in matches[:number_of_matches]]).reshape(-1, 1, 2)
    # Calculate Homography
    h, status = cv2.findHomography(base_keypoints, test_keypoints)
    # Warp source image to destination based on homography
    im_out = cv2.warpPerspective(test_gray, h, (base_gray.shape[1], base_gray.shape[0]))
    output.debug_show("After rotation", im_out, debug_mode=debug_mode, fxy=fxy)