如何在Android中动态合并两个Drawable?

19

我有两个不同的Drawables,需要在运行时合并并获取一个单独的Drawable。我希望第一个Drawable在顶部,另一个在底部。我发现了LayerDrawable,看起来正是我所需的,但我在尝试排列Drawables时遇到了麻烦。

我有一个ImageButton,大小为48x48 dp,这是最终Drawable的位置。第一个Drawable是加号按钮(20x20 dp),第二个是位于加号按钮下方的小点(4x4 dp)。

加号按钮Drawable使用字体图形加载。我正在使用此 XML 片段创建点按钮Drawable

<?xml version="1.0" encoding="utf-8"?>
<shape xmlns:android="http://schemas.android.com/apk/res/android" 
       android:shape="oval">
    <solid
        android:color="@color/white_40"/>
    <size
        android:width="4dp"
        android:height="4dp"/>
</shape>

我的第一种方法是将两个Drawables添加到LayerDrawable中,但是当我这样做时,xml文件中指定的圆点的宽度/高度属性被忽略了,并且它会拉伸以覆盖加号图标。

LayerDrawable finalDrawable = new LayerDrawable(new Drawable[] {plusIcon, dotIcon});

以上操作的结果如下:


我尝试的第二种方法是使用setLayerInset来尝试定位两个Drawables

    LayerDrawable finalDrawable = new LayerDrawable(new Drawable[] {plusIcon, dotIcon});
    finalDrawable.setLayerInset(0, 0, 0, 0, 0);
    finalDrawable.setLayerInset(1, dp(22), dp(44), dp(22), 0);
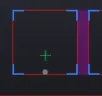
以上代码片段最终使圆点放置在正确的位置,但它还开始影响加号按钮的位置和大小,最终看起来像这样:
enter image description here。但我真正想要的是将加号按钮放在ImageButton的中心,并将加号图标放在其正下方。有人知道我错在哪里以及如何正确定位这两个可绘制对象吗?PS:我的应用程序支持API 15+,因此无法使用LayerDrawable API的许多方法,例如setLayerGravity、'setPaddingMode等。
2个回答

24

编辑

这段代码适用于23级以下的API:

ImageButton button = (ImageButton) findViewById(R.id.button);

Drawable plusIcon = ContextCompat.getDrawable(this, R.drawable.plus);
Drawable dotIcon = ContextCompat.getDrawable(this, R.drawable.oval);

int horizontalInset = (plusIcon.getIntrinsicWidth() - dotIcon.getIntrinsicWidth()) / 2;

LayerDrawable finalDrawable = new LayerDrawable(new Drawable[] {plusIcon, dotIcon});
finalDrawable.setLayerInset(0, 0, 0, 0, dotIcon.getIntrinsicHeight());
finalDrawable.setLayerInset(1, horizontalInset, plusIcon.getIntrinsicHeight(), horizontalInset, 0);

button.setImageDrawable(finalDrawable);

Original

The following code works for me:

ImageButton button = (ImageButton) findViewById(R.id.button);

Drawable plusIcon = ContextCompat.getDrawable(this, R.drawable.plus);
Drawable dotIcon = ContextCompat.getDrawable(this, R.drawable.oval);

LayerDrawable finalDrawable = new LayerDrawable(new Drawable[] {plusIcon, dotIcon});
finalDrawable.setLayerInsetBottom(0, dotIcon.getIntrinsicHeight());
finalDrawable.setLayerGravity(1, Gravity.BOTTOM | Gravity.CENTER_HORIZONTAL);

button.setImageDrawable(finalDrawable);

这将产生以下用户界面:

输入图像描述


嘿Ben,谢谢你的回答。但根据我记得,
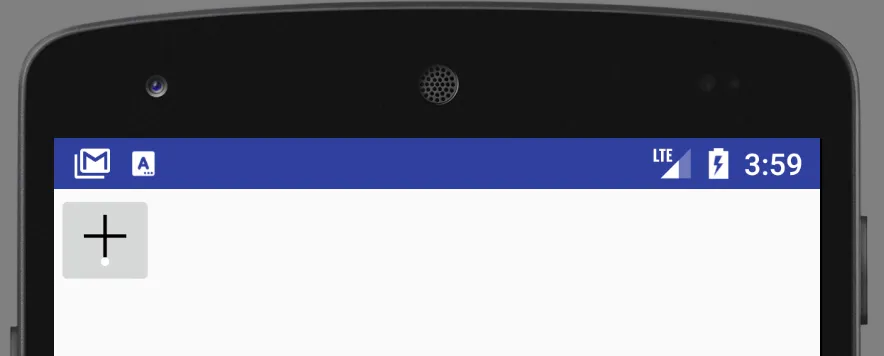
setLayerGravity仅适用于API 23及以上版本。我的应用程序支持API 15及以上版本。 - akshayt23
嘿,非常感谢!修改后的答案让它工作了。只有一个小问题,我发现如果我改变底部点的大小,加号图标将不得不向上移动以为点图标腾出空间,因为它在ImageButton内的相对位置取决于点的大小。 有没有办法让我将加号图标定位在正中心(Gravity.CENTER),并将点图标放在其下方4个dp的位置? - akshayt23
2
我认为此时我们已经超出了LayerDrawable的本意。我会考虑创建一个包含点和加号的矢量可绘制对象,或者使用FrameLayout/ConstraintLayout(放在按钮上方)来定位这两个可绘制对象。 - Ben P.
是的,问题在于我无法使用布局来定位可绘制对象,因为我只能返回一个应用于“ImageButton”的“Drawable”。这就是为什么我尝试使用“LayerDrawable”来实现这一目标的原因。有什么想法吗? - akshayt23
似乎每个LayerDrawable层都会被缩放以适应LayerDrawable的大小,这是其任何图层中最大的尺寸。这个“层大小”包括插入。因此,如果您定义了一些大小填充,您可以在所有侧面上通过(填充+点直径)来插入加号,并且在顶部通过(点直径+填充+加号高度+填充)和((2直径+2填充+加号宽度)- 直径)/ 2在每个侧面上插入点。 - Ben P.
我成功地完成了这项工作。感谢Ben提供的所有帮助! - akshayt23

1
这是我的解决方法:
final View view = findViewById(R.id.view_in_layout);

Drawable bottom = ContextCompat.getDrawable(context, R.drawable.ic_bottom);
Drawable top = ContextCompat.getDrawable(context, R.drawable.ic_top);

//bottom = index 0, top = index 1
final LayerDrawable layer = new LayerDrawable(new Drawable[]{bottom, top});

view.addOnLayoutChangeListener(new View.OnLayoutChangeListener() {
    @Override
    public void onLayoutChange(View v, int left, int top, int right, int bottom,
                  int oldLeft, int oldTop, int oldRight, int oldBottom) {
        //get the real height after it is calculated
        int height = view.getHeight();
        //set the height half of the available space for example purposes,
        //the drawables will have half of the available height
        int halfHeight = height / 2;
        //the bottom drawable need to start when the top drawable ends
        layer.setLayerInset(0, 0, halfHeight, 0, 0);
        //the top drawable need to end before the bottom drawable starts
        layer.setLayerInset(1, 0, 0, 0, halfHeight);

        view.setBackground(layer);
        view.removeOnLayoutChangeListener(this);
    }
});

你可以选择不同的维度来绘制图形,或者使用索引移动它们。例如,我使用 View.OnLayoutChangeListener(...) 来等待视图的当前可用高度。

网页内容由stack overflow 提供, 点击上面的
可以查看英文原文,
原文链接