这是我的方法:
Stack(
      children: <Widget>[
        Container(
          decoration: BoxDecoration(
            image: DecorationImage(
              fit: BoxFit.fill,
              image: NetworkImage("https://cdn.pixabay.com/photo/2018/09/17/16/24/cat-3684184_960_720.jpg")
            )
          ),
        ),
        Column(
          mainAxisSize: MainAxisSize.max,
          mainAxisAlignment: MainAxisAlignment.end,
          children: <Widget>[
            Theme(
              data: Theme.of(context).copyWith(canvasColor: Colors.transparent),
              child: BottomNavigationBar(
                items: [
                  BottomNavigationBarItem(
                      icon: Icon(Icons.photo_camera), title: Text("Test")),
                  BottomNavigationBarItem(
                      icon: Icon(Icons.photo_camera), title: Text("Test")),
                ],
              ),
            )
          ],
        )
      ],
    );
这将使用背景图像(底层)和在其内容对齐方式为
end的列内的底部导航栏来填充整个屏幕(图像纯粹是琐碎的,但您会得到这个意思)。
为了完成目的,我将在下面粘贴我在原问题的评论中给出的解释。
深入思考后,我意识到这将无法实现所需的相同效果,因为两个女孩的图像将位于NavigationBar上方。建议使用一个Stack,其中两个女孩的图像是底层(堆栈的底部),并且设置MainAxisSize.max和MainAxisAlignment.end的全屏幕Column。我可以把它写在答案中,但我现在无法测试它,所以我更愿意写一个评论。希望有所帮助
更新:
之前的解决方案仍然具有navbar阴影。由于我使用了
Row自己实现了
BottomNavigationBar,因此此屏幕(小部件)的构建方法不会产生阴影。
@override
  Widget build(BuildContext context) {
    return Stack(
      children: <Widget>[
        Container(
          decoration: BoxDecoration(
              image: DecorationImage(
                  fit: BoxFit.fill,
                  image: NetworkImage(
                      "https://media.idownloadblog.com/wp-content/uploads/2016/04/macinmac-portrat-splash.jpg"))),
        ),
        Column(
          mainAxisSize: MainAxisSize.max,
          mainAxisAlignment: MainAxisAlignment.end,
          children: <Widget>[
            Row(
              mainAxisSize: MainAxisSize.max,
              mainAxisAlignment: MainAxisAlignment.spaceEvenly,
              children: <Widget>[
                GestureDetector(
                    onTap: () {
                      print("Tap!");
                    },
                    child: Icon(
                      Icons.photo_camera,
                      size: 50,
                    )),
                GestureDetector(
                    onTap: () {
                      print("Tap!");
                    },
                    child: Icon(
                      Icons.photo_camera,
                      size: 50,
                    )),
                GestureDetector(
                    onTap: () {
                      print("Tap!");
                    },
                    child: Icon(
                      Icons.photo_camera,
                      size: 50,
                    )),
                GestureDetector(
                    onTap: () {
                      print("Tap!");
                    },
                    child: Icon(
                      Icons.photo_camera,
                      size: 50,
                    )),
              ],
            )
          ],
        )
      ],
    );
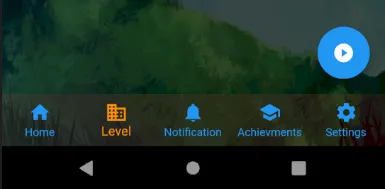
这是我手机上的截图:

奖励
您可以通过调用以下方法实现全屏:
SystemChrome.setEnabledSystemUIOverlays([])
source: here


Stack,将两个女孩的图像作为底层(堆栈的底部),并使用全屏的Column,将MainAxisSize设置为MainAxisSize.max,将MainAxisAlignment设置为MainAxisAlignment.end。我可以写一个答案,但现在无法测试,所以我更喜欢写一个评论。希望能有所帮助。 - magicleon94