对于Swift 4.0,这里有一个可用的扩展 -
extension UIButton {

  func leftImage(image: UIImage, renderMode: UIImage.RenderingMode) {
       self.setImage(image.withRenderingMode(renderMode), for: .normal)
       self.imageEdgeInsets = UIEdgeInsets(top: 0, left: 10, bottom: 0, right: 0)
       self.titleEdgeInsets.left = (self.frame.width/2) - (self.titleLabel?.frame.width ?? 0)
       self.contentHorizontalAlignment = .left
       self.imageView?.contentMode = .scaleAspectFit
   }

    func rightImage(image: UIImage, renderMode: UIImageRenderingMode){
        self.setImage(image.withRenderingMode(renderMode), for: .normal)
        self.imageEdgeInsets = UIEdgeInsets(top: 0, left:image.size.width / 2, bottom: 0, right: 0)
        self.contentHorizontalAlignment = .right
        self.imageView?.contentMode = .scaleAspectFit
    }
}
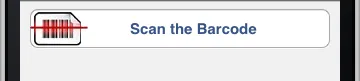
使用方法:
myButton.rightImage(image: UIImage(named: "image_name")!, renderMode: .alwaysOriginal)
myButton.leftImage(image: UIImage(named: "image_name")!, renderMode: .alwaysOriginal)
renderMode可为.alwaysTemplate或.alwaysOriginal。此外,myButton应该是custom类型的UIButton。
这个扩展还可以在UIBarButtonItem中的UIButton中使用,在UINavigationBar上使用(注:自iOS 11起,导航栏遵循自动布局,因此您需要添加宽度/高度约束到UIBarButtonItem)。对于在导航栏上的用法,请确保您遵循Apple推荐的@2x和@3x图像大小(即50x50、75x75),并且对于iPhone 6、7、8、6s、7s、8s、Plus变体和iPhone x具有更好的可访问性,UIBarButton的宽度和高度应该是高度-25和宽度-55(或者您的应用程序所需的任何数字,这些数字是大多数情况下都有效的一些基本数字)。
更新:在Swift 4.2中,UIImageRenderingMode已更名为UIImage.RenderingMode
extension UIButton {
    func leftImage(image: UIImage, renderMode: UIImage.RenderingMode) {
        self.setImage(image.withRenderingMode(renderMode), for: .normal)
        self.imageEdgeInsets = UIEdgeInsets(top: 0, left: 0, bottom: 0, right: image.size.width / 2)
        self.contentHorizontalAlignment = .left
        self.imageView?.contentMode = .scaleAspectFit
    }

    func rightImage(image: UIImage, renderMode: UIImage.RenderingMode){
        self.setImage(image.withRenderingMode(renderMode), for: .normal)
        self.imageEdgeInsets = UIEdgeInsets(top: 0, left:image.size.width / 2, bottom: 0, right: 0)
        self.contentHorizontalAlignment = .right
        self.imageView?.contentMode = .scaleAspectFit
    }
}


frame.width是正确的 https://developer.apple.com/reference/coregraphics/cgrect/1454758-width - redent84frame.width是只读属性,因此我们可以在想要读取帧宽度时使用它 :) - MohyGcontentHorizontalAlignment = .left。 - Radek Wilczakround((availableWidth - imageSize.width) / 2)。 - androidguy