使用matplotlib显示MNIST图像

16

我正在使用tensorflow导入一些MNIST输入数据。我按照这个教程进行了操作...https://www.tensorflow.org/get_started/mnist/beginners

我这样导入它们...

from tensorflow.examples.tutorials.mnist import input_data

mnist = input_data.read_data_sets("/tmp/data/", one_hot=True)

我希望能够显示训练集中的任何图像。我知道这些图像的位置是mnist.train.images,因此我尝试访问第一张图像并像这样进行显示...

with tf.Session() as sess:
    #access first image
    first_image = mnist.train.images[0]

    first_image = np.array(first_image, dtype='uint8')
    pixels = first_image.reshape((28, 28))
    plt.imshow(pixels, cmap='gray')

我试图将该图像转换为28x28的numpy数组,因为我知道每个图像是28x28像素。

然而,当我运行代码时,我得到了以下结果...

输入图像描述

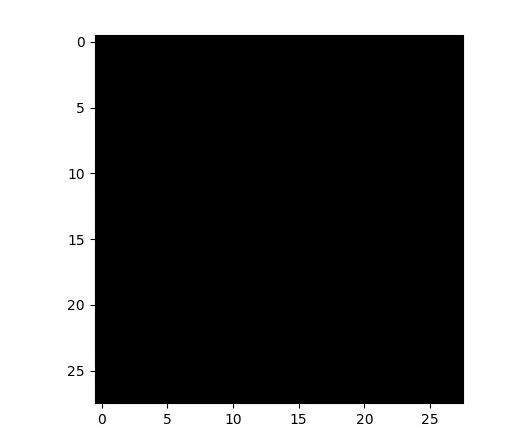
显然我做错了什么。当我打印矩阵时,一切似乎看起来很好,但我认为我错误地改变了形状。

4个回答

33

这里是使用matplotlib显示图像的完整代码

from matplotlib import pyplot as plt
import numpy as np
from tensorflow.examples.tutorials.mnist import input_data

mnist = input_data.read_data_sets('MNIST_data', one_hot = True)
first_image = mnist.test.images[0]
first_image = np.array(first_image, dtype='float')
pixels = first_image.reshape((28, 28))
plt.imshow(pixels, cmap='gray')
plt.show()

3
这对我很有帮助,谢谢。请帮忙编辑并包含几个重要的行,其中定义了 npmnistplt 等内容,以便搜索快速答案的人可以快速复制和粘贴您所提供的代码。谢谢。 - Somo S.
当使用PyTorch导入MNIST数据时,此方法也是有效的。 - Stefan

12
下面的代码显示了用于训练神经网络的MNIST数字数据库中显示的示例图像。它使用了来自Stackflow的各种代码片段,并避免了pil。
# Tested with Python 3.5.2 with tensorflow and matplotlib installed.
from matplotlib import pyplot as plt
import numpy as np
from tensorflow.examples.tutorials.mnist import input_data
mnist = input_data.read_data_sets('MNIST_data', one_hot = True)
def gen_image(arr):
    two_d = (np.reshape(arr, (28, 28)) * 255).astype(np.uint8)
    plt.imshow(two_d, interpolation='nearest')
    return plt

# Get a batch of two random images and show in a pop-up window.
batch_xs, batch_ys = mnist.test.next_batch(2)
gen_image(batch_xs[0]).show()
gen_image(batch_xs[1]).show()

mnist的定义在:https://github.com/tensorflow/tensorflow/blob/master/tensorflow/contrib/learn/python/learn/datasets/mnist.py

导致我需要显示MNIST图像的tensorflow神经网络在:https://github.com/tensorflow/tensorflow/blob/r1.2/tensorflow/examples/tutorials/mnist/mnist_deep.py

由于我只编程了两个小时,可能会出现一些新手错误。请随意更正。


4
您正在将一个浮点数数组 (如文档所描述) 转换为 uint8,如果它们不是 1.0 则会将它们截断为 0。您应该将其四舍五入或使用浮点数或乘以255。
我不确定为什么您看不到白色背景,但我建议您始终使用明确定义的灰度。

3

如果您想使用PIL.Image来完成此操作:

import numpy as np
import PIL.Image as pil
from tensorflow.examples.tutorials.mnist import input_data

mnist = input_data.read_data_sets('mnist')

testImage = (np.array(mnist.test.images[0], dtype='float')).reshape(28,28)

img = pil.fromarray(np.uint8(testImage * 255) , 'L')
img.show()

网页内容由stack overflow 提供, 点击上面的
可以查看英文原文,
原文链接