简而言之:
我在Python 2.7中实现的Wave Collapse Function算法有缺陷,但我无法确定问题所在。我需要帮助找出可能遗漏的内容或错误。
什么是Wave Collapse Function算法?
它是由Maxim Gumin于2016年编写的一种算法,可以从示例图像生成程序模式。您可以看到它的效果这里(2D重叠模型)和这里(3D瓦片模型)。
此实现的目标:
将算法(2D重叠模型)简化到其本质,并避免原始C#脚本冗余和笨拙(令人惊讶的长而难以阅读)。这是尝试制作更短,更清晰和Pythonic版本的算法。
此实现的特点:
我使用Processing(Python模式),这是一种可视化设计软件,可使图像处理更加轻松(没有PIL,没有Matplotlib等)。主要缺点是我只能使用Python 2.7,并且无法导入numpy。
与原版不同,这个实现:
例如,当N = 3时:
这4个步骤是介绍性步骤,它们是初始化算法所必需的。现在开始算法的核心部分: 5/ 观察:
找到熵最小的非零单元格的索引(请注意,在第一次迭代中,所有熵都相等,因此我们需要随机选择一个单元格的索引)。然后,在Wave中对应索引处查看仍然有效的模式,并根据该模式在输入图像中出现的频率(加权选择)随机选择其中之一。
例如,如果
我们现在将所选模式的索引分配给具有最小熵的单元格。这意味着,在Wave中相应位置的每个模式都被设置为
例如,如果在
7 / 传播:
由于相邻约束,模式选择对波中的相邻单元格产生影响。需要相应地更新左侧和右侧,上方和下方最近折叠单元格对应的布尔数组。
例如,如果已折叠单元格
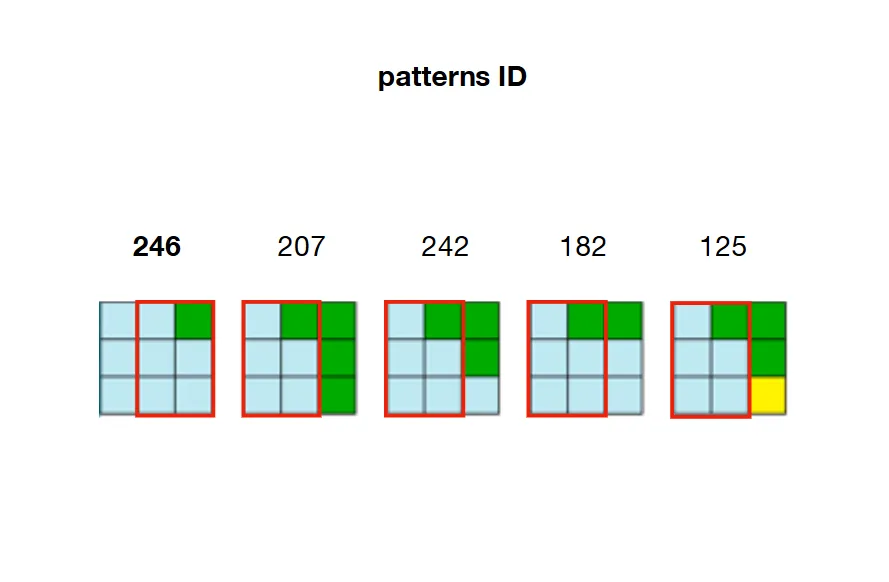
例如,回顾第2步的图片,我们可以看到只有207、242、182和125这些模式可以放置在246模式的右侧。这意味着W[23](单元格22的右侧)需要保持207、242、182和125这些模式为True,并将数组中的所有其他模式设置为False。如果这些模式不再有效(因为先前的约束已经将其设置为False),则算法面临矛盾。
8/ 更新熵
由于单元格已经折叠(选择了一个模式,设置为True),并且其周围的单元格已相应更新(将非相邻模式设置为False),因此所有这些单元格的熵都已更改,并且需要重新计算。(请记住,单元格的熵与它在Wave中持有的有效模式数量相关。)
在本例中,单元格22的熵现在为0(H[22]=0,因为只有模式246被设置为True在W[22]),并且其相邻单元格的熵已减少(未与模式246相邻的模式已被设置为False)。
到目前为止,算法已经完成了第一次迭代,并将循环执行步骤5(查找具有最小非零熵的单元格)到8(更新熵),直到所有单元格都已折叠。
关于最后一点,我应该澄清矛盾状态是正常的,但应该非常罕见(如this论文第6页中所述和this文章中所述)。
数小时的调试让我相信,介绍性步骤(1至5)是正确的(计算和存储模式、相邻和熵计算、数组初始化)。这让我认为算法核心部分(步骤6至8)可能有问题。要么我实施这些步骤时出现错误,要么我错过了逻辑的关键要素。
因此,对于这个问题的任何帮助都将不胜感激!
同时,任何基于提供的脚本(使用Processing或不使用)的回答都是受欢迎的。
有用的额外资源:
这篇详细的文章来自Stephen Sherratt,这篇解释性论文来自Karth & Smith。此外,为了比较,建议查看这个Python实现(包含不强制的回溯机制)。
注:我尽力使这个问题尽可能清晰(用GIF和插图进行全面解释,用有用的链接和资源进行完整注释代码),但如果您决定投票否决它,请留下简要评论以解释您的原因。
我在Python 2.7中实现的Wave Collapse Function算法有缺陷,但我无法确定问题所在。我需要帮助找出可能遗漏的内容或错误。
什么是Wave Collapse Function算法?
它是由Maxim Gumin于2016年编写的一种算法,可以从示例图像生成程序模式。您可以看到它的效果这里(2D重叠模型)和这里(3D瓦片模型)。
此实现的目标:
将算法(2D重叠模型)简化到其本质,并避免原始C#脚本冗余和笨拙(令人惊讶的长而难以阅读)。这是尝试制作更短,更清晰和Pythonic版本的算法。
此实现的特点:
我使用Processing(Python模式),这是一种可视化设计软件,可使图像处理更加轻松(没有PIL,没有Matplotlib等)。主要缺点是我只能使用Python 2.7,并且无法导入numpy。
与原版不同,这个实现:
- 不是面向对象的(在当前状态下),更易于理解/更接近伪代码
- 使用1D数组而不是2D数组
- 使用数组切片进行矩阵操作
例如,当N = 3时:
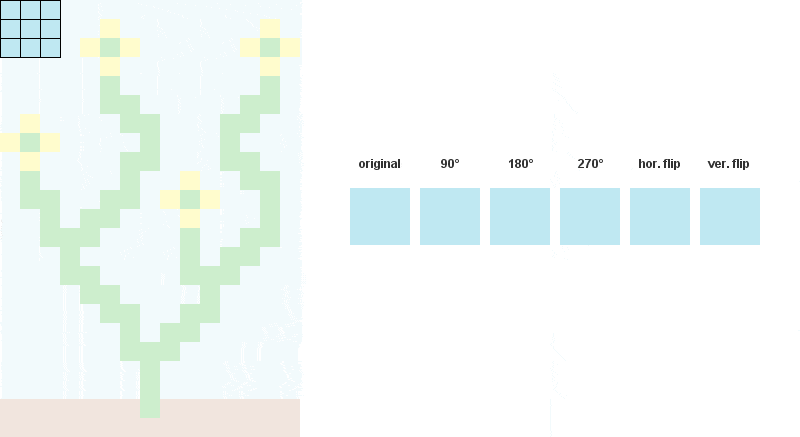
2/ 预计算并存储每个模式之间可能的邻接关系。 在下面的示例中,模式207、242、182和125可以与模式246的右侧重叠。
3/创建一个具有输出维度的数组(称为W表示波)。该数组的每个元素都是一个数组,其中包含每个模式的状态(True或False)。
例如,假设我们在输入中计算出326个独特的模式,并且我们希望输出的维度为20乘20(400个单元格)。那么“Wave”数组将包含400(20x20)个数组,每个数组包含326个布尔值。
开始时,所有布尔值都设置为True,因为每个模式都允许在波的任何位置。
W = [[True for pattern in xrange(len(patterns))] for cell in xrange(20*20)]
4/ 创建另一个数组,其维度与输出相同(称为H)。该数组的每个元素是一个浮点数,保存着其对应单元格在输出中的“熵”值。
这里的熵指香农熵,根据波中特定位置上有效模式的数量进行计算。一个单元格拥有的有效模式越多(在波中设置为True),其熵就越高。
例如,要计算单元格22的熵,我们查看其在波中的对应索引(W[22]),并计算设置为True的布尔值的数量。通过该计数,我们现在可以使用香农公式计算熵。该计算结果将存储在H中与相同索引H[22]。
开始时,所有单元格都具有相同的熵值(在H中的每个位置上都是相同的浮点数),因为所有模式都被设置为True,适用于每个单元格。
H = [entropyValue for cell in xrange(20*20)]
这4个步骤是介绍性步骤,它们是初始化算法所必需的。现在开始算法的核心部分: 5/ 观察:
找到熵最小的非零单元格的索引(请注意,在第一次迭代中,所有熵都相等,因此我们需要随机选择一个单元格的索引)。然后,在Wave中对应索引处查看仍然有效的模式,并根据该模式在输入图像中出现的频率(加权选择)随机选择其中之一。
例如,如果
H中的最低值位于索引22(H[22]),则我们查看W[22]处设置为True的所有模式,并根据其在输入中出现的次数随机选择一个。(请记住,在第1步中,我们已经计算了每个模式的出现次数)。这确保了模式在输出中的分布与其在输入中的分布相似。
6/ 崩溃:我们现在将所选模式的索引分配给具有最小熵的单元格。这意味着,在Wave中相应位置的每个模式都被设置为
False,除了已选择的模式。例如,如果在
W[22]中将模式246设置为True并已选择,则所有其他模式都将设置为False。单元格22被分配模式246。
在输出单元格22中,将填充模式246的第一种颜色(左上角)。 (在此示例中为蓝色)7 / 传播:
由于相邻约束,模式选择对波中的相邻单元格产生影响。需要相应地更新左侧和右侧,上方和下方最近折叠单元格对应的布尔数组。
例如,如果已折叠单元格
22并分配了模式246,则必须修改W [21](左侧),W [23](右侧),W [2](向上)和W [42](向下),使它们仅保留与模式246相邻的模式。例如,回顾第2步的图片,我们可以看到只有207、242、182和125这些模式可以放置在246模式的右侧。这意味着W[23](单元格22的右侧)需要保持207、242、182和125这些模式为True,并将数组中的所有其他模式设置为False。如果这些模式不再有效(因为先前的约束已经将其设置为False),则算法面临矛盾。
8/ 更新熵
由于单元格已经折叠(选择了一个模式,设置为True),并且其周围的单元格已相应更新(将非相邻模式设置为False),因此所有这些单元格的熵都已更改,并且需要重新计算。(请记住,单元格的熵与它在Wave中持有的有效模式数量相关。)
在本例中,单元格22的熵现在为0(H[22]=0,因为只有模式246被设置为True在W[22]),并且其相邻单元格的熵已减少(未与模式246相邻的模式已被设置为False)。
到目前为止,算法已经完成了第一次迭代,并将循环执行步骤5(查找具有最小非零熵的单元格)到8(更新熵),直到所有单元格都已折叠。
我的脚本
要运行这个脚本,您需要安装Python模式的Processing。它包含大约80行代码(与原始脚本的1000行相比较短),并且完全注释,因此可以快速理解。您还需要下载输入图像并相应地更改第16行的路径。
from collections import Counter
from itertools import chain, izip
import math

d = 20  # dimensions of output (array of dxd cells)
N = 3 # dimensions of a pattern (NxN matrix)

Output = [120 for i in xrange(d*d)] # array holding the color value for each cell in the output (at start each cell is grey = 120)

def setup():
    size(800, 800, P2D)
    textSize(11)

    global W, H, A, freqs, patterns, directions, xs, ys, npat

    img = loadImage('Flowers.png') # path to the input image
    iw, ih = img.width, img.height # dimensions of input image
    xs, ys = width//d, height//d # dimensions of cells (squares) in output
    kernel = [[i + n*iw for i in xrange(N)] for n in xrange(N)] # NxN matrix to read every patterns contained in input image
    directions = [(-1, 0), (1, 0), (0, -1), (0, 1)] # (x, y) tuples to access the 4 neighboring cells of a collapsed cell
    all = [] # array list to store all the patterns found in input


    # Stores the different patterns found in input
    for y in xrange(ih):
        for x in xrange(iw):

            ''' The one-liner below (cmat) creates a NxN matrix with (x, y) being its top left corner.
                This matrix will wrap around the edges of the input image.
                The whole snippet reads every NxN part of the input image and store the associated colors.
                Each NxN part is called a 'pattern' (of colors). Each pattern can be rotated or flipped (not mandatory). '''


            cmat = [[img.pixels[((x+n)%iw)+(((a[0]+iw*y)/iw)%ih)*iw] for n in a] for a in kernel]

            # Storing rotated patterns (90°, 180°, 270°, 360°)
            for r in xrange(4):
                cmat = zip(*cmat[::-1]) # +90° rotation
                all.append(cmat)

            # Storing reflected patterns (vertical/horizontal flip)
            all.append(cmat[::-1])
            all.append([a[::-1] for a in cmat])


    # Flatten pattern matrices + count occurences

    ''' Once every pattern has been stored,
        - we flatten them (convert to 1D) for convenience
        - count the number of occurences for each one of them (one pattern can be found multiple times in input)
        - select unique patterns only
        - store them from less common to most common (needed for weighted choice)'''

    all = [tuple(chain.from_iterable(p)) for p in all] # flattern pattern matrices (NxN --> [])
    c = Counter(all)
    freqs = sorted(c.values()) # number of occurences for each unique pattern, in sorted order
    npat = len(freqs) # number of unique patterns
    total = sum(freqs) # sum of frequencies of unique patterns
    patterns = [p[0] for p in c.most_common()[:-npat-1:-1]] # list of unique patterns sorted from less common to most common


    # Computes entropy

    ''' The entropy of a cell is correlated to the number of possible patterns that cell holds.
        The more a cell has valid patterns (set to 'True'), the higher its entropy is.
        At start, every pattern is set to 'True' for each cell. So each cell holds the same high entropy value'''

    ent = math.log(total) - sum(map(lambda x: x * math.log(x), freqs)) / total


    # Initializes the 'wave' (W), entropy (H) and adjacencies (A) array lists

    W = [[True for _ in xrange(npat)] for i in xrange(d*d)] # every pattern is set to 'True' at start, for each cell
    H = [ent for i in xrange(d*d)] # same entropy for each cell at start (every pattern is valid)
    A = [[set() for dir in xrange(len(directions))] for i in xrange(npat)] #see below for explanation


    # Compute patterns compatibilities (check if some patterns are adjacent, if so -> store them based on their location)

    ''' EXAMPLE:
    If pattern index 42 can placed to the right of pattern index 120,
    we will store this adjacency rule as follow:

                     A[120][1].add(42)

    Here '1' stands for 'right' or 'East'/'E'

    0 = left or West/W
    1 = right or East/E
    2 = up or North/N
    3 = down or South/S '''

    # Comparing patterns to each other
    for i1 in xrange(npat):
        for i2 in xrange(npat):
            for dir in (0, 2):
                if compatible(patterns[i1], patterns[i2], dir):
                    A[i1][dir].add(i2)
                    A[i2][dir+1].add(i1)


def compatible(p1, p2, dir):

    '''NOTE:
    what is refered as 'columns' and 'rows' here below is not really columns and rows
    since we are dealing with 1D patterns. Remember here N = 3'''

    # If the first two columns of pattern 1 == the last two columns of pattern 2
    # --> pattern 2 can be placed to the left (0) of pattern 1
    if dir == 0:
        return [n for i, n in enumerate(p1) if i%N!=2] == [n for i, n in enumerate(p2) if i%N!=0]

    # If the first two rows of pattern 1 == the last two rows of pattern 2
    # --> pattern 2 can be placed on top (2) of pattern 1
    if dir == 2:
        return p1[:6] == p2[-6:]


def draw():    # Equivalent of a 'while' loop in Processing (all the code below will be looped over and over until all cells are collapsed)
    global H, W, grid

    ### OBSERVATION
    # Find cell with minimum non-zero entropy (not collapsed yet)

    '''Randomly select 1 cell at the first iteration (when all entropies are equal),
       otherwise select cell with minimum non-zero entropy'''

    emin = int(random(d*d)) if frameCount <= 1 else H.index(min(H))


    # Stoping mechanism

    ''' When 'H' array is full of 'collapsed' cells --> stop iteration '''

    if H[emin] == 'CONT' or H[emin] == 'collapsed':
        print 'stopped'
        noLoop()
        return


    ### COLLAPSE
    # Weighted choice of a pattern

    ''' Among the patterns available in the selected cell (the one with min entropy),
        select one pattern randomly, weighted by the frequency that pattern appears in the input image.
        With Python 2.7 no possibility to use random.choice(x, weight) so we have to hard code the weighted choice '''

    lfreqs = [b * freqs[i] for i, b in enumerate(W[emin])] # frequencies of the patterns available in the selected cell
    weights = [float(f) / sum(lfreqs) for f in lfreqs] # normalizing these frequencies
    cumsum = [sum(weights[:i]) for i in xrange(1, len(weights)+1)] # cumulative sums of normalized frequencies
    r = random(1)
    idP = sum([cs < r for cs in cumsum])  # index of selected pattern

    # Set all patterns to False except for the one that has been chosen
    W[emin] = [0 if i != idP else 1 for i, b in enumerate(W[emin])]

    # Marking selected cell as 'collapsed' in H (array of entropies)
    H[emin] = 'collapsed'

    # Storing first color (top left corner) of the selected pattern at the location of the collapsed cell
    Output[emin] = patterns[idP][0]


    ### PROPAGATION
    # For each neighbor (left, right, up, down) of the recently collapsed cell
    for dir, t in enumerate(directions):
        x = (emin%d + t[0])%d
        y = (emin/d + t[1])%d
        idN = x + y * d #index of neighbor

        # If that neighbor hasn't been collapsed yet
        if H[idN] != 'collapsed':

            # Check indices of all available patterns in that neighboring cell
            available = [i for i, b in enumerate(W[idN]) if b]

            # Among these indices, select indices of patterns that can be adjacent to the collapsed cell at this location
            intersection = A[idP][dir] & set(available)

            # If the neighboring cell contains indices of patterns that can be adjacent to the collapsed cell
            if intersection:

                # Remove indices of all other patterns that cannot be adjacent to the collapsed cell
                W[idN] = [True if i in list(intersection) else False for i in xrange(npat)]


                ### Update entropy of that neighboring cell accordingly (less patterns = lower entropy)

                # If only 1 pattern available left, no need to compute entropy because entropy is necessarily 0
                if len(intersection) == 1:
                    H[idN] = '0' # Putting a str at this location in 'H' (array of entropies) so that it doesn't return 0 (float) when looking for minimum entropy (min(H)) at next iteration


                # If more than 1 pattern available left --> compute/update entropy + add noise (to prevent cells to share the same minimum entropy value)
                else:
                    lfreqs = [b * f for b, f in izip(W[idN], freqs) if b]
                    ent = math.log(sum(lfreqs)) - sum(map(lambda x: x * math.log(x), lfreqs)) / sum(lfreqs)
                    H[idN] = ent + random(.001)


            # If no index of adjacent pattern in the list of pattern indices of the neighboring cell
            # --> mark cell as a 'contradiction'
            else:
                H[idN] = 'CONT'


    # Draw output

    ''' dxd grid of cells (squares) filled with their corresponding color.
        That color is the first (top-left) color of the pattern assigned to that cell '''

    for i, c in enumerate(Output):
        x, y = i%d, i/d
        fill(c)
        rect(x * xs, y * ys, xs, ys)

        # Displaying corresponding entropy value
        fill(0)
        text(H[i], x * xs + xs/2 - 12, y * ys + ys/2)
问题
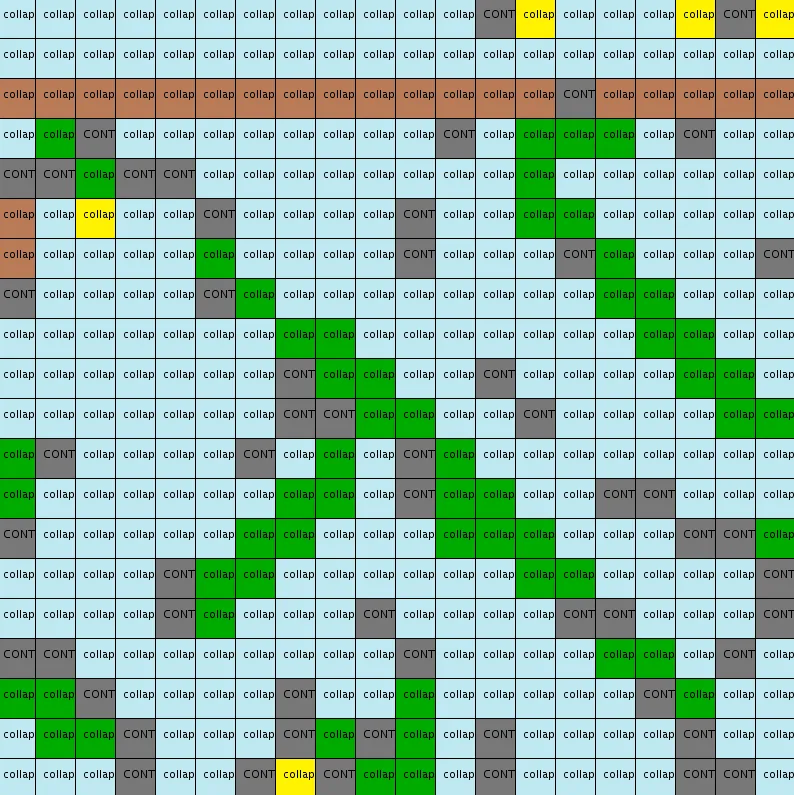
尽管我已经努力将上述所有步骤仔细编码,但这个实现返回非常奇怪和令人失望的结果:
20x20输出示例
关于最后一点,我应该澄清矛盾状态是正常的,但应该非常罕见(如this论文第6页中所述和this文章中所述)。
数小时的调试让我相信,介绍性步骤(1至5)是正确的(计算和存储模式、相邻和熵计算、数组初始化)。这让我认为算法核心部分(步骤6至8)可能有问题。要么我实施这些步骤时出现错误,要么我错过了逻辑的关键要素。
因此,对于这个问题的任何帮助都将不胜感激!
同时,任何基于提供的脚本(使用Processing或不使用)的回答都是受欢迎的。
有用的额外资源:
这篇详细的文章来自Stephen Sherratt,这篇解释性论文来自Karth & Smith。此外,为了比较,建议查看这个Python实现(包含不强制的回溯机制)。
注:我尽力使这个问题尽可能清晰(用GIF和插图进行全面解释,用有用的链接和资源进行完整注释代码),但如果您决定投票否决它,请留下简要评论以解释您的原因。

PIL的实现,它不在你的黑名单中 https://github.com/ikarth/wfc_python/blob/master/model.py - norok2