React-Leaflet地图未正确显示。

83

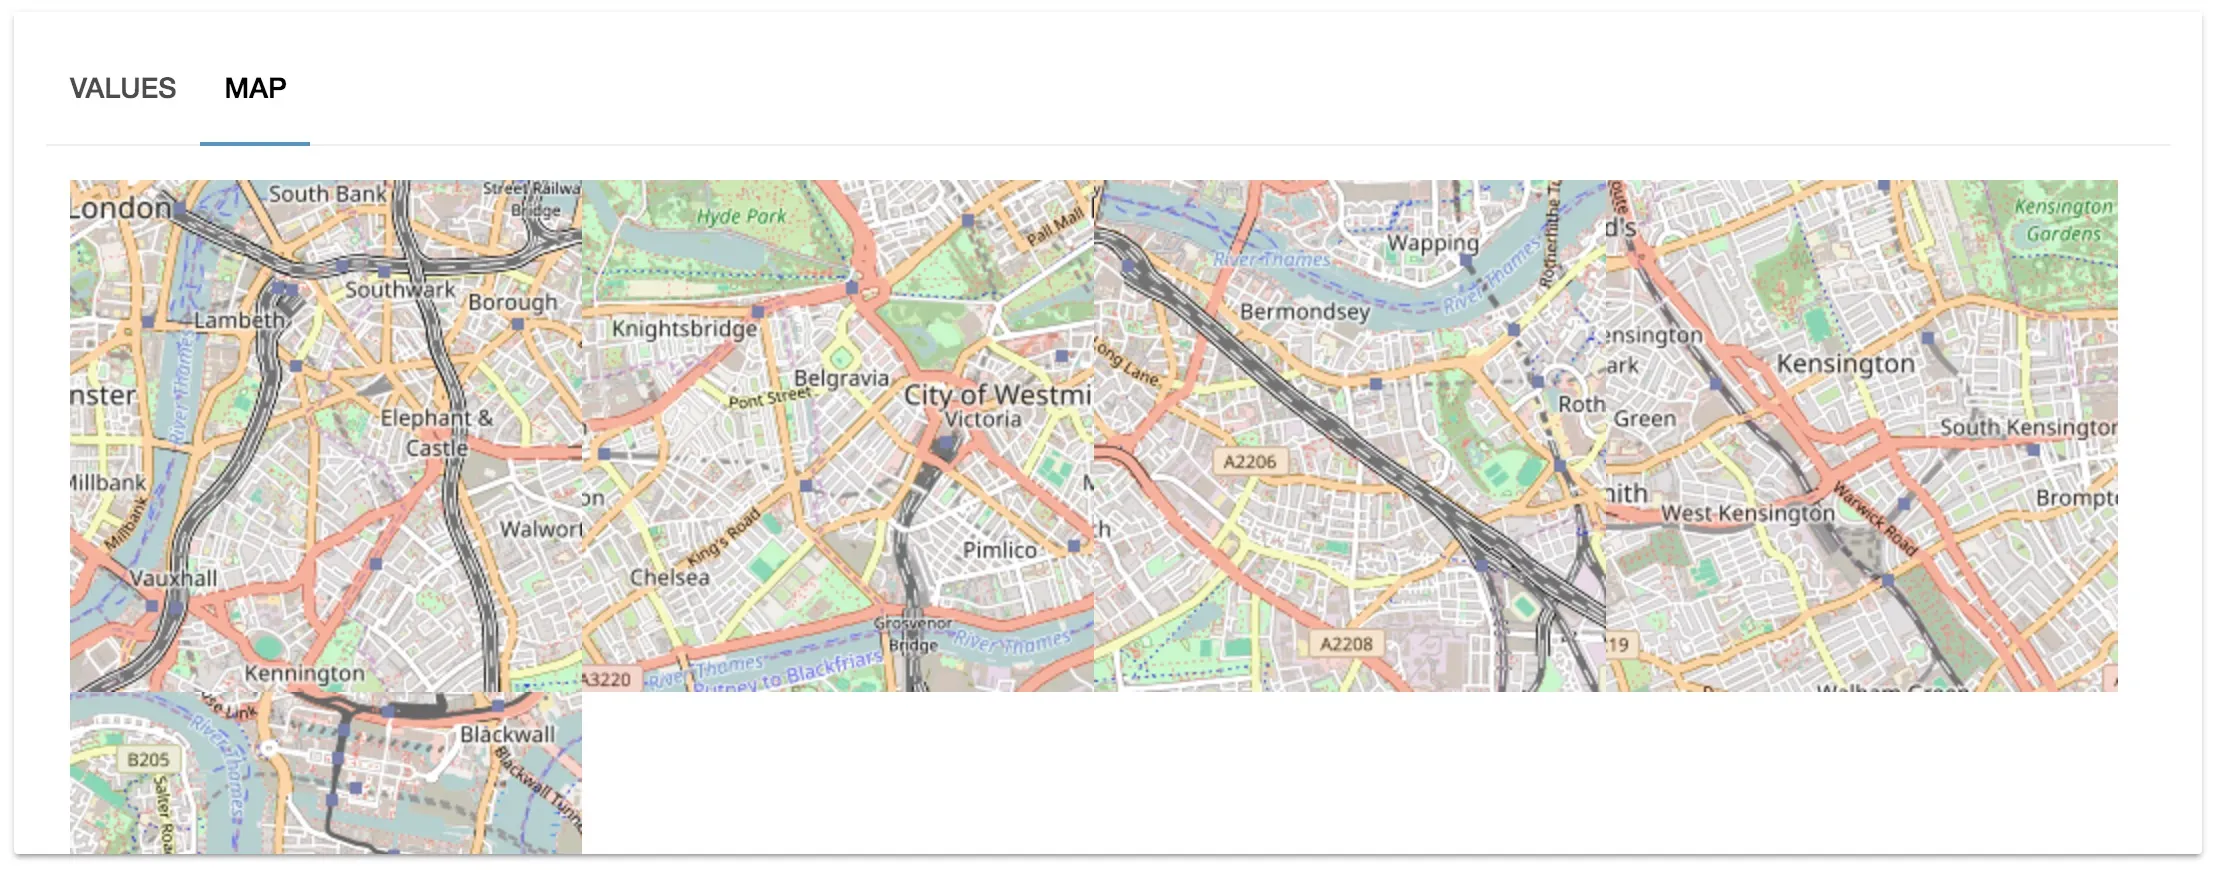
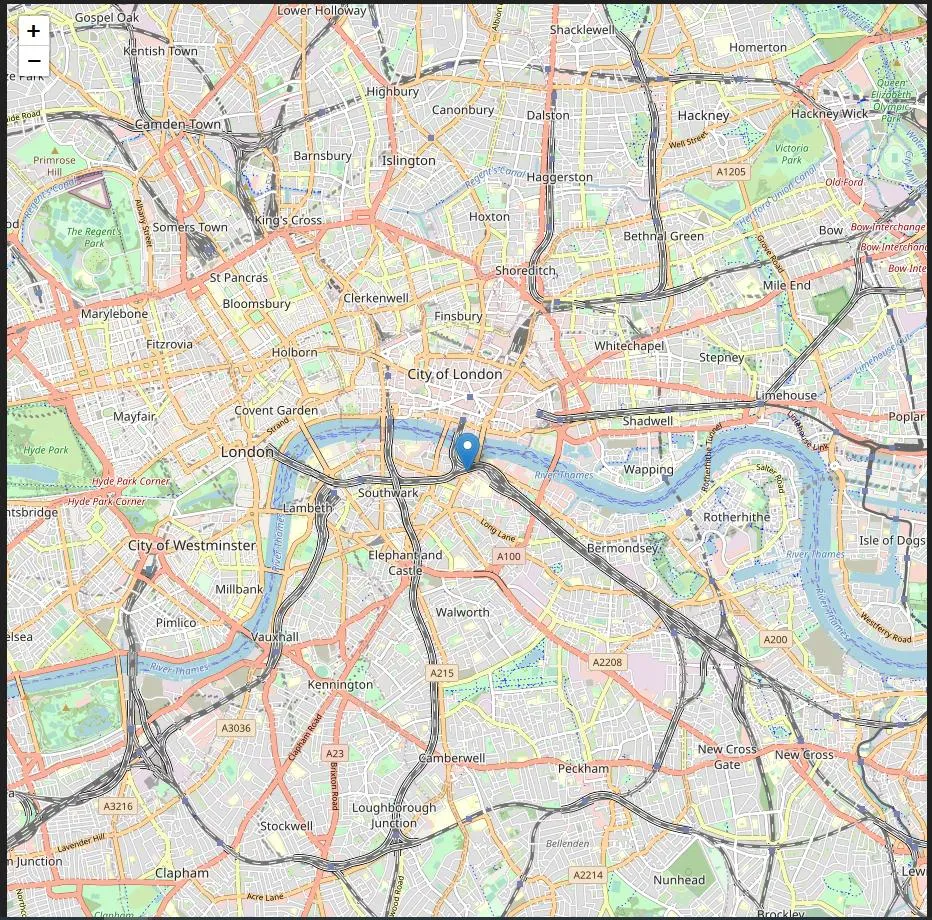
我正在尝试使用react-leaflet来显示地图。我使用来自这个 fiddle的代码,它可以工作,但是在我的电脑上输出结果是这样的:

enter image description here

这是我的代码:

DeviceMap.js

import React from 'react'
import { Map, Marker, Popup, TileLayer } from 'react-leaflet';

export class DeviceMap extends React.Component {
  constructor() {
    super();
    this.state = {
      lat: 51.505,
      lng: -0.09,
      zoom: 13,
    };
  }

  render() {
    const position = [this.state.lat, this.state.lng];
    return (
      <Map center={position} zoom={this.state.zoom} scrollWheelZoom={false}>
        <TileLayer
          attribution='&copy; <a href="http://osm.org/copyright">OpenStreetMap</a> contributors'
          url='http://{s}.tile.osm.org/{z}/{x}/{y}.png'
        />
        <Marker position={position}>
          <Popup>
            <span>A pretty CSS3 popup. <br/> Easily customizable.</span>
          </Popup>
        </Marker>
      </Map>
    );
  }
}

export default DeviceMap

DeviceTabs.js

export class DeviceTabs extends React.Component {
  state = {
    index: 0
  };

  handleTabChange = (index) => {
    this.setState({ index })
  };

  render () {
    return (
      <Tabs index={this.state.index} onChange={this.handleTabChange}>
        <Tab label='Values'>
          <DeviceTable {...this.props} />
        </Tab>
        <Tab label='Map'>
          <div className={style.leaflet}>
            <DeviceMap />
          </div>
        </Tab>
      </Tabs>
    )
  }
}

style.scss

.leaflet {
  height: 300px;
  width: 100%;
}

控制台中没有错误,我不知道该在哪里搜索了。由于代码段可以正常工作,所以这不是一个 bug。我错过了什么吗?

->

控制台没有报错,但我不知道还有哪些地方可以检查。因为代码段能够正常运行,所以这不是一个 bug。我可能漏掉了什么?

18个回答

123

看起来你还没有加载Leaflet样式表。

根据react-leaflet的GitHub指南:

如果你不熟悉Leaflet,请确保在使用这个库之前阅读它的快速入门指南。你需要将其CSS添加到页面中以正确渲染地图,并设置容器的高度。

http://leafletjs.com/examples/quick-start/

以下是你需要准备的内容:

<link rel="stylesheet" href="https://unpkg.com/leaflet@1.0.1/dist/leaflet.css" />

更新

注意:@ThomasThiebaud指出您可能还需要设置.leaflet-container的高度。

--

Ange Loron 还提供了一种正确的可选 JS 模块导入方式(与 cdn 或样式链接相比)。

import 'leaflet/dist/leaflet.css';


就其价值而言,文档页面设计不佳...并且维护者在 GitHub 中不断处理这个问题,但由于某种原因,问题是*用户连续没有进行所需设置的 * 锅。 /s


2
谢谢你的回答。使用这行代码后,我失去了所有内容(没有错误,也没有任何显示)。我认为地图高度还有其他问题,因为我正在使用CSS模块。我明天会进行调查。 - ThomasThiebaud
26
我明白了!你需要设置 .leaflet-container 的高度。 - ThomasThiebaud
8
有趣的是,有时候stackoverflow上的回答比官方文档提供的信息更好。 - Konrad
5
你是一个美丽的人。这条评论挽救了我的项目。 - Gibs LeFleur
import 'leaflet/dist/leaflet.css'不能直接使用,因为CSS文件中引用了dist文件夹中的图像文件。项目所有者需要记录如何正确设置这个问题。 - rm.rf.etc
显示剩余4条评论

65

我也是第一次使用这个库,文档不够清晰。但是以下是我认为必需的几点才能使它正常工作。

1. react-leaflet 包

2. Leaflet 包:

要么使用 npm 安装它:

npm install leaflet 并在使用 react-leafMap 的文件中导入 import 'leaflet/dist/leaflet.css';

要么将这两行包含在 index.html 中:

<link rel="stylesheet" href="https://unpkg.com/leaflet@1.6.0/dist/leaflet.css"
  integrity="sha512-xwE/Az9zrjBIphAcBb3F6JVqxf46+CDLwfLMHloNu6KEQCAWi6HcDUbeOfBIptF7tcCzusKFjFw2yuvEpDL9wQ=="
  crossorigin=""/>

<!-- Make sure you put this AFTER Leaflet's CSS -->
<script src="https://unpkg.com/leaflet@1.6.0/dist/leaflet.js"
  integrity="sha512-gZwIG9x3wUXg2hdXF6+rVkLF/0Vi9U8D2Ntg4Ga5I5BZpVkVxlJWbSQtXPSiUTtC0TjtGOmxa1AJPuV0CPthew=="
  crossorigin=""></script>

3. 将此添加到 App.css 或 index.css 文件中并导入该文件:(这是必须的)

.leaflet-container {
  width: 100wh; 
  height: 100vh;
}

// 或者直接将样式添加到地图容器中

<Map
   center={position}
   zoom={1}
   style={{ height: '100vh', width: '100wh' }}
   >
   <TileLayer .... />
</Map>


2
谢谢,只需要将宽度的字母改正为“w”。 style={{ height: '100vh', width: '100wh' }} - Beginner
1
谢谢,对我来说重要的是添加import 'leaflet/dist/leaflet.css'; - Mrmld Sky
在使用 react-leaf 中的 Map 的文件中导入 'leaflet/dist/leaflet.css',这对我起作用了。 - ng-someone

31

以防万一有人遇到同样的问题,我通过添加以下内容解决了它:

import 'leaflet/dist/leaflet.css';

17

试试这个

import React, { Component } from 'react'
import Leaflet from 'leaflet';
import { Map, TileLayer, Marker, Popup } from 'react-leaflet'
import 'leaflet/dist/leaflet.css';

Leaflet.Icon.Default.imagePath =
'../node_modules/leaflet'

delete Leaflet.Icon.Default.prototype._getIconUrl;

Leaflet.Icon.Default.mergeOptions({
    iconRetinaUrl: require('leaflet/dist/images/marker-icon-2x.png'),
    iconUrl: require('leaflet/dist/images/marker-icon.png'),
    shadowUrl: require('leaflet/dist/images/marker-shadow.png')
});


export default class MapDisplay extends Component {
state = {
    lat: 41.257017,
    lng: 29.077524,
    zoom: 13,
}


render() {
    const position = [this.state.lat, this.state.lng]
    return (
    <Map center={position} zoom={this.state.zoom} style={{height : '400px'}}>
        <TileLayer
        attribution='&amp;copy <a href="http://osm.org/copyright">OpenStreetMap</a> contributors'
        url="https://{s}.tile.openstreetmap.org/{z}/{x}/{y}.png"
        />
        <Marker position={position}>
        <Popup>
            Son Konum
        </Popup>
        </Marker>
    </Map>
    )
}
}

它有助于查看地图,但我仍然看不到标记图标。 - yehonatan yehezkel
Leaflet.Icon.Default.imagePath = '//cdnjs.cloudflare.com/ajax/libs/leaflet/1.3.4/images/'; 这解决了我的问题。 - yehonatan yehezkel
这个很好用,我终于可以使用它了。 - Alan Yu

14

你只需要将以下内容添加到你的CSS文件中,我之前也遇到了同样的问题,这种方法解决了我的问题:

  @import url("~leaflet/dist/leaflet.css");

.leaflet-container {
  width: 100%;
  height: 100vh;
}

这很聪明,它起作用了。 - lewis machilika

12

您可以通过在 index.html 文件的 head 元素中添加以下代码行来修复问题。

<link rel="stylesheet" href="//cdnjs.cloudflare.com/ajax/libs/normalize/7.0.0/normalize.min.css">
<link rel="stylesheet" href="//cdnjs.cloudflare.com/ajax/libs/leaflet/1.3.1/leaflet.css">

<style>
  body {
    padding-bottom: 30px;
  }
  h1, h2, p {
    font-family: sans-serif;
    text-align: center;
  }
  .leaflet-container {
    height: 400px;
    width: 80%;
    margin: 0 auto;
  }
</style>

注意:您可以更改CSS以满足您的需求。


9

导入leaflet.css

import 'leaflet/dist/leaflet.css';

有时在添加leaflet文件后,关于图像加载会出现两个错误。为了解决这些错误,在导入部分导入marker-icon.png和marker-shadow.png,然后定义L.Marker.prototype.options.icon:

import icon from 'leaflet/dist/images/marker-icon.png';
import iconShadow from 'leaflet/dist/images/marker-shadow.png';
import iconRetina from 'leaflet/dist/images/marker-icon-2x.png';
let DefaultIcon = L.icon({
            ...L.Icon.Default.prototype.options,
            iconUrl: icon,
            iconRetinaUrl: iconRetina,
            shadowUrl: iconShadow
        });
        L.Marker.prototype.options.icon = DefaultIcon;

如果地图没有显示,将高度和宽度(style={{width: '100%',height: '400px'}})添加到Map标签中作为样式。
<Map
center={[35.6892, 51.3890]}
style={{width: '100%',height: '400px'}}
>

增加高度和宽度


8
在我的情况下,使用React时添加这个有帮助:
<MapContainer
        center={{ lat: 51.505, lng: -0.09 }}
        zoom={13}
        style={{ height: "50vh", width: "100%" }}
        scrollWheelZoom={false}
      >

至少需要一个带有vh的高度或宽度参数,否则仅使用100%/100%将无法正常工作。


4

如果有人想要将这个嵌入到一个独立的组件中,我经过一些挣扎之后找出了如何做到这一点。

import React from 'react';
import { MapContainer, Marker, Popup, TileLayer } from "react-leaflet";
import './MapObject.css'

const position = [51.505, -0.09]
class MapObject extends React.Component {
    render() {

        return (
                <MapContainer center={position} zoom={13} scrollWheelZoom={false}>
                <TileLayer
                attribution='&copy; <a href="http://osm.org/copyright">OpenStreetMap</a> contributors'
                url="https://{s}.tile.openstreetmap.org/{z}/{x}/{y}.png"
                />
                <Marker position={position}>
                <Popup>
                    A pretty CSS3 popup. <br /> Easily customizable.
                </Popup>
                </Marker>
            </MapContainer>           
        );
    }
}

然后,这个内容会被简单地加载。

import MapObject from './MapObject'

同时,MapObject.css需要像这样(没有它,地图根本不会出现)

.leaflet-container {
    width: 100%;
    height: 100vh;
  }

这是生成的地图:

在此输入图片描述


3
**Go to your react app folder my-app/public/index.html open index.html

and pest this two links in head tag
<head>
<link rel="stylesheet" href="https://unpkg.com/leaflet@1.4.0/dist/leaflet.css" />
<script src="https://unpkg.com/leaflet@1.4.0/dist/leaflet.js"></script>

</head>**


<!DOCTYPE html>
<html lang="en">
  <head>
    <meta charset="utf-8" />
    <link rel="stylesheet" href="//cdnjs.cloudflare.com/ajax/libs/normalize/7.0.0/normalize.min.css">
<link rel="stylesheet" href="//cdnjs.cloudflare.com/ajax/libs/leaflet/1.3.1/leaflet.css">
    <style>
    #mpp {

            overflow: hidden;
        }
    </style>
    <link rel="shortcut icon" href="%PUBLIC_URL%/favicon.ico" />
    <meta
      name="viewport"
      content="width=device-width, initial-scale=1, shrink-to-fit=no"
    />
    <meta name="theme-color" content="#000000" />
    <!--
      manifest.json provides metadata used when your web app is installed on a
      user's mobile device or desktop. See https://developers.google.com/web/fundamentals/web-app-manifest/
    -->
    <link rel="manifest" href="%PUBLIC_URL%/manifest.json" />
    <!--
      Notice the use of %PUBLIC_URL% in the tags above.
      It will be replaced with the URL of the `public` folder during the build.
      Only files inside the `public` folder can be referenced from the HTML.

      Unlike "/favicon.ico" or "favicon.ico", "%PUBLIC_URL%/favicon.ico" will
      work correctly both with client-side routing and a non-root public URL.
      Learn how to configure a non-root public URL by running `npm run build`.
    -->
    <title>React App</title>
  </head>
  <body>
    <noscript>You need to enable JavaScript to run this app.</noscript>
    <div id="root"></div>
    <!--
      This HTML file is a template.
      If you open it directly in the browser, you will see an empty page.

      You can add webfonts, meta tags, or analytics to this file.
      The build step will place the bundled scripts into the <body> tag.

      To begin the development, run `npm start` or `yarn start`.
      To create a production bundle, use `npm run build` or `yarn build`.
    -->
  </body>
</html>

网页内容由stack overflow 提供, 点击上面的
可以查看英文原文,
原文链接