带有居中和裁剪功能的WPF图像主机

4
我感觉可能需要一些转换器,但这就是我想做的。我想要一个单独的Image控件(因为它在绑定到真实数据的数据模板中),具有以下参数:
  • 在90x90的空间内居中(不进行任何拉伸)。
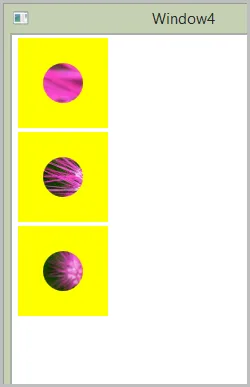
  • 圆形剪裁半径为40像素(水平和垂直均应该如此)。
  • 如果图像> 90x90,则应在90x90的空间中居中,并从中心裁剪一个40x40的圆形。
  • 如果图像< 90x90,则应在90x90的空间内居中。剪切圆应没有效果,因为整个图像都包含在裁剪区域内。
下面是我的XAML代码。对于正好为90x90的图片来说,它按预期工作(即它们不会被拉伸,它们居中显示并且剪切正常)。对于大于90x90的图像,剪裁正常工作,但图像没有居中显示。对于小于90x90的图像,图像居中显示,但剪裁似乎将图像放置在Image内容的左上角区域,因此剪裁了图像的左上部分。
<Style x:Key="ImageStyle">
    <Setter Property="Width" Value="90" />
    <Setter Property="Height" Value="90" />
    <Setter Property="Stretch" Value="None" />
    <Setter Property="HorizontalAlignment" Value="Center" />
    <Setter Property="VerticalAlignment" Value="Center" />
    <Setter Property="Clip">
        <Setter.Value>
            <EllipseGeometry Center="45,45" RadiusX="40" RadiusY="40" />
        </Setter.Value>
    </Setter>
</Style>

<Grid>
    <!-- Other Stuff -->
    <Image Source="{Binding ImagePath}" Style="{StaticResource ImageStyle}" />
</Grid>

我可以通过将内容包裹在网格中并在那里移动裁剪来解决第二个问题(小图像裁剪),但是大型内容无法居中:

<Grid>
    <!-- Other Stuff -->
    <Grid Width="90" Height="90">
        <Grid.Clip>
            <EllipseGeometry Center="45,45" RadiusX="40" RadiusY="40" />
        </Grid.Clip>
        <Image Source="{Binding ImagePath}" Style="{StaticResource ImageStyle}" />
    </Grid>
</Grid>
3个回答

10
我最终只能从图像样式中删除宽度和高度属性。使用WPF Snoop查看时,图像现在比包含的网格大,但由于网格具有固定大小,因此它会在其中心对齐。

我最终只能从图像样式中删除宽度和高度属性。使用WPF Snoop查看时,图像现在比包含的网格大,但由于网格具有固定大小,因此它会在其中心对齐。

<Style x:Key="ImageStyle">
    <Setter Property="Stretch" Value="None" />
    <Setter Property="HorizontalAlignment" Value="Center" />
    <Setter Property="VerticalAlignment" Value="Center" />
</Style>

<Grid>
    <!-- Other Stuff -->
    <Grid Width="90" Height="90">
        <Grid.Clip>
            <EllipseGeometry Center="45,45" RadiusX="40" RadiusY="40" />
        </Grid.Clip>
        <Image Source="{Binding ImagePath}" Style="{StaticResource ImageStyle}" />
    </Grid>
</Grid>

3

我发现最简单的方法是使用不同的元素来居中和裁剪图像,比如一个矩形,然后用ImageBrush来填充它。例如:

<Rectangle>
    <Rectangle.Fill>
        <ImageBrush
            ImageSource="{Binding SomeUriPropertyOrOther}"
            Stretch="UniformToFill"/>
    </Rectangle.Fill>
</Rectangle>

这段代码实现了居中和裁剪功能。(我猜对于Stretch == Fill和Uniform来说这是无关紧要的。)

0

在您的数据模板中使用ImageBrush。然后,您可以绘制到椭圆形中,而不必使用剪切。

XAML

  <Grid>
    <ListBox ItemsSource='{Binding}'>
      <ListBox.ItemTemplate>
        <DataTemplate>

          <Grid Width='90' Height='90' Background='Yellow'>

          <Ellipse Width='40'
                   Height='40'>
            <Ellipse.Fill>
              <ImageBrush ImageSource='{Binding ImagePath}'
                          Stretch='None' />
            </Ellipse.Fill>

          </Ellipse>
          </Grid>
        </DataTemplate>
      </ListBox.ItemTemplate>
    </ListBox>

代码

public partial class Window4 : Window {
    public Window4() {
      InitializeComponent();

      var data = new List<DemoData>();
      data.Add(new DemoData { Header="Large Image", ImagePath="flower.png"});
      data.Add(new DemoData { Header = "Medium Image", ImagePath = "flower_med.png" });
      data.Add(new DemoData { Header = "Small Image", ImagePath = "flower_small.png" });
      this.DataContext = data;
    }
  }

  internal class DemoData {
    public string Header { get; set; }
    public string ImagePath { get; set; }
  }

结果

ListBox with ellipses


网页内容由stack overflow 提供, 点击上面的
可以查看英文原文,
原文链接