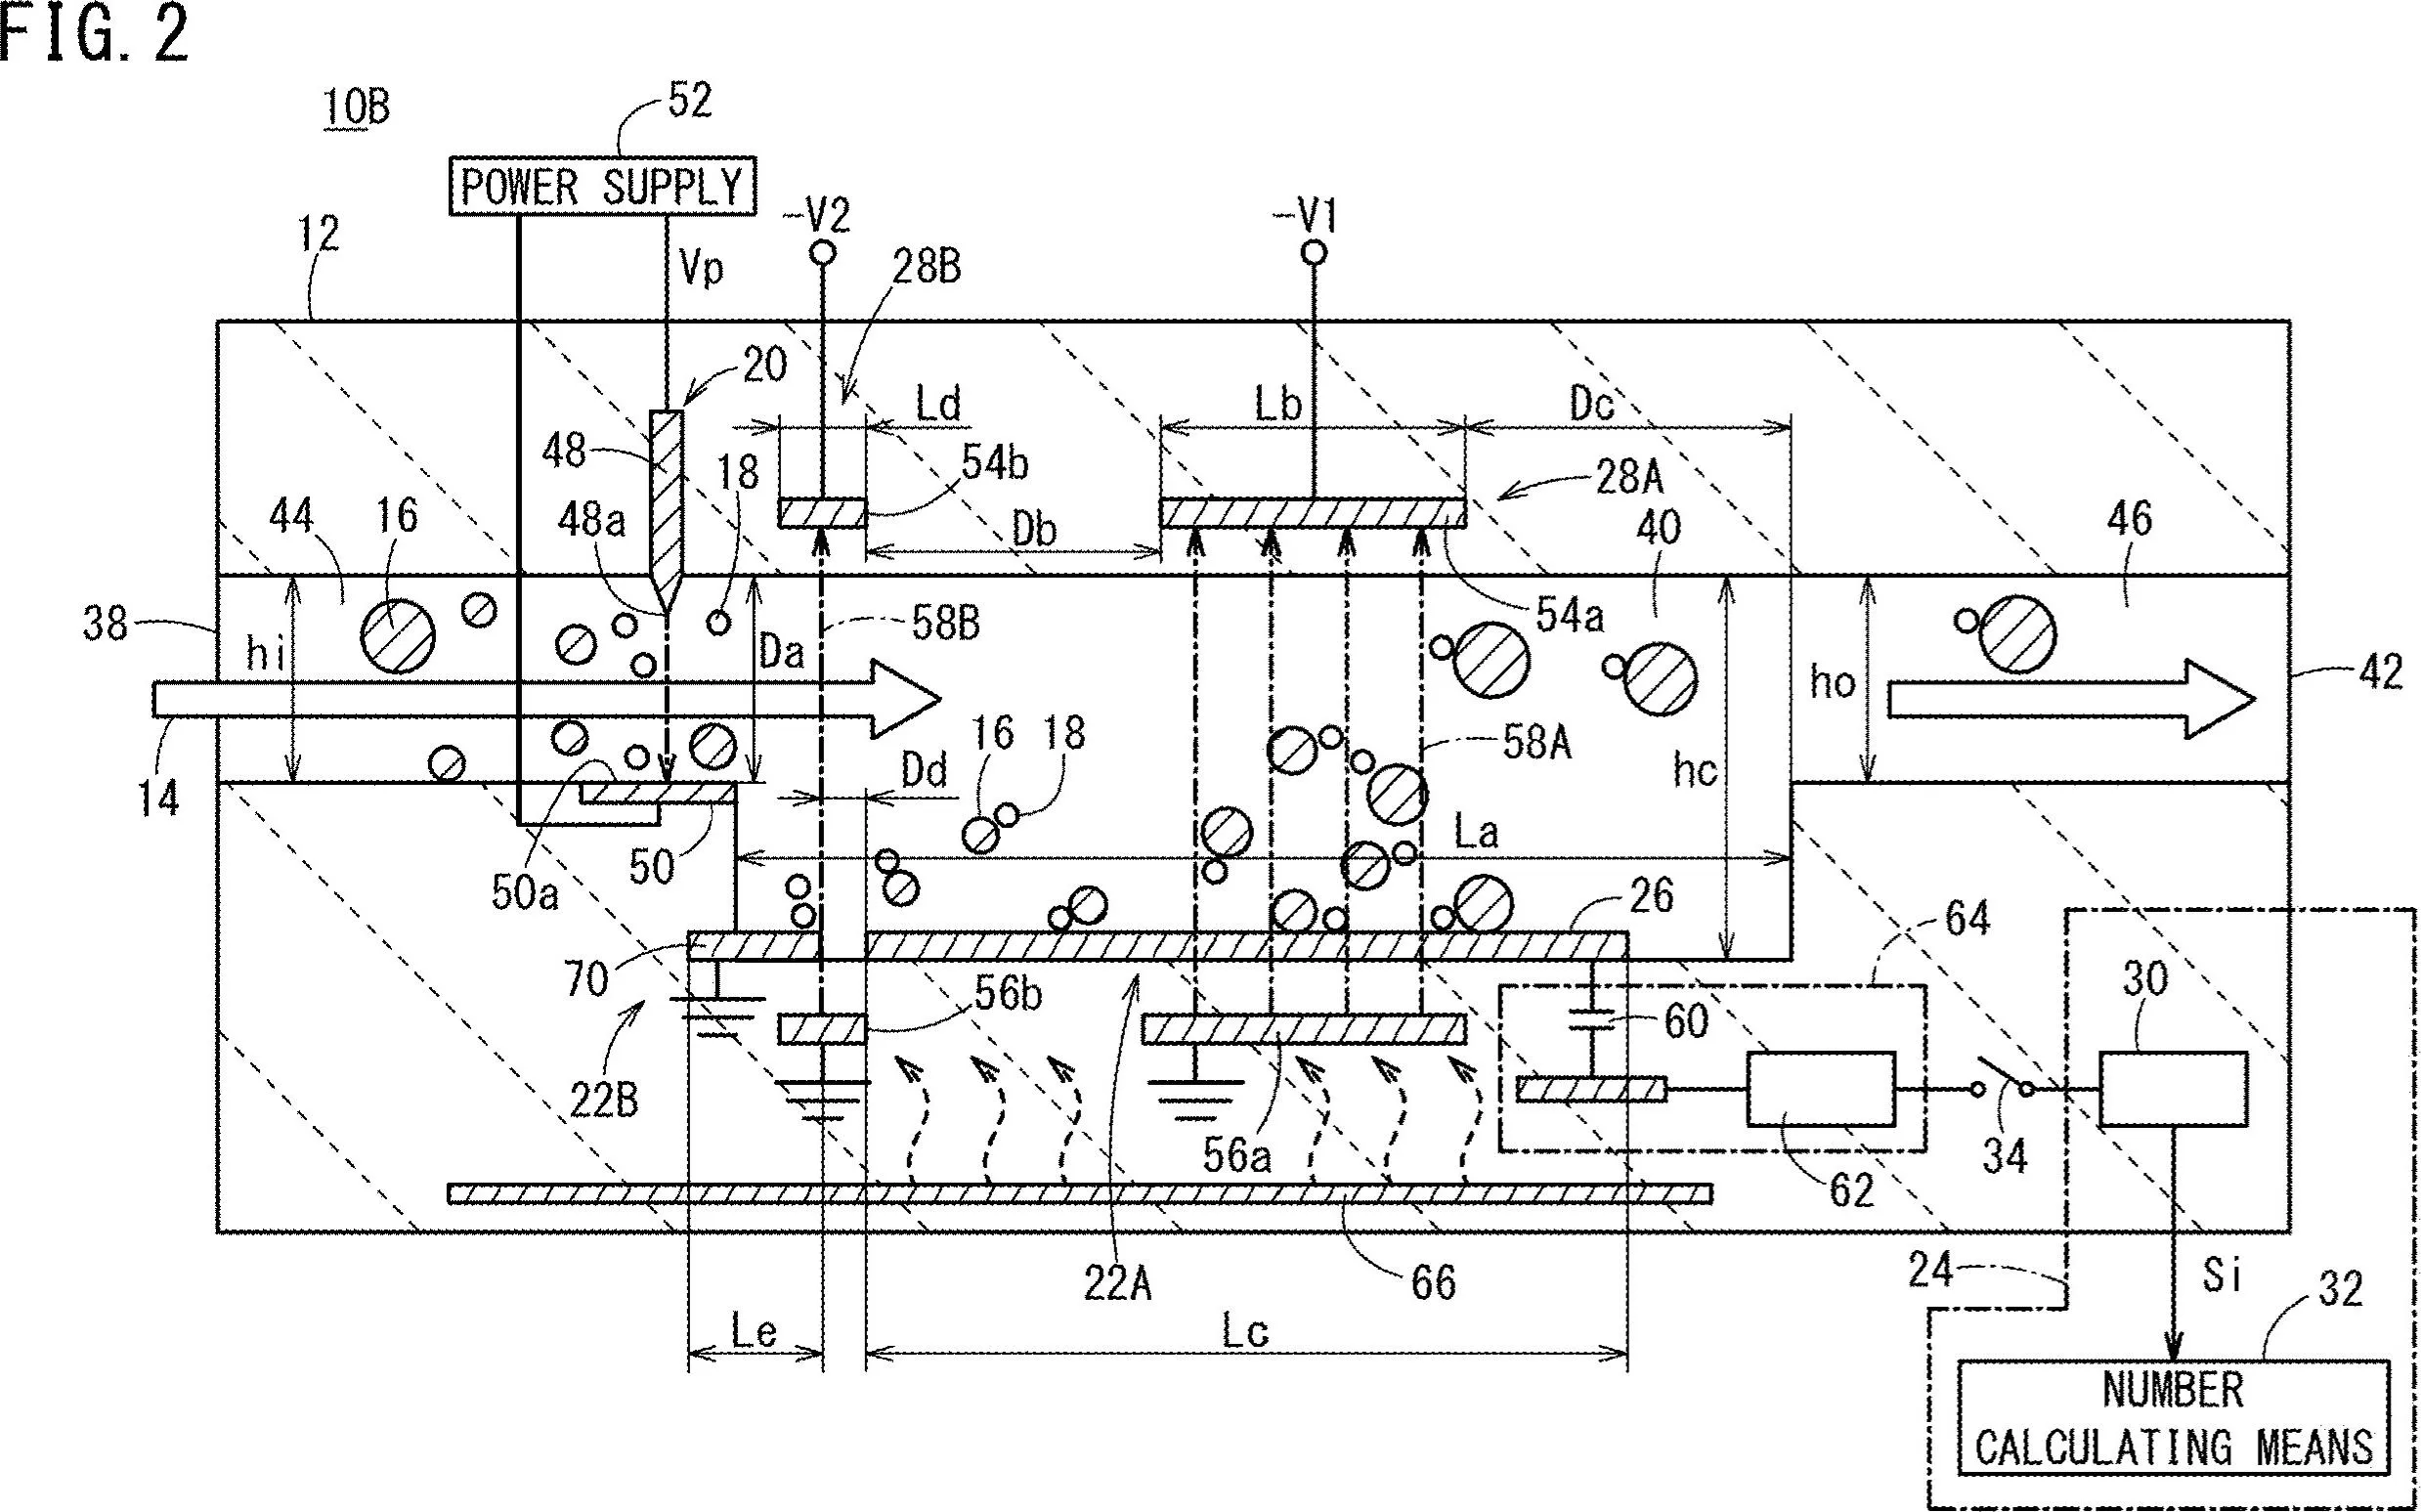
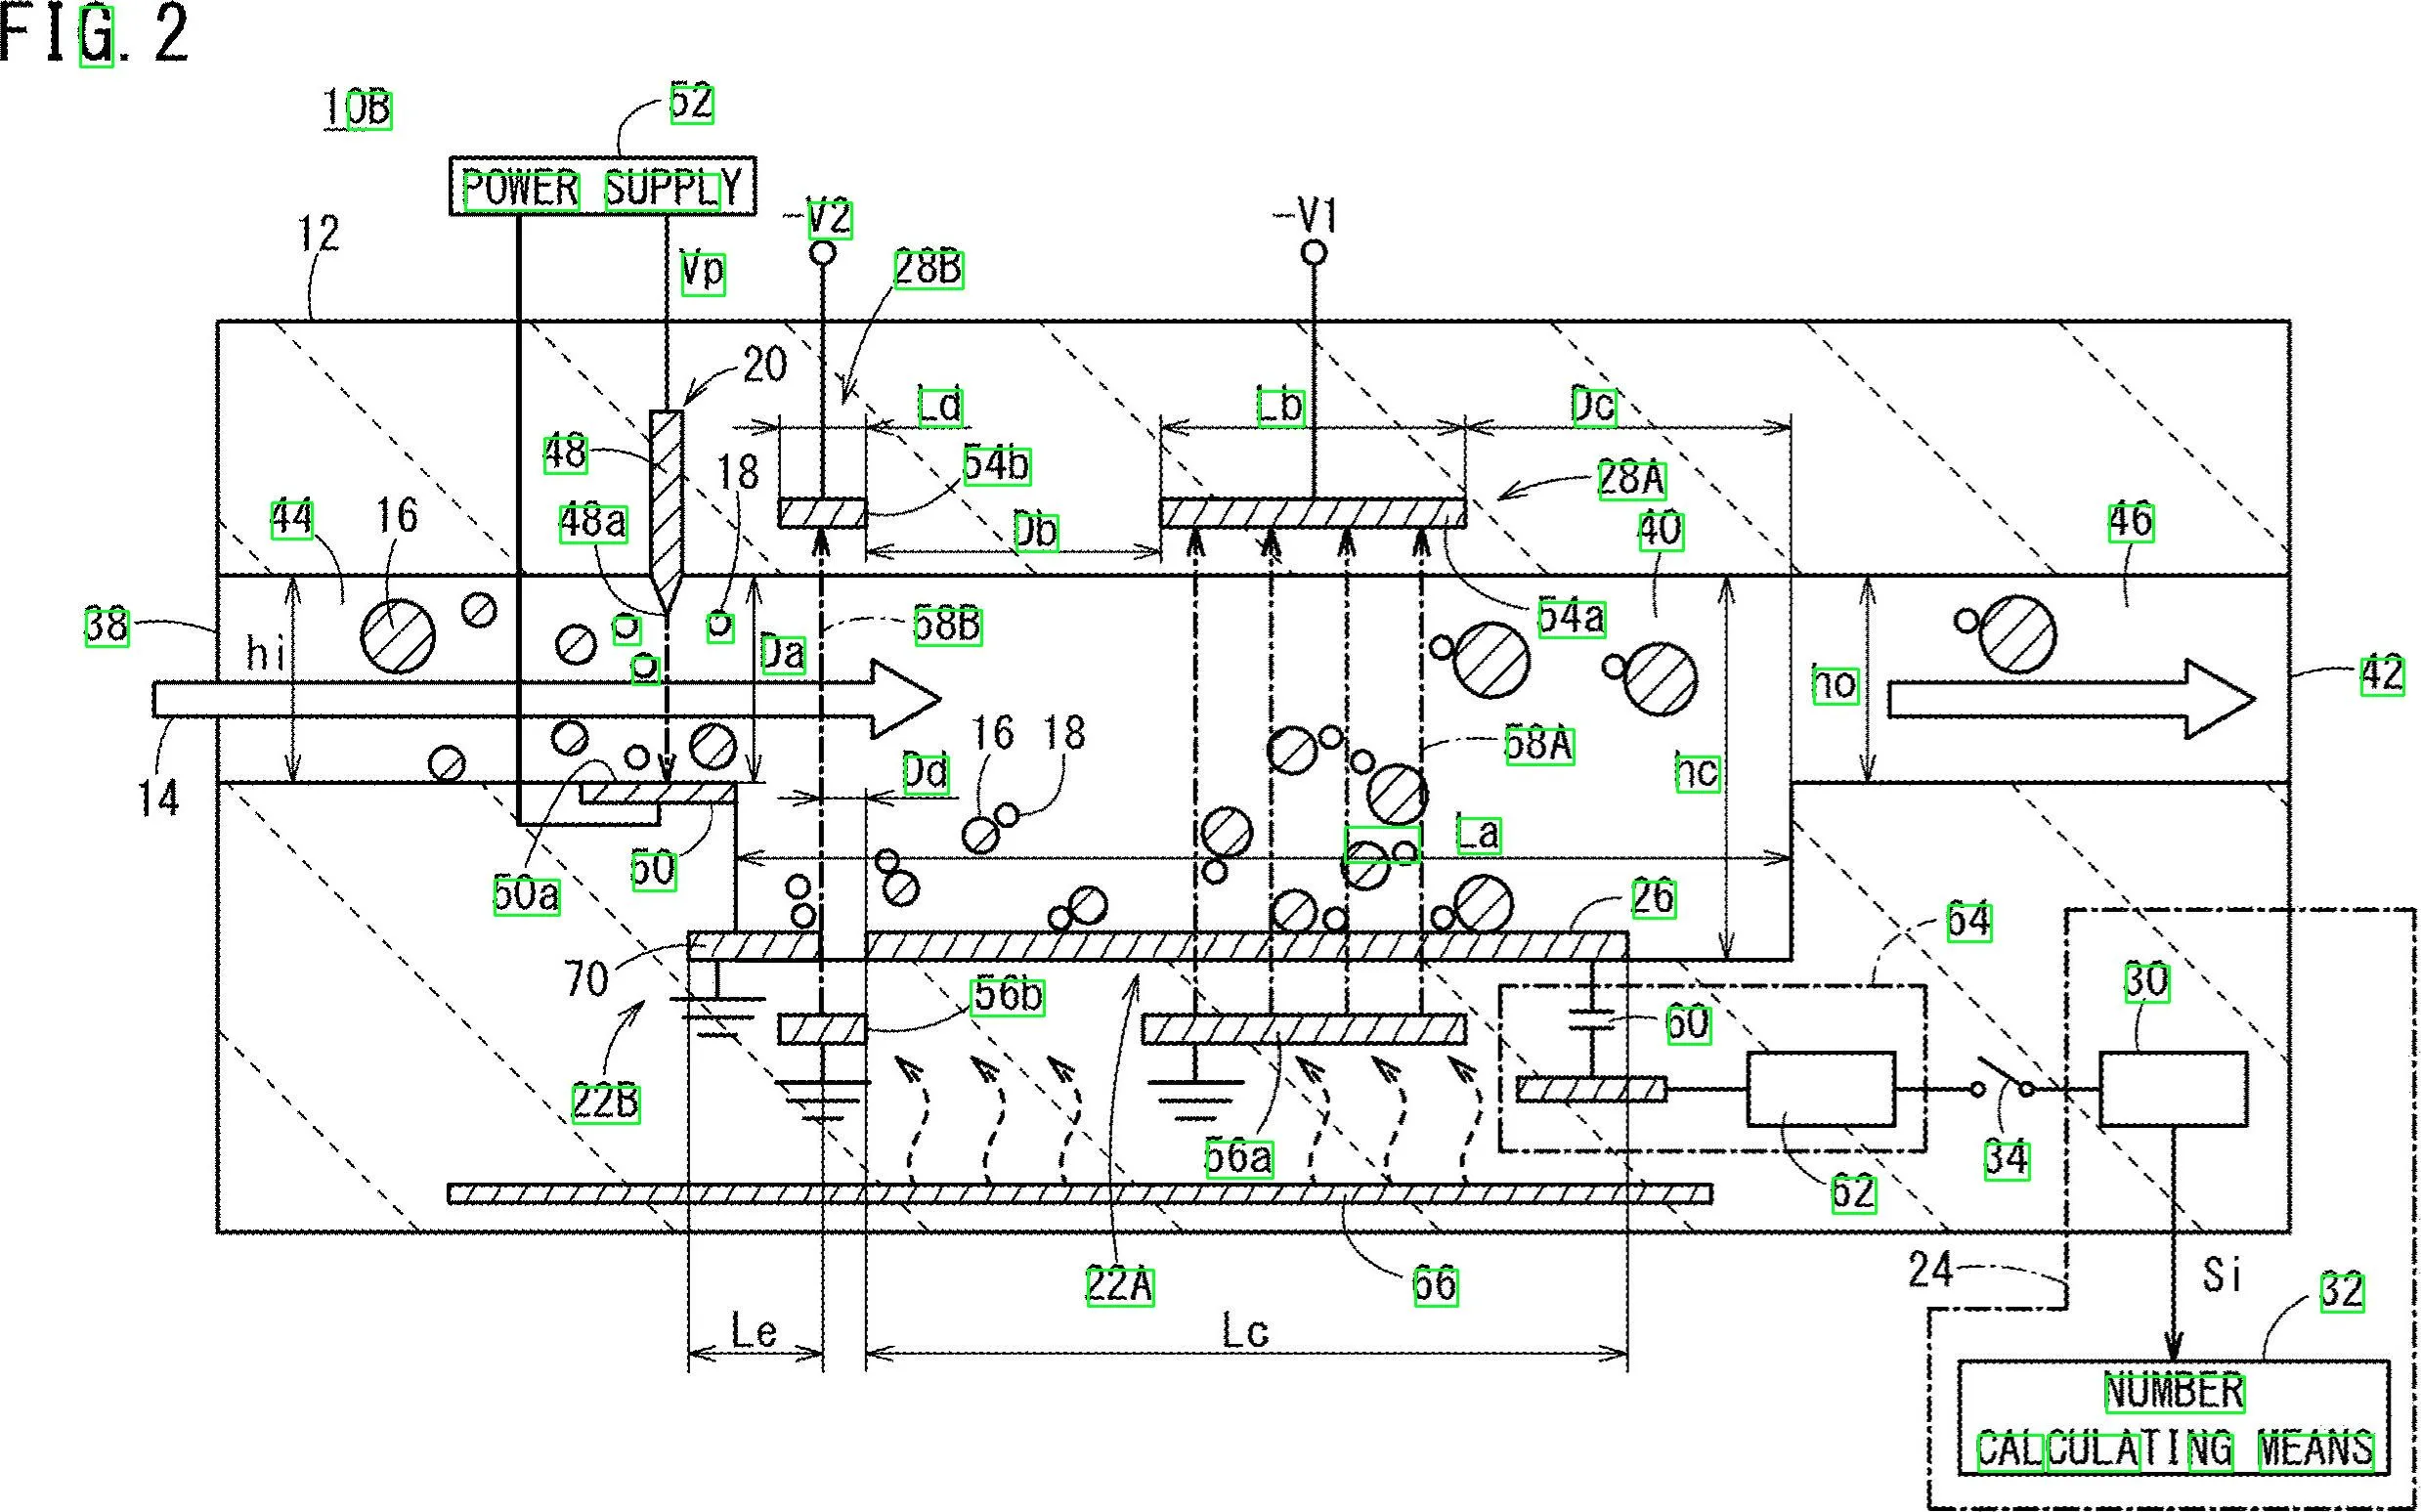
我有一张包含文字(数字和字母)的图片。我想获取此图中所有文字和数字的位置,并提取出所有文字。
移除水平和垂直线条。使用水平和垂直内核创建cv2.getStructuringElement(), 然后用cv2.drawContours()移除线条。
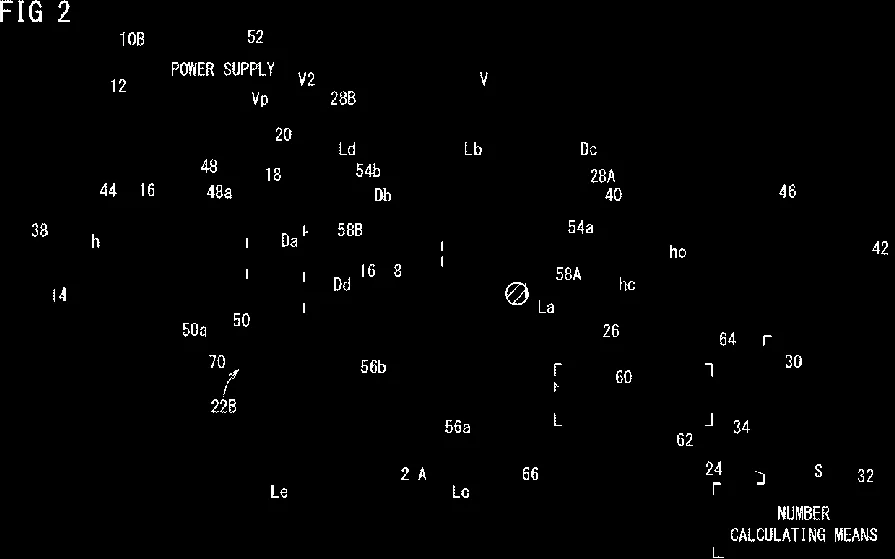
移除对角线,圆形对象和曲线轮廓。使用轮廓面积cv2.contourArea()和轮廓逼近cv2.approxPolyDP()来隔离非文本轮廓。
提取文本ROI并OCR。找到轮廓并过滤ROI,然后使用Pytesseract进行OCR。
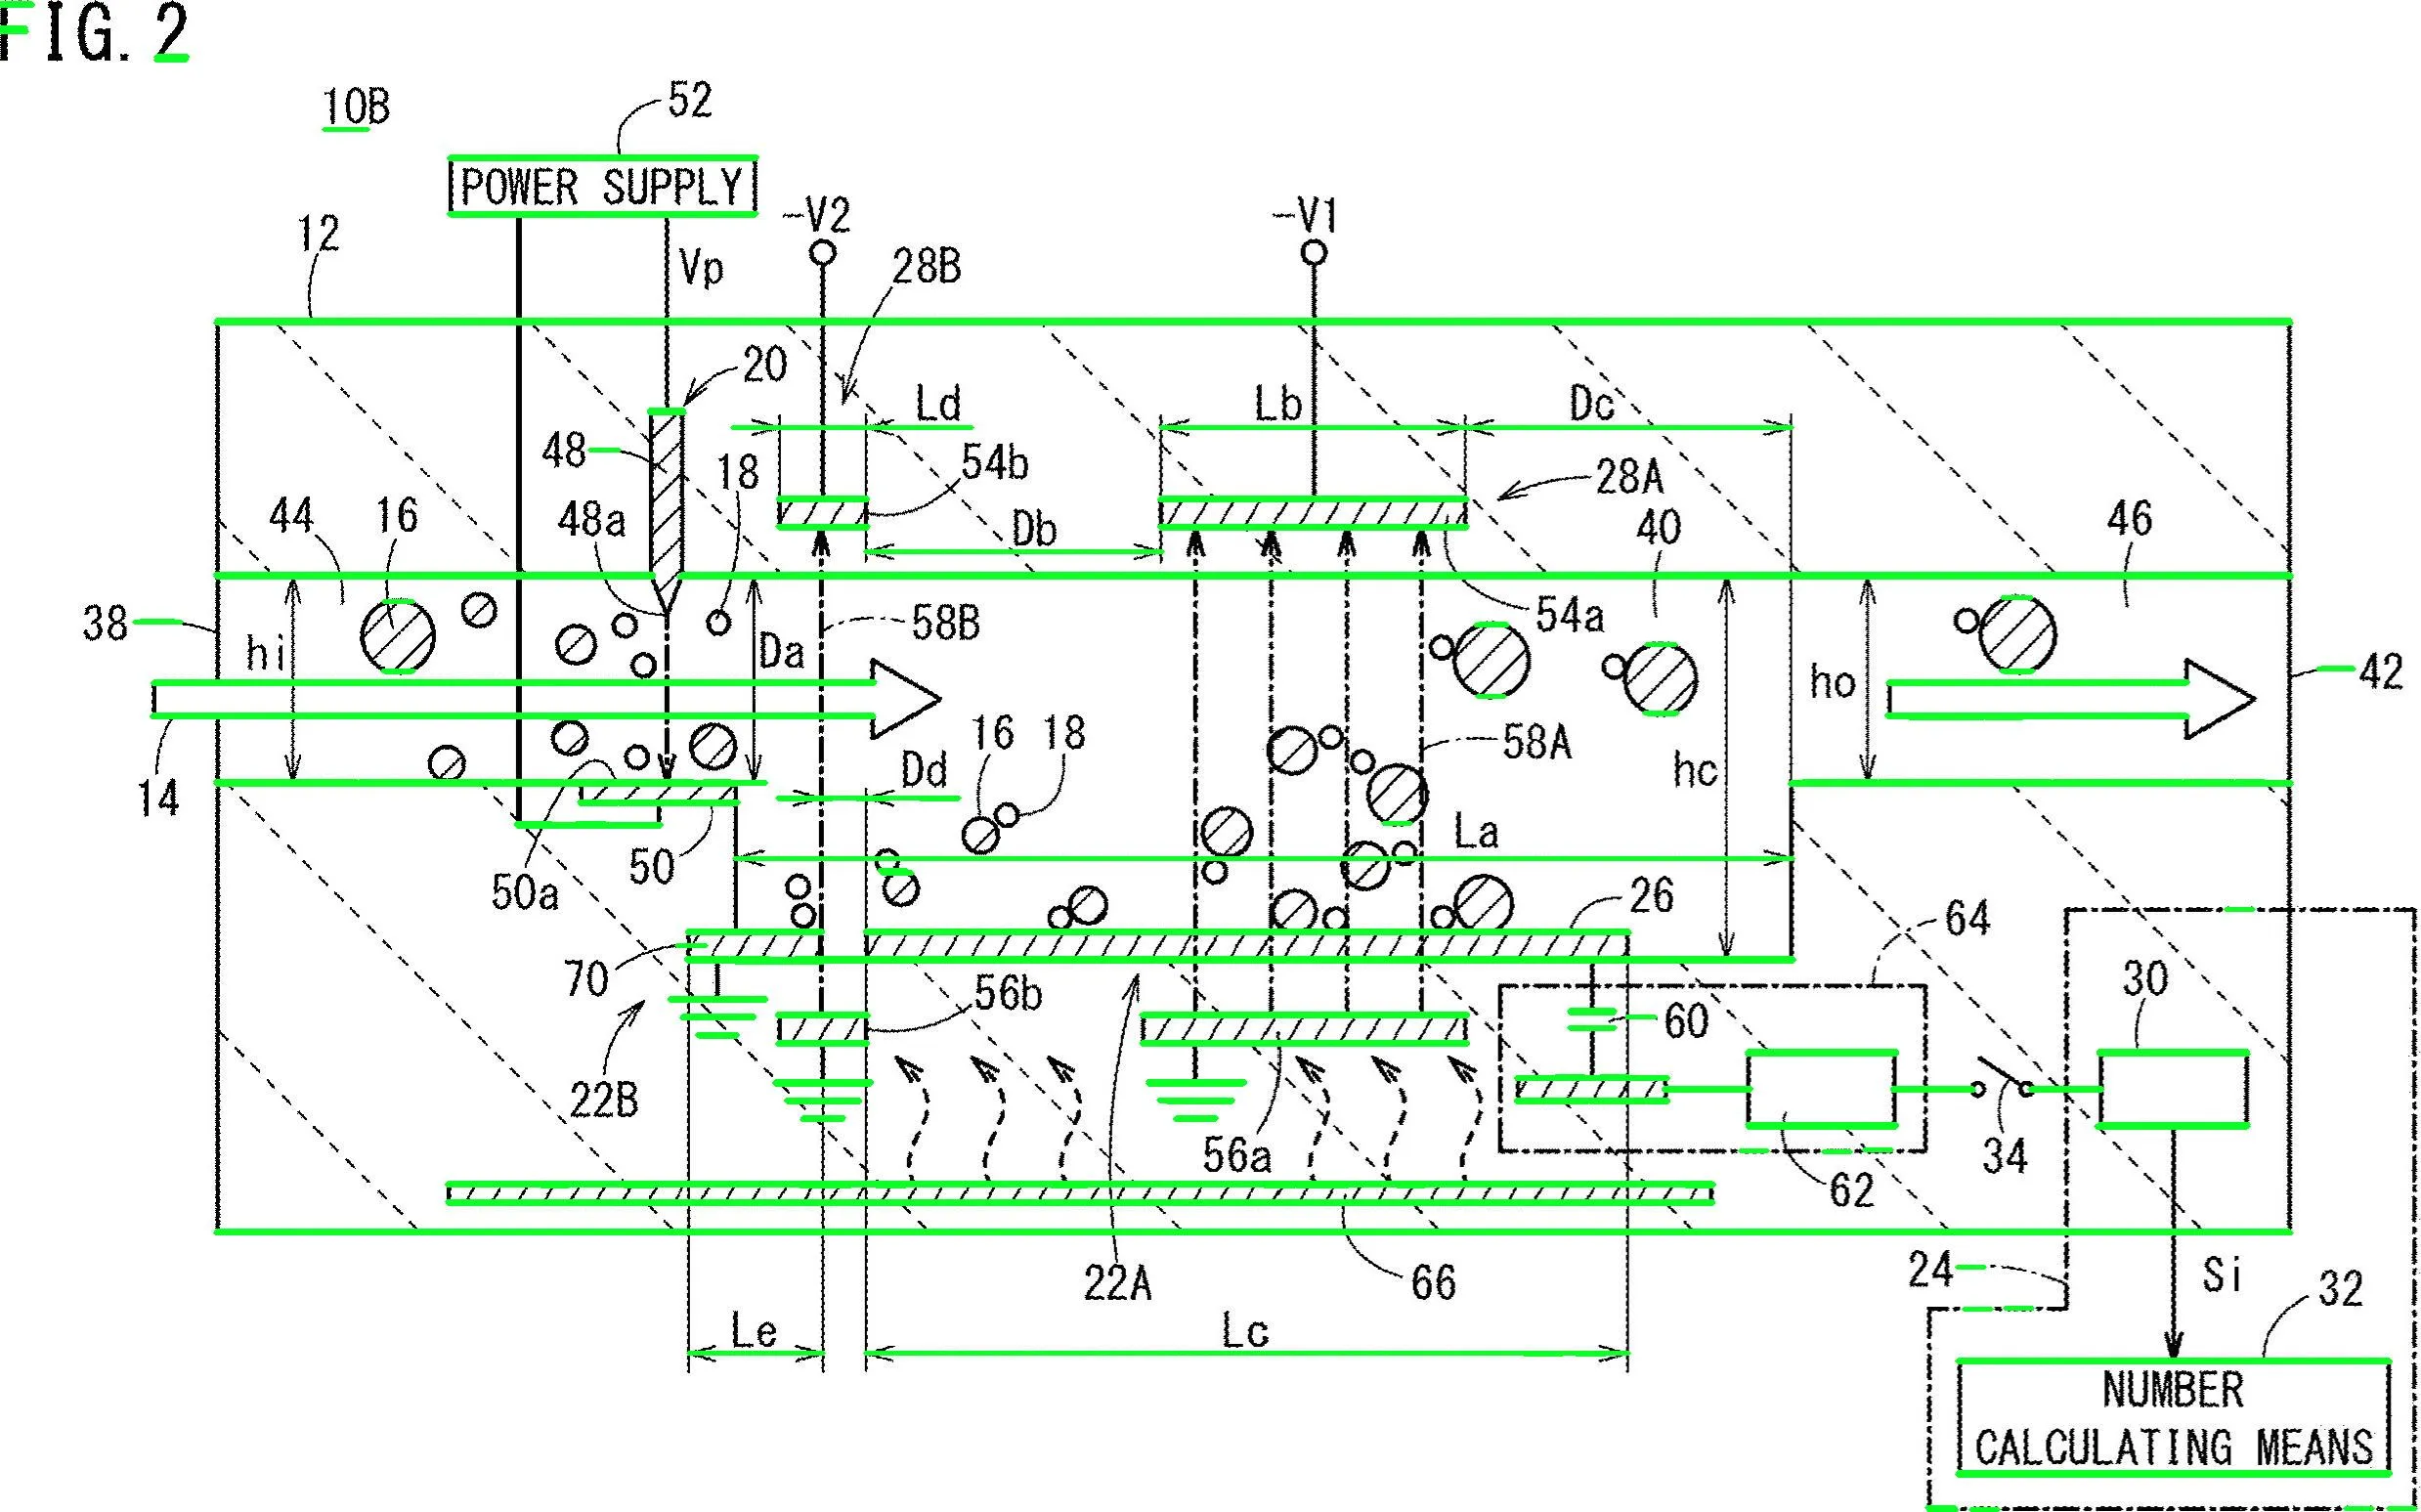
移除绿色高亮显示的水平线
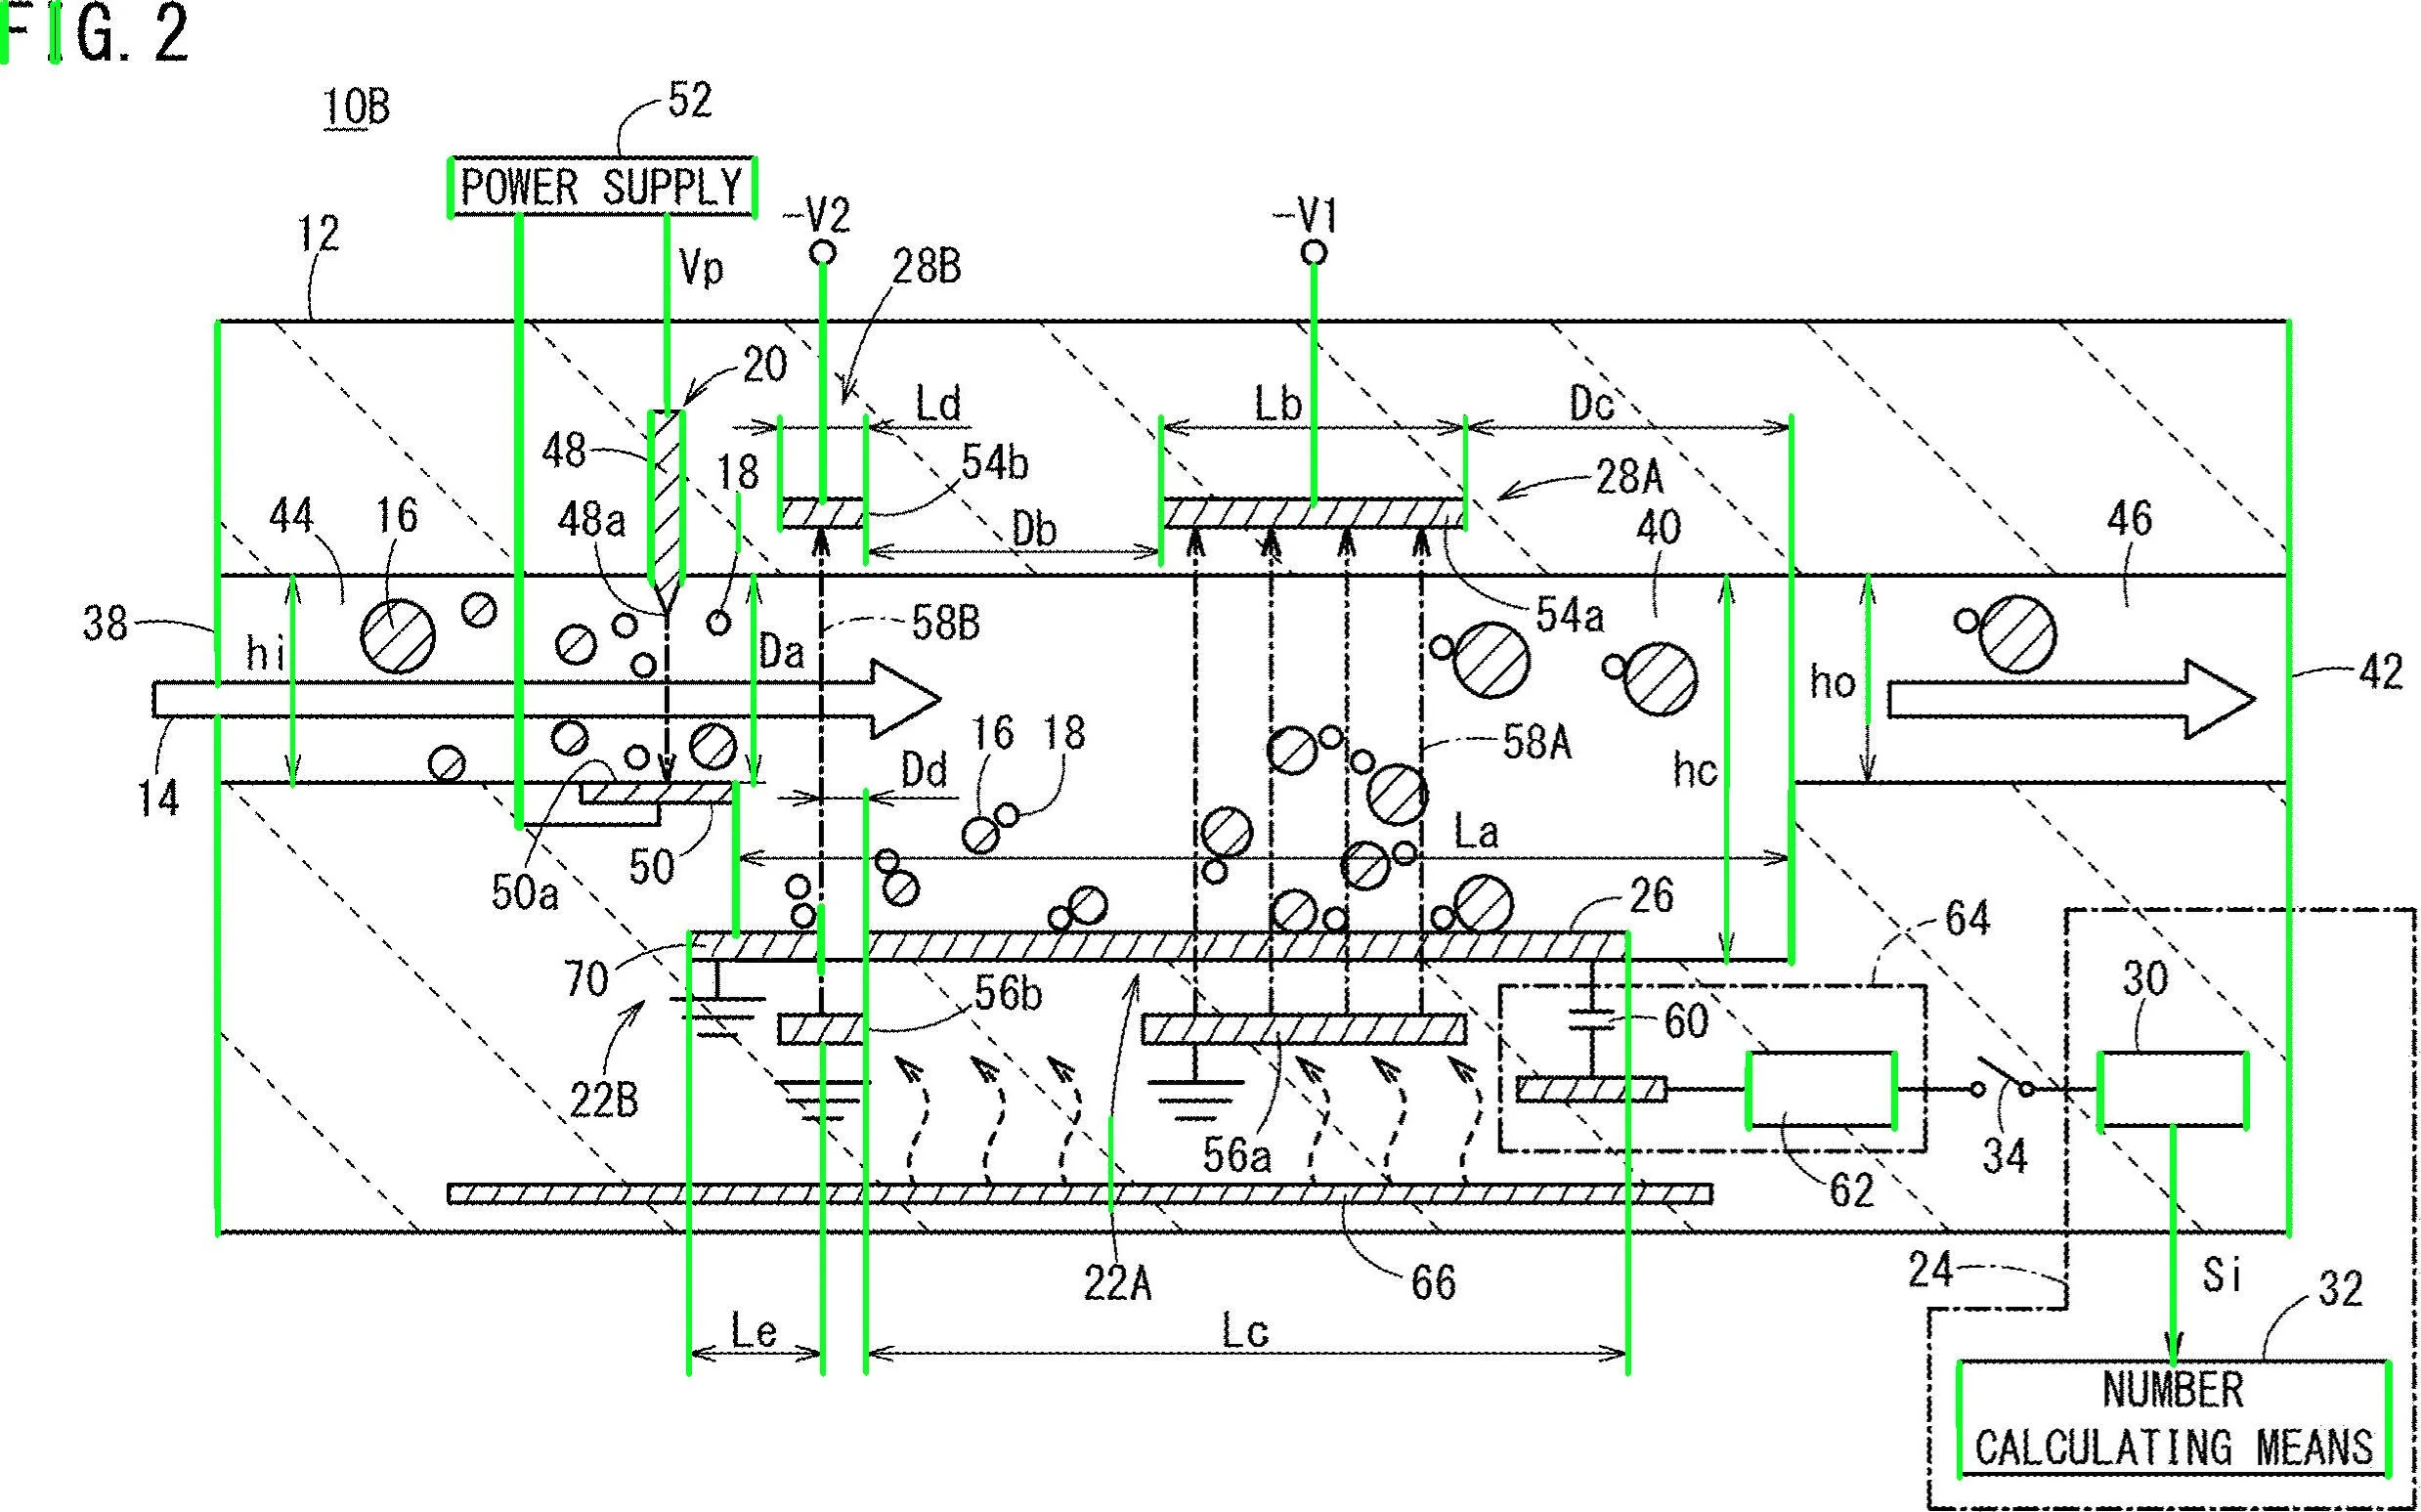
移除了垂直线
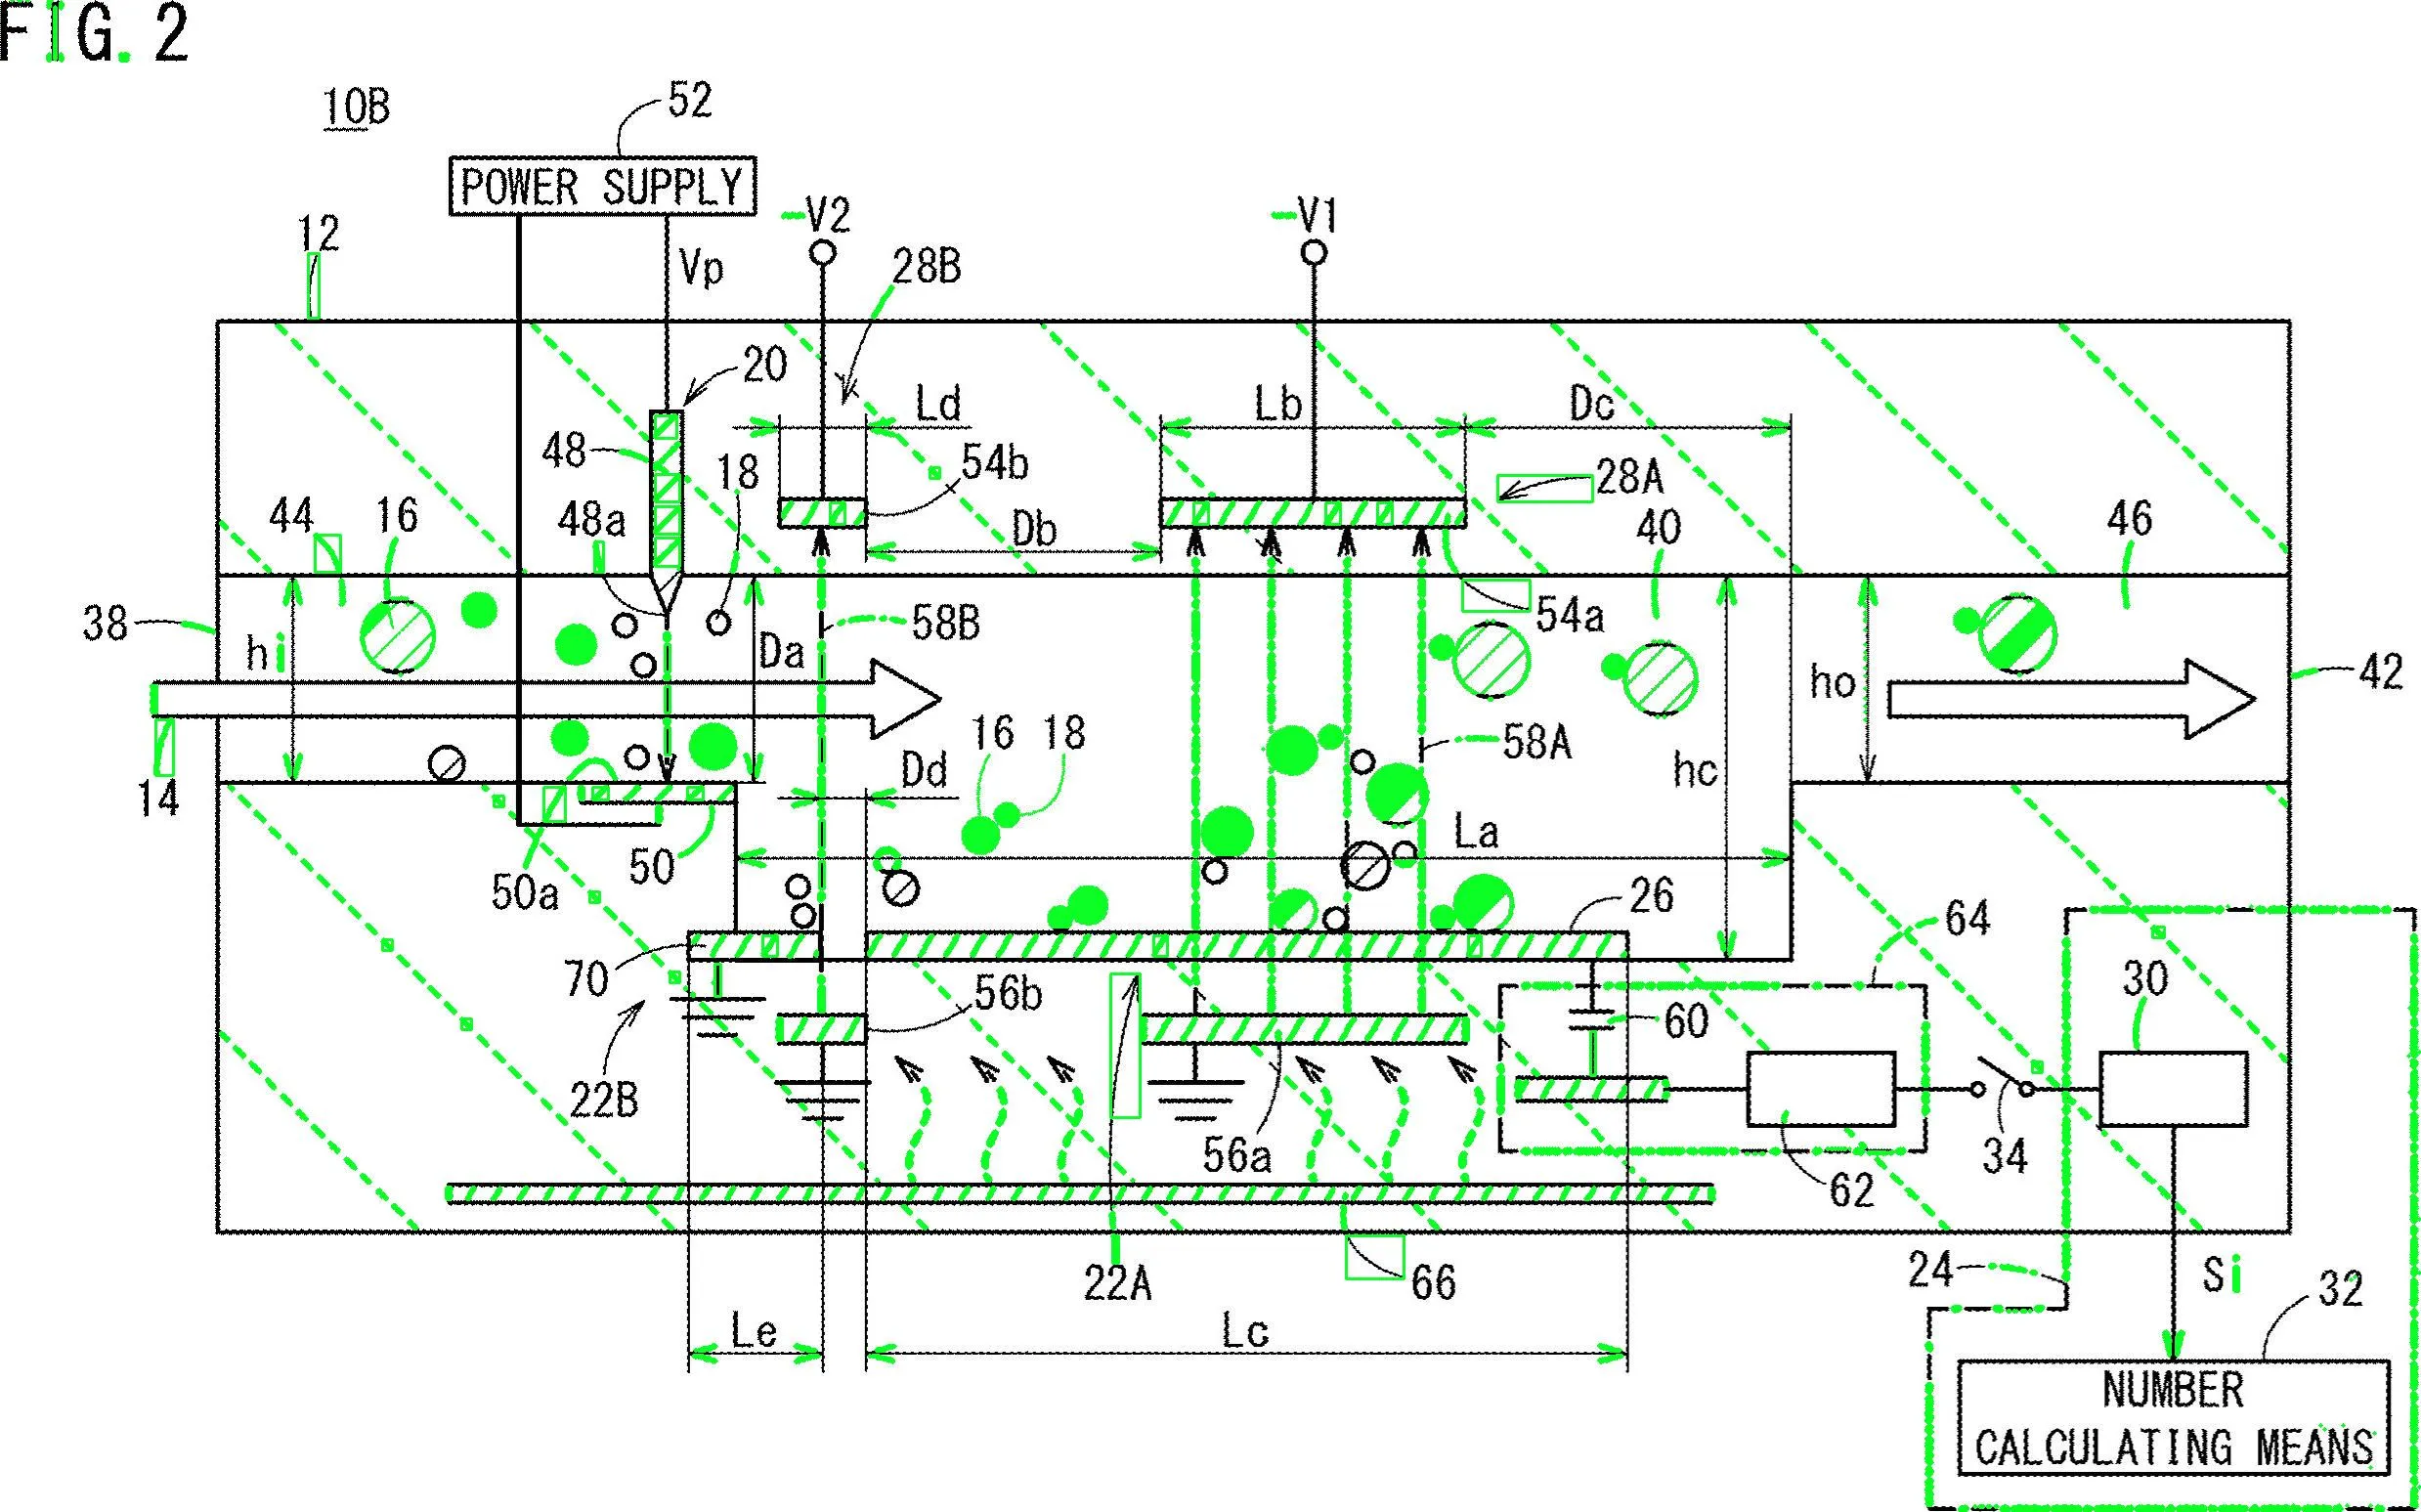
移除各种非文本轮廓(如对角线、圆形对象和曲线)
import cv2
import numpy as np
import pytesseract

pytesseract.pytesseract.tesseract_cmd = r"C:\Program Files\Tesseract-OCR\tesseract.exe"

# Load image, grayscale, Otsu's threshold
image = cv2.imread('1.jpg')
gray = cv2.cvtColor(image, cv2.COLOR_BGR2GRAY)
thresh = cv2.threshold(gray, 0, 255, cv2.THRESH_BINARY_INV + cv2.THRESH_OTSU)[1]
clean = thresh.copy()

# Remove horizontal lines
horizontal_kernel = cv2.getStructuringElement(cv2.MORPH_RECT, (15,1))
detect_horizontal = cv2.morphologyEx(thresh, cv2.MORPH_OPEN, horizontal_kernel, iterations=2)
cnts = cv2.findContours(detect_horizontal, cv2.RETR_EXTERNAL, cv2.CHAIN_APPROX_SIMPLE)
cnts = cnts[0] if len(cnts) == 2 else cnts[1]
for c in cnts:
    cv2.drawContours(clean, [c], -1, 0, 3)

# Remove vertical lines
vertical_kernel = cv2.getStructuringElement(cv2.MORPH_RECT, (1,30))
detect_vertical = cv2.morphologyEx(thresh, cv2.MORPH_OPEN, vertical_kernel, iterations=2)
cnts = cv2.findContours(detect_vertical, cv2.RETR_EXTERNAL, cv2.CHAIN_APPROX_SIMPLE)
cnts = cnts[0] if len(cnts) == 2 else cnts[1]
for c in cnts:
    cv2.drawContours(clean, [c], -1, 0, 3)

cnts = cv2.findContours(clean, cv2.RETR_EXTERNAL, cv2.CHAIN_APPROX_SIMPLE)
cnts = cnts[0] if len(cnts) == 2 else cnts[1]
for c in cnts:
    # Remove diagonal lines
    area = cv2.contourArea(c)
    if area < 100:
        cv2.drawContours(clean, [c], -1, 0, 3)
    # Remove circle objects
    elif area > 1000:
        cv2.drawContours(clean, [c], -1, 0, -1)
    # Remove curve stuff
    peri = cv2.arcLength(c, True)
    approx = cv2.approxPolyDP(c, 0.02 * peri, True)
    x,y,w,h = cv2.boundingRect(c)
    if len(approx) == 4:
        cv2.rectangle(clean, (x, y), (x + w, y + h), 0, -1)

open_kernel = cv2.getStructuringElement(cv2.MORPH_RECT, (2,2))
opening = cv2.morphologyEx(clean, cv2.MORPH_OPEN, open_kernel, iterations=2)
close_kernel = cv2.getStructuringElement(cv2.MORPH_RECT, (3,2))
close = cv2.morphologyEx(opening, cv2.MORPH_CLOSE, close_kernel, iterations=4)
cnts = cv2.findContours(close, cv2.RETR_EXTERNAL, cv2.CHAIN_APPROX_SIMPLE)
cnts = cnts[0] if len(cnts) == 2 else cnts[1]
for c in cnts:
    x,y,w,h = cv2.boundingRect(c)
    area = cv2.contourArea(c)
    if area > 500:
        ROI = image[y:y+h, x:x+w]
        ROI = cv2.GaussianBlur(ROI, (3,3), 0)
        data = pytesseract.image_to_string(ROI, lang='eng',config='--psm 6')
        if data.isalnum():
            cv2.rectangle(image, (x, y), (x + w, y + h), (36,255,12), 2)
            print(data)

cv2.imwrite('image.png', image)
cv2.imwrite('clean.png', clean)
cv2.imwrite('close.png', close)
cv2.imwrite('opening.png', opening)
cv2.waitKey()
让我们来处理算法。首先读取图像并将其缩小到原始尺寸的一半。您的图像太大了。将其转换为灰度图像,并通过otsu获得二进制图像,以下是伪代码:
//Read input:
inputImage = imread( "diagram.png" );

//Resize Image;
resizeScale = 0.5;

inputResized = imresize( inputImage, resizeScale );

//Convert to grayscale;
inputGray = rgb2gray( inputResized );

//Get binary image via otsu:
binaryImage = imbinarize( inputGray, "Otsu" );
//Prepare the output matrices:
cv::Mat outputLabels, stats, centroids;
int connectivity = 8;

//Run the binary image through connected components:
int numberofComponents = cv::connectedComponentsWithStats( binaryImage, outputLabels, stats, centroids, connectivity );

//Prepare a vector of colors – color the filtered blobs in black
std::vector<cv::Vec3b> colors(numberofComponents+1);
colors[0] = cv::Vec3b( 0, 0, 0 ); // Element 0 is the background, which remains black.

//loop through the detected blobs:
for( int i = 1; i <= numberofComponents; i++ ) {

    //get area:
    auto blobArea = stats.at<int>(i, cv::CC_STAT_AREA);

    //get height, width and compute aspect ratio:
    auto blobWidth = stats.at<int>(i, cv::CC_STAT_WIDTH);
    auto blobHeight = stats.at<int>(i, cv::CC_STAT_HEIGHT);
    float blobAspectRatio = (float)blobHeight/(float)blobWidth;

    //Filter your blobs…

};
现在,我们将应用属性过滤器。这只是与预先计算的阈值进行比较。我使用了以下值:
Minimum Area: 40  Maximum Area:400
MinimumAspectRatio:  1
for循环中,将当前blob属性与这些值进行比较。如果测试结果为正,则将blob“涂黑”。继续在for循环中: //Filter your blobs…
//Test the current properties against the thresholds:
bool areaTest = (blobArea > maxArea)||(blobArea < minArea);
bool aspectRatioTest = !(blobAspectRatio > minAspectRatio); //notice we are looking for TALL elements!
//Paint the blob black:
if( areaTest || aspectRatioTest ){
//filtered blobs are colored in black:
colors[i] = cv::Vec3b( 0, 0, 0 );
}else{
//unfiltered blobs are colored in white:
colors[i] = cv::Vec3b( 255, 255, 255 );
}
cv::Mat filteredMat = cv::Mat::zeros( binaryImage.size(), CV_8UC3 );
for( int y = 0; y < filteredMat.rows; y++ ){
    for( int x = 0; x < filteredMat.cols; x++ )
    {
        int label = outputLabels.at<int>(y, x);
        filteredMat.at<cv::Vec3b>(y, x) = colors[label];
    }
}
就是这样了。你已经过滤掉了所有与你要查找的内容不相似的元素。运行算法后,你会得到以下结果:
我另外发现了blob的边界框,以更好地可视化结果:

一种方法是使用滑动窗口(很耗费资源)。
确定图像中字符的大小(所有字符在图像中看起来都是相同大小的),并设置窗口大小。尝试使用Tesseract进行检测(输入图像需要进行预处理)。如果一个窗口连续检测到字符,则存储窗口的坐标。合并坐标并获取字符区域。