我想到了一个解决方法,借助于 Andrey T 的答案 (https://dev59.com/Il4d5IYBdhLWcg3wFPQ7#29662638):
首先,您需要创建一个实用方法,仅在需要时才包装按钮:
public static void applyWorkaroundForButtonWidthsTooWide(Button dialogButton) {
if (dialogButton == null)
return;
if (!(dialogButton.getParent() instanceof LinearLayout))
return;
final LinearLayout linearLayout = (LinearLayout) dialogButton.getParent();
linearLayout.addOnLayoutChangeListener(new View.OnLayoutChangeListener() {
@Override
public void onLayoutChange(View v, int left, int top, int right, int bottom, int oldLeft, int oldTop,
int oldRight, int oldBottom) {
if (right - left > 0) {
final int parentWidth = linearLayout.getWidth();
int childrenWidth = 0;
for (int i = 0; i < linearLayout.getChildCount(); ++i)
childrenWidth += linearLayout.getChildAt(i).getWidth();
if (childrenWidth > parentWidth) {
linearLayout.setOrientation(LinearLayout.VERTICAL);
linearLayout.setPadding(linearLayout.getPaddingLeft(), 0, linearLayout.getPaddingRight(),
linearLayout.getPaddingBottom());
for (int i = 0; i < linearLayout.getChildCount(); ++i) {
if (linearLayout.getChildAt(i) instanceof Button) {
final Button child = (Button) linearLayout.getChildAt(i);
child.setGravity(Gravity.END | Gravity.CENTER_VERTICAL);
final LinearLayout.LayoutParams params = (LinearLayout.LayoutParams) child.getLayoutParams();
params.width = LinearLayout.LayoutParams.MATCH_PARENT;
params.gravity = Gravity.END;
child.setLayoutParams(params);
} else if (linearLayout.getChildAt(i) instanceof Space) {
linearLayout.removeViewAt(i--);
}
}
}
linearLayout.removeOnLayoutChangeListener(this);
}
}
});
}
你可以添加额外的错误处理(比如try/catch语句),并根据需要进行进一步的自定义。
现在,在显示对话框时调用此实用方法:
dialog.setOnShowListener(new DialogInterface.OnShowListener() {
                @Override
                public void onShow(DialogInterface dialogInterface) {
                    MaterialAlertDialogUtils.applyWorkaroundForButtonWidthsTooWide(dialog.getButton(AlertDialog.BUTTON_POSITIVE));
                }
            });
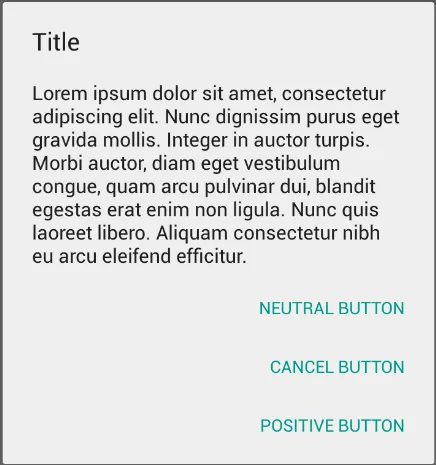
这个技巧能够自动换行按钮,只会在必要的情况下进行。我已经在各种场合使用它,因为即使是只有两个按钮的对话框,在德语中也可能需要换行,在许多其他语言中则肯定需要换行。