我需要在WPF的画布上构建一个绘制网格线的函数:
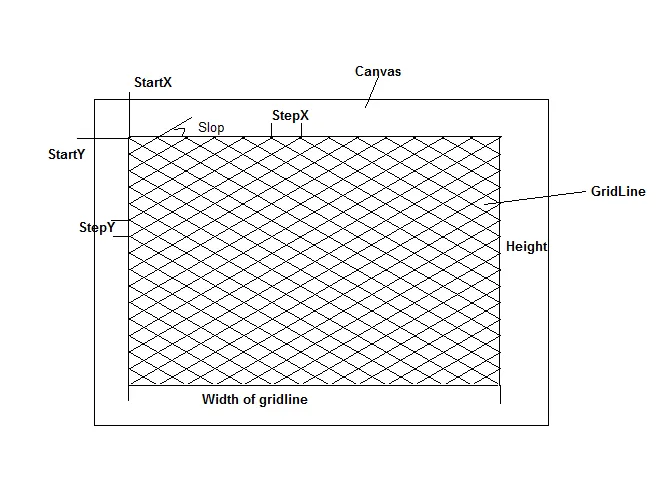
void DrawGridLine(double startX, double startY, double stepX, double stepY,
                  double slop, double width, double height)
{
    // How to implement draw gridline here?
}
我该怎么做?
<DrawingBrush x:Key="GridTile" Stretch="None" TileMode="Tile"
              Viewport="0,0 20,10" ViewportUnits="Absolute">
                  <!-- ^^^^^^^^^^^ set the size of the tile-->
    <DrawingBrush.Drawing>
        <GeometryDrawing>
            <GeometryDrawing.Geometry>
                <!-- draw a single X -->
                <GeometryGroup>
                    <!-- top-left to bottom-right -->
                    <LineGeometry StartPoint="0,0" EndPoint="20,10" />

                    <!-- bottom-left to top-right -->
                    <LineGeometry StartPoint="0,10" EndPoint="20,0" />
                </GeometryGroup>
            </GeometryDrawing.Geometry>
            <GeometryDrawing.Pen>
                <!-- set color and thickness of lines -->
                <Pen Thickness="1" Brush="Black" />
            </GeometryDrawing.Pen>
        </GeometryDrawing>
    </DrawingBrush.Drawing>
</DrawingBrush>
这样就完成了线条的绘制。现在为了能够从网格边缘偏移地绘制它们,您需要有另一个画笔,在其中绘制具有所需尺寸的矩形,并填充您的图块。因此,要使用起始位置(30, 45)(对应于startX和startY)以及width和height, 130x120:
<DrawingBrush x:Key="OffsetGrid" Stretch="None" AlignmentX="Left" AlignmentY="Top">
    <DrawingBrush.Transform>
        <!-- set the left and top offsets -->
        <TranslateTransform X="30" Y="45" />
    </DrawingBrush.Transform>
    <DrawingBrush.Drawing>
        <GeometryDrawing Brush="{StaticResource GridTile}" >
            <GeometryDrawing.Geometry>
                <!-- set the width and height filled with the tile from the origin -->
                <RectangleGeometry Rect="0,0 130,120" />
            </GeometryDrawing.Geometry>
        </GeometryDrawing>
    </DrawingBrush.Drawing>
</DrawingBrush>
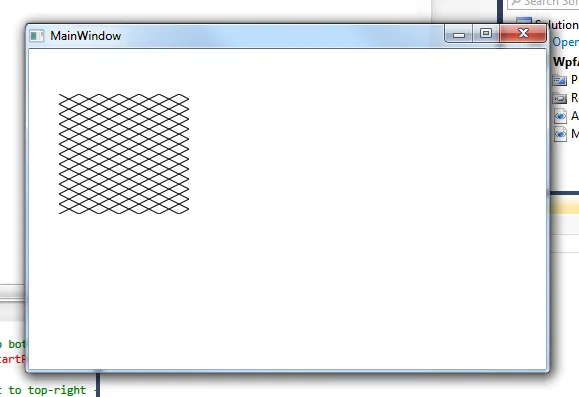
最后,要使用它,只需将其设置为网格(或其他面板)的背景:
<Grid Background="{StaticResource OffsetGrid}">
    <!-- ... -->
</Grid>
最终效果如下所示:
static Brush CreateGridBrush(Rect bounds, Size tileSize)
{
    var gridColor = Brushes.Black;
    var gridThickness = 1.0;
    var tileRect = new Rect(tileSize);

    var gridTile = new DrawingBrush
    {
        Stretch = Stretch.None,
        TileMode = TileMode.Tile,
        Viewport = tileRect,
        ViewportUnits = BrushMappingMode.Absolute,
        Drawing = new GeometryDrawing
        {
            Pen = new Pen(gridColor, gridThickness),
            Geometry = new GeometryGroup
            {
                Children = new GeometryCollection
                {
                    new LineGeometry(tileRect.TopLeft, tileRect.BottomRight),
                    new LineGeometry(tileRect.BottomLeft, tileRect.TopRight)
                }
            }
        }
    };

    var offsetGrid = new DrawingBrush
    {
        Stretch = Stretch.None,
        AlignmentX = AlignmentX.Left,
        AlignmentY = AlignmentY.Top,
        Transform = new TranslateTransform(bounds.Left, bounds.Top),
        Drawing = new GeometryDrawing
        {
            Geometry = new RectangleGeometry(new Rect(bounds.Size)),
            Brush = gridTile
        }
    };

    return offsetGrid;
}