如何使RecyclerView在应用栏快照时不滚动
10
- penduDev
5
https://dev59.com/s10a5IYBdhLWcg3wPGaQ - Mateusz Pryczkowski
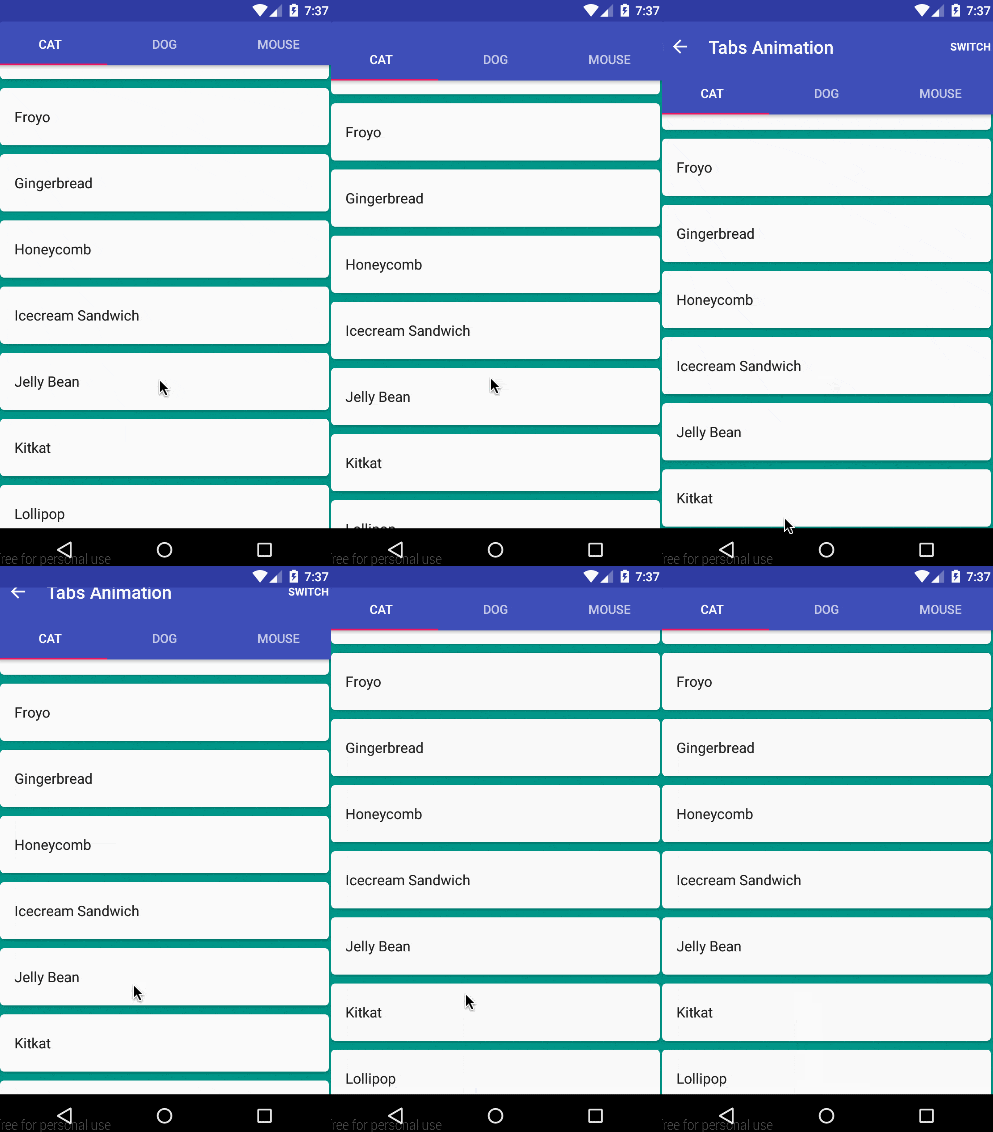
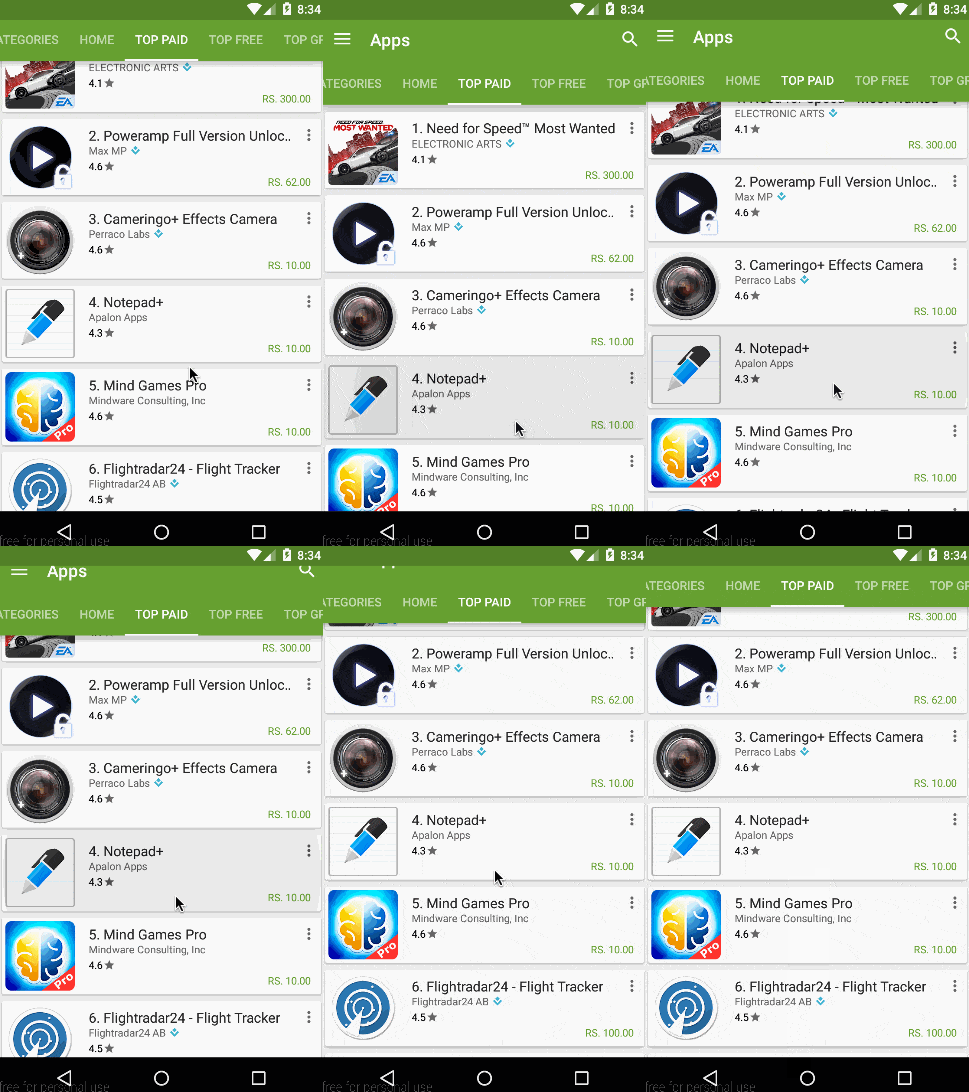
我已经使用了snap标志...但我的问题是,当发生snap时,listview/recyclerview不应该随着snap滚动(就像在Google Play中一样,只有appbar移动,列表项保持静止)。 - penduDev
也许您使用了错误的布局层次结构。尝试使用 这个答案 使事情正常工作。 - aleien
你找到了有效的解决方案吗?提出的解决方案并没有实现Google Play应用程序的确切行为。在Google Play中,当发生滑动时,滚动视图并不会移动,只有工具栏会移动。谢谢。 - godness
不,答案仍然存在。 - penduDev
4个回答
6
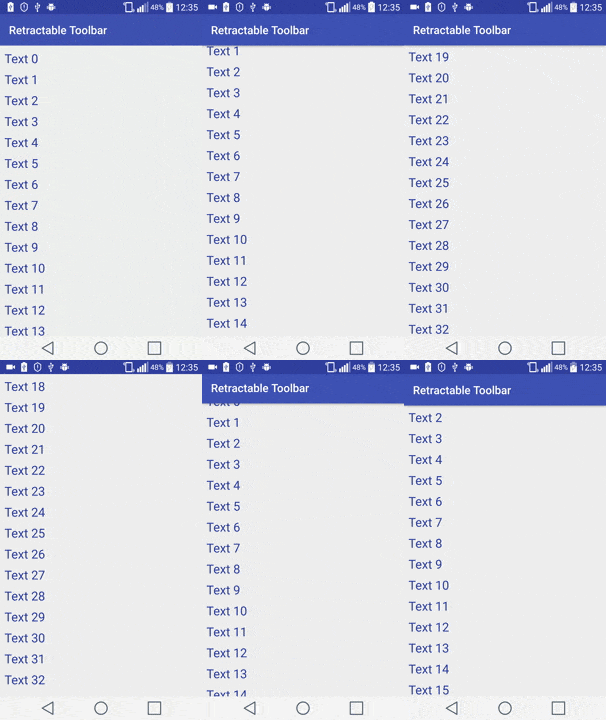
请查看我的库:可收起的工具栏
您需要在build.gradle中添加以下内容:
compile 'it.michelelacorte.retractabletoolbar:library:1.0.0'
然后在你的 MainActivity.java 中使用 RecyclerView 和以下代码:
RetractableToolbarUtil.ShowHideToolbarOnScrollingListener showHideToolbarListener;
recyclerView.addOnScrollListener(showHideToolbarListener = new RetractableToolbarUtil.ShowHideToolbarOnScrollingListener(toolbar));

if (savedInstanceState != null) {
            showHideToolbarListener.onRestoreInstanceState((RetractableToolbarUtil.ShowHideToolbarOnScrollingListener.State) savedInstanceState
                    .getParcelable(RetractableToolbarUtil.ShowHideToolbarOnScrollingListener.SHOW_HIDE_TOOLBAR_LISTENER_STATE));
}
这是效果:
编辑:
自23.1.0设计库以来,您可以将|snap属性添加到您的ToolBar布局中:
       <android.support.v7.widget.Toolbar
            android:id="@+id/toolbar"
            android:layout_width="match_parent"
            android:layout_height="wrap_content"
            app:layout_scrollFlags="scroll|enterAlways|snap />
这应该就是您所寻找的内容。
- Michele Lacorte
7
对我来说不起作用...当我将你的库代码与选项卡条一起添加时,它看起来像这样http://i.imgur.com/gPZADmo.gif - penduDev
我已经使用了 snap 标志...请参见问题的第二条评论
即使使用了 snap 标志,RecyclerView 仍然会滚动。 - penduDev
@penduDev,recyclerView scrolls是什么意思?请解释一下。 - Michele Lacorte
是的,所以您想要像我的gif那样,只需使用tabLayout...对吗? - Michele Lacorte
看起来你很诚实,我已经尝试了2天来操作tablayout和工具栏,但我总是遇到一些布局问题,很烦人,但还是不好看... @penduDev - Michele Lacorte
显示剩余2条评论
2
我在我的项目中找到了一个很好的解决方案。它由两个行为组成,一个用于AppBarLayout,另一个用于滚动容器。你可以在Github上找到它:appbar-snap-behavior。
安装它非常容易:
安装它非常容易:
compile "com.github.godness84:appbar-snap-behavior:0.1.1"
记得在你的根build.gradle文件的repositories末尾添加maven { url "https://jitpack.io" }:
allprojects {
        repositories {
            ...
            maven { url "https://jitpack.io" }
        }
}
然后:
- 将
app:layout_behavior="com.github.godness84.appbarsnapbehavior.AppBarSnapBehavior"添加到您的 AppBarLayout 中 - 将
app:layout_behavior="com.github.godness84.appbarsnapbehavior.ScrollingViewBehavior"应用到您的滚动容器中。
不幸的是,由于默认行为被替换,一些功能不再可用(例如 AppBarLayout.setExpanded()),但在正常情况下它可以工作!试试看,并让我知道效果如何。
- godness
2
谢谢,它确实运行得非常好。然而有一件事:当你在(在我的情况下)NestedScrollView的底部并向下快速滑动时,视图会滚动到顶部,但不会完全滚动到顶部,而是停在AppBarLayout的高度处。然后你必须手动再滚动AppBarLayout的高度才能完全滚动到NestedScrollView的顶部。是否有办法让它在快速滑动操作时完全滚动到顶部?@godness - Bernd Kampl
我已经修复了这个行为,并将其放在了您的 Github 存储库的分支中,可以在此处找到:https://github.com/Seylox/appbar-snap-behavior最简单的使用方法是将 ScrollingViewBehavior.java 和 AppBarSnapBehavior.java 复制到您的项目中,并在 xml 中将它们用作 layoutbehaviors。 - Bernd Kampl
1
我已经成功地“绕过”了这个问题。
我创建了一个抽象类,在你的项目中使用它!
这是布局:
最后,以片段的形式:
最终,在声明片段时,从活动中设置parentappbar和actionbarheight:
我创建了一个抽象类,在你的项目中使用它!
这是布局:
<FrameLayout
    android:id="@+id/content"
    android:layout_width="match_parent"
    android:layout_height="match_parent"
        >

        <android.support.v4.view.ViewPager
            android:id="@+id/viewPager"
            android:layout_width="match_parent"
            android:layout_height="match_parent"
            android:layout_marginTop="@dimen/status_bar_height" />

        <FrameLayout
            android:id="@+id/appBarLayout"
            android:layout_width="match_parent"
            android:layout_height="@dimen/status_bar_app_bar"
            android:background="@color/appbar"
            >

            <android.support.v7.widget.Toolbar
                android:id="@+id/toolbar"
                android:layout_width="match_parent"
                android:layout_height="?attr/actionBarSize"
                android:layout_marginTop="@dimen/status_bar_height"
                android:background="@color/appbar" />

            <android.support.design.widget.AppBarLayout
                android:id="@+id/tabLayout"
                android:layout_width="match_parent"
                android:layout_height="48dp"
                android:layout_gravity="bottom"
                android:background="@color/appbar"
                />

        </FrameLayout>

    </FrameLayout>
帧布局将成为您的“新”应用栏。
然后,您的片段(在viewpager中的那些)必须扩展此类:
public abstract class SnappableAppBarFragment extends Fragment {

    public int scrollAttuale;
    private boolean attivaSnap = true;
    private boolean isTouching = false;

    public void setSnapActivated(boolean state){attivaSnap = state;}

    public void setUpSnappableAppbar(final View fragMainView, final NestedScrollView nestedScrollView, final FrameLayout appBar, final int actionBarHeight) {
        nestedScrollView.getViewTreeObserver().addOnScrollChangedListener(new ViewTreeObserver.OnScrollChangedListener() {
            @Override
            public void onScrollChanged() {
                if (!attivaSnap)
                    return;
                int scrollY = nestedScrollView.getScrollY();
                int differenza = scrollAttuale - scrollY;
                if (differenza > 0 && appBar.getY() < 0) {
                    //Esci
                    appBar.animate().translationYBy(differenza).setDuration(0).start();
                    if (appBar.getY() > 0) {
                        appBar.animate().translationY(0).setDuration(0).start();
                    }
                }
                if (differenza < 0 && appBar.getY() > -actionBarHeight) {
                    //Entra
                    appBar.animate().translationYBy(differenza).setDuration(0).start();
                    if (appBar.getY() < -actionBarHeight)
                        appBar.animate().translationY(-actionBarHeight).setDuration(0).start();
                }

                if (differenza >= -2 && differenza <= 2 && !isTouching ){
                    int spazioTot = actionBarHeight;
                    if ((Math.abs(appBar.getY()) < spazioTot / 2 || nestedScrollView.getScrollY() <= 200) && appBar.getY() != 0) {
                        //Espandi
                        appBar.animate().translationY(0).setDuration(270).start();
                    } else if (appBar.getY() != 0) {
                        //Chiudi
                        appBar.animate().translationY(-actionBarHeight).setDuration(270).start();
                    }
                }
                scrollAttuale = scrollY;
                //Scrolling verso l'alto differenza è positiva
                //Scrolling verso il basso differenza è negativa
            }
        });
        fragMainView.setOnTouchListener(new View.OnTouchListener() {
            @Override
            public boolean onTouch(View view, MotionEvent motionEvent) {
                if (!attivaSnap)
                    return false;

                if (motionEvent.getAction() == MotionEvent.ACTION_UP) {
                    isTouching = false;
                    Handler handler = new Handler();
                    handler.postDelayed(new Runnable() {
                        @Override
                        public void run() {
                            int spazioTot = actionBarHeight;
                            //   && nestedScrollView.getScrollY() <= 200  && nestedScrollView.getScrollY() <= 200   && nestedScrollView.getScrollY() <= 200
                            if ((Math.abs(appBar.getY()) < spazioTot / 2 || nestedScrollView.getScrollY() <= 200) && appBar.getY() != 0) {
                                //Espandi
                                appBar.animate().translationY(0).setDuration(270).start();
                            } else if (appBar.getY() != 0) {
                                //Chiudi
                                appBar.animate().translationY(-actionBarHeight).setDuration(270).start();
                            }
                        }
                    }, 0);
                }
                if (motionEvent.getAction() == MotionEvent.ACTION_DOWN || motionEvent.getAction() == MotionEvent.ACTION_SCROLL) {
                    isTouching = true;
                }
                return false;
            }
        });
    }
}
最后,以片段的形式:
 public class Fragment1 extends SnappableAppBarFragment {

          ...

        @Override
            public View onCreateView(LayoutInflater inflater, ViewGroup container,
                                     Bundle savedInstanceState) {
                // Inflate the layout for this fragment
                viewPrincipale = inflater.inflate(R.layout.fragment_home, container, false);

                mainActivity = (MainActivity) getActivity();

                setUpSnappableAppbar(viewPrincipale, (NestedScrollView) viewPrincipale.findViewById(R.id.nestedScrollView), parentAppBar, actionBarHeight);

        ...

        }

        public void setParentAppBar(FrameLayout frameLayout) {
            parentAppBar = frameLayout;
        }

        public void setActionBarHeight(int height) {
            actionBarHeight = height;
        }
        ...
    }
最终,在声明片段时,从活动中设置parentappbar和actionbarheight:
fragment1.setParentAppBar((FrameLayout) findViewById(R.id.appBarLayout));
fragment1.setActionBarHeight(toolbar.getLayoutParams().height);
这就是全部内容了,如果有点长,但这是我找到的唯一方法来使它工作!
另外,抱歉我的英语不好,我是一名意大利开发人员:P 再见
编辑:重要!!在SNAPPABLEAPPBARFRAGMENT中更改此内容:final int actionBarHeight TO final float actionBarHeight !!! 它会更加流畅:D
- Narger
1
嗨,使用以下布局,它将完全像谷歌Play商店应用程序一样运作,我已经测试过了。
<?xml version="1.0" encoding="utf-8"?>
<android.support.design.widget.AppBarLayout
    android:id="@+id/appbar"
    android:layout_width="match_parent"
    android:layout_height="wrap_content"
    android:paddingTop="@dimen/appbar_padding_top"
    android:theme="@style/AppTheme.AppBarOverlay">

    <android.support.v7.widget.Toolbar
        android:id="@+id/toolbar"
        android:layout_width="match_parent"
        android:layout_height="?attr/actionBarSize"
        android:background="?attr/colorPrimary"
        app:layout_scrollFlags="scroll|enterAlways|snap"
        app:popupTheme="@style/AppTheme.PopupOverlay">

    </android.support.v7.widget.Toolbar>

    <android.support.design.widget.TabLayout
        android:id="@+id/tabs"
        android:layout_width="match_parent"
        android:layout_height="wrap_content" />

</android.support.design.widget.AppBarLayout>

<android.support.v4.view.ViewPager
    android:id="@+id/container"
    android:layout_width="match_parent"
    android:layout_height="match_parent"
    app:layout_behavior="@string/appbar_scrolling_view_behavior" />
请注意我使用了以下设计支持库
compile 'com.android.support:design:23.1.1'
如果有任何问题,请告诉我,我一定会帮助你解决。
- Sandy
1
我正在使用这个布局:http://hastebin.com/liluzinoxu.xml它与你的相同,只是在末尾添加了一个额外的ViewFlipper和tabMode="scrollable"...但是RecyclerView仍然与应用栏一起滚动...我应该尝试删除ViewFlipper吗?...将支持设计库从23.1.0更改为23.1.1只会使快照动画更快,并没有其他区别。 - penduDev
网页内容由stack overflow 提供, 点击上面的可以查看英文原文,
原文链接
原文链接


