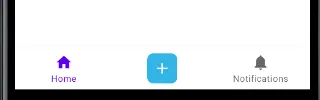
我想创建以下自定义底部导航栏。我如何设置菜单项的自定义布局?或者是否存在可轻松创建此类型底部栏的准备库?

我想创建以下自定义底部导航栏。我如何设置菜单项的自定义布局?或者是否存在可轻松创建此类型底部栏的准备库?
button_custom.xml
<FrameLayout xmlns:android="http://schemas.android.com/apk/res/android"
    android:layout_width="match_parent"
    android:layout_height="match_parent">

    <ImageButton
        android:layout_width="40dp"
        android:layout_height="40dp"
        android:layout_gravity="center"
        android:background="@drawable/button_border"
        android:src="@drawable/ic_baseline_add_24"/>
</FrameLayout>
button_border.xml
<shape xmlns:android="http://schemas.android.com/apk/res/android"
    android:shape="rectangle">

    <corners android:radius="8dp"/>
    <solid android:color="@android:color/holo_blue_light"/>

</shape>
ic_baseline_add_24.xml
<vector xmlns:android="http://schemas.android.com/apk/res/android"
    android:width="24dp"
    android:height="24dp"
    android:tint="@android:color/white"
    android:viewportWidth="24"
    android:viewportHeight="24">
    <path
        android:fillColor="@android:color/white"
        android:pathData="M19,13h-6v6h-2v-6H5v-2h6V5h2v6h6v2z" />
</vector>
bottom_nav_menu.xml
<menu xmlns:android="http://schemas.android.com/apk/res/android">

    <item
        android:id="@+id/navigation_home"
        android:icon="@drawable/ic_home_black_24dp"
        android:title="@string/title_home" />

    <item
        android:id="@+id/navigation_dashboard"
        android:title="" />

    <item
        android:id="@+id/navigation_notifications"
        android:icon="@drawable/ic_notifications_black_24dp"
        android:title="@string/title_notifications" />

</menu>
activity_main.xml
<?xml version="1.0" encoding="utf-8"?>
<androidx.constraintlayout.widget.ConstraintLayout xmlns:android="http://schemas.android.com/apk/res/android"
    xmlns:app="http://schemas.android.com/apk/res-auto"
    android:id="@+id/container"
    android:layout_width="match_parent"
    android:layout_height="match_parent"
    android:paddingTop="?attr/actionBarSize">

    <com.google.android.material.bottomnavigation.BottomNavigationView
        android:id="@+id/nav_view"
        android:layout_width="0dp"
        android:layout_height="wrap_content"
        android:layout_marginStart="0dp"
        android:layout_marginEnd="0dp"
        android:background="?android:attr/windowBackground"
        app:layout_constraintBottom_toBottomOf="parent"
        app:layout_constraintLeft_toLeftOf="parent"
        app:layout_constraintRight_toRightOf="parent"
        app:menu="@menu/bottom_nav_menu" />

    <fragment
        android:id="@+id/nav_host_fragment"
        android:name="androidx.navigation.fragment.NavHostFragment"
        android:layout_width="match_parent"
        android:layout_height="match_parent"
        app:defaultNavHost="true"
        app:layout_constraintBottom_toTopOf="@id/nav_view"
        app:layout_constraintLeft_toLeftOf="parent"
        app:layout_constraintRight_toRightOf="parent"
        app:layout_constraintTop_toTopOf="parent"
        app:navGraph="@navigation/mobile_navigation" />

</androidx.constraintlayout.widget.ConstraintLayout>
MainActivity.kt
class MainActivity : AppCompatActivity() {

    override fun onCreate(savedInstanceState: Bundle?) {
        super.onCreate(savedInstanceState)
        setContentView(R.layout.activity_main)
        val navView: BottomNavigationView = findViewById(R.id.nav_view)

        val navController = findNavController(R.id.nav_host_fragment)
        // Passing each menu ID as a set of Ids because each
        // menu should be considered as top level destinations.
        val appBarConfiguration = AppBarConfiguration(setOf(
                R.id.navigation_home, R.id.navigation_dashboard, R.id.navigation_notifications))
        setupActionBarWithNavController(navController, appBarConfiguration)
        navView.setupWithNavController(navController)

        //Add custom tab menu
        val bottomMenuView = navView.getChildAt(0) as BottomNavigationMenuView
        val view = bottomMenuView.getChildAt(1)
        val itemView = view as BottomNavigationItemView

        val viewCustom = LayoutInflater.from(this).inflate(R.layout.button_custom, bottomMenuView, false)
        itemView.addView(viewCustom)
    }
}
setOnClickListener 但是它无法被点击。有什么解决办法吗? - TeosetOnClickListener 时,由于某种原因处理程序从未被调用,但是在设计中使用“onClick”(即在片段 XML 中)确实有效 ♂️ - inspector-g这只是一个主题,图标设置为:<item android:icon="@drawable/some_icon" ... />。
请求一个库来完成这样一个简单的任务既有问题,也被认为是不相关的。