如何在Android中使用泛洪填充算法?

15

我是Android编程新手,并且最近尝试编写一个简单的应用程序,只是为了练习!在这个应用程序中,我想在用户点击时给图像上色,但是我不知道该如何开始。我已经阅读了不同的主题,其中提到要使用“泛洪填充”算法。我在网上找到了它,但是我不知道如何将其放入我的简单应用程序中。

我找到的代码:

private void FloodFill(Bitmap bmp, Point pt, int targetColor, int replacementColor) 
{
   Queue<Point> q = new LinkedList<Point>();
   q.add(pt);
   while (q.size() > 0) {
       Point n = q.poll();
       if (bmp.getPixel(n.x, n.y) != targetColor)
           continue;

    Point w = n, e = new Point(n.x + 1, n.y);

    while ((w.x > 0) && (bmp.getPixel(w.x, w.y) == targetColor)) {
        bmp.setPixel(w.x, w.y, replacementColor);
        if ((w.y > 0) && (bmp.getPixel(w.x, w.y - 1) == targetColor))
            q.add(new Point(w.x, w.y - 1));
        if ((w.y < bmp.getHeight() - 1) && (bmp.getPixel(w.x, w.y + 1) == targetColor))
            q.add(new Point(w.x, w.y + 1));

        w.x--;
    }

    while ((e.x < bmp.getWidth() - 1) && (bmp.getPixel(e.x, e.y) == targetColor)) {
        bmp.setPixel(e.x, e.y, replacementColor);
        if ((e.y > 0) && (bmp.getPixel(e.x, e.y - 1) == targetColor))
            q.add(new Point(e.x, e.y - 1));
        if ((e.y < bmp.getHeight() - 1) && (bmp.getPixel(e.x, e.y + 1) == targetColor))
            q.add(new Point(e.x, e.y + 1));

        e.x++;
    }
  }
}

我知道如何在用户触摸事件后跟随手指在屏幕上绘制线条,但我也想知道如何用某种颜色填充给定的图像,例如这张:

一只小狮子!

我在Stack Overflow上看到了这些其他问题:

这似乎很容易做到,但我不会!你能给我展示一个小例子吗?我想知道如何设置画布、需要着色的图像以及如何操作。


请勿在问题中发布解决方案。如果与其他答案不同,请将其作为答案发布并接受它。 - thegrinner
@Raghunandan 啊,这是出乎意料的。我不太想重新回滚,但如果这很重要,他应该用不同的标识(即不是“解决方案”)将其添加回去。 - thegrinner
@thegrinner,如果没有代码,我无法为他提供更多帮助,所以我要求他编辑问题并发布代码。 - Raghunandan
如果 @user2349361 仍有疑问,请提一个新问题。过多的注释。 - Raghunandan
这个链接速度真快:https://dev59.com/DWsz5IYBdhLWcg3wLUx2#17426163 - Arash
显示剩余3条评论
2个回答

19

Android中使用泛洪填充算法时出现内存不足的异常。检查链接中是否有示例。

您需要得到x和y触摸的坐标,然后可以使用asynctask来填充封闭区域。使用ProgressDialog直到泛洪填充完成并用替换颜色填满封闭区域。

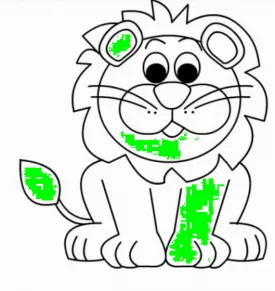
注意:当着色大面积封闭区域时我遇到了问题,花费了很长时间。我不确定使用asynctask是否是最佳方法。我希望有人能在这方面澄清一下。

您可以根据需要修改以下内容。

final Point p1 = new Point();
p1.x=(int) x; //x co-ordinate where the user touches on the screen
p1.y=(int) y; //y co-ordinate where the user touches on the screen  

FloodFill f= new FloodFill(); 
f.floodFill(bmp,pt,targetColor,replacementColor);
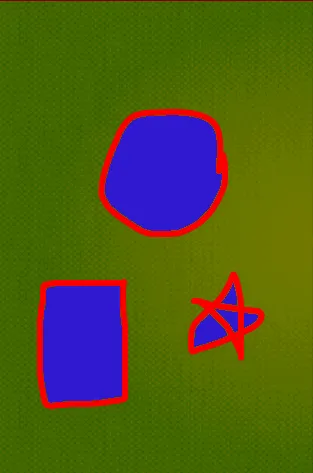
泛洪填充算法用于填充封闭区域

    public class FloodFill {
public void floodFill(Bitmap  image, Point node, int targetColor,
        int replacementColor) {
    int width = image.getWidth();
    int height = image.getHeight();
    int target = targetColor;
    int replacement = replacementColor;
    if (target != replacement) {
        Queue<Point> queue = new LinkedList<Point>();
        do {
            int x = node.x;
            int y = node.y;
            while (x > 0 && image.getPixel(x - 1, y) == target) {
                x--;
            }
            boolean spanUp = false;
            boolean spanDown = false;
            while (x < width && image.getPixel(x, y) == target) {
                image.setPixel(x, y, replacement);
                if (!spanUp && y > 0 && image.getPixel(x, y - 1) == target) {
                    queue.add(new Point(x, y - 1));
                    spanUp = true;
                } else if (spanUp && y > 0
                        && image.getPixel(x, y - 1) != target) {
                    spanUp = false;
                }
                if (!spanDown && y < height - 1
                        && image.getPixel(x, y + 1) == target) {
                    queue.add(new Point(x, y + 1));
                    spanDown = true;
                } else if (spanDown && y < height - 1
                        && image.getPixel(x, y + 1) != target) {
                    spanDown = false;
                }
                x++;
            }
        } while ((node = queue.poll()) != null);
    }
}
}

输入图像描述

编辑:

输入图像描述

编辑于 2014 年 8 月 7 日:

使用上述泛洪填充算法可以很好地填充小的封闭区域。然而,对于大面积操作,该算法速度慢且消耗大量内存。最近我发现了一篇帖子,介绍了一种比上述方法更快的队列线性泛洪填充算法。

来源:

http://www.codeproject.com/Articles/16405/Queue-Linear-Flood-Fill-A-Fast-Flood-Fill-Algorith

代码:

public class QueueLinearFloodFiller {

    protected Bitmap image = null;
    protected int[] tolerance = new int[] { 0, 0, 0 };
    protected int width = 0;
    protected int height = 0;
    protected int[] pixels = null;
    protected int fillColor = 0;
    protected int[] startColor = new int[] { 0, 0, 0 };
    protected boolean[] pixelsChecked;
    protected Queue<FloodFillRange> ranges;

    // Construct using an image and a copy will be made to fill into,
    // Construct with BufferedImage and flood fill will write directly to
    // provided BufferedImage
    public QueueLinearFloodFiller(Bitmap img) {
        copyImage(img);
    }

    public QueueLinearFloodFiller(Bitmap img, int targetColor, int newColor) {
        useImage(img);

        setFillColor(newColor);
        setTargetColor(targetColor);
    }

    public void setTargetColor(int targetColor) {
        startColor[0] = Color.red(targetColor);
        startColor[1] = Color.green(targetColor);
        startColor[2] = Color.blue(targetColor);
    }

    public int getFillColor() {
        return fillColor;
    }

    public void setFillColor(int value) {
        fillColor = value;
    }

    public int[] getTolerance() {
        return tolerance;
    }

    public void setTolerance(int[] value) {
        tolerance = value;
    }

    public void setTolerance(int value) {
        tolerance = new int[] { value, value, value };
    }

    public Bitmap getImage() {
        return image;
    }

    public void copyImage(Bitmap img) {
        // Copy data from provided Image to a BufferedImage to write flood fill
        // to, use getImage to retrieve
        // cache data in member variables to decrease overhead of property calls
        width = img.getWidth();
        height = img.getHeight();

        image = Bitmap.createBitmap(width, height, Bitmap.Config.RGB_565);
        Canvas canvas = new Canvas(image);
        canvas.drawBitmap(img, 0, 0, null);

        pixels = new int[width * height];

        image.getPixels(pixels, 0, width, 1, 1, width - 1, height - 1);
    }

    public void useImage(Bitmap img) {
        // Use a pre-existing provided BufferedImage and write directly to it
        // cache data in member variables to decrease overhead of property calls
        width = img.getWidth();
        height = img.getHeight();
        image = img;

        pixels = new int[width * height];

        image.getPixels(pixels, 0, width, 1, 1, width - 1, height - 1);
    }

    protected void prepare() {
        // Called before starting flood-fill
        pixelsChecked = new boolean[pixels.length];
        ranges = new LinkedList<FloodFillRange>();
    }

    // Fills the specified point on the bitmap with the currently selected fill
    // color.
    // int x, int y: The starting coords for the fill
    public void floodFill(int x, int y) {
        // Setup
        prepare();

        if (startColor[0] == 0) {
            // ***Get starting color.
            int startPixel = pixels[(width * y) + x];
            startColor[0] = (startPixel >> 16) & 0xff;
            startColor[1] = (startPixel >> 8) & 0xff;
            startColor[2] = startPixel & 0xff;
        }

        // ***Do first call to floodfill.
        LinearFill(x, y);

        // ***Call floodfill routine while floodfill ranges still exist on the
        // queue
        FloodFillRange range;

        while (ranges.size() > 0) {
            // **Get Next Range Off the Queue
            range = ranges.remove();

            // **Check Above and Below Each Pixel in the Floodfill Range
            int downPxIdx = (width * (range.Y + 1)) + range.startX;
            int upPxIdx = (width * (range.Y - 1)) + range.startX;
            int upY = range.Y - 1;// so we can pass the y coord by ref
            int downY = range.Y + 1;

            for (int i = range.startX; i <= range.endX; i++) {
                // *Start Fill Upwards
                // if we're not above the top of the bitmap and the pixel above
                // this one is within the color tolerance
                if (range.Y > 0 && (!pixelsChecked[upPxIdx])
                        && CheckPixel(upPxIdx))
                    LinearFill(i, upY);

                // *Start Fill Downwards
                // if we're not below the bottom of the bitmap and the pixel
                // below this one is within the color tolerance
                if (range.Y < (height - 1) && (!pixelsChecked[downPxIdx])
                        && CheckPixel(downPxIdx))
                    LinearFill(i, downY);

                downPxIdx++;
                upPxIdx++;
            }
        }

        image.setPixels(pixels, 0, width, 1, 1, width - 1, height - 1);
    }

    // Finds the furthermost left and right boundaries of the fill area
    // on a given y coordinate, starting from a given x coordinate, filling as
    // it goes.
    // Adds the resulting horizontal range to the queue of floodfill ranges,
    // to be processed in the main loop.

    // int x, int y: The starting coords
    protected void LinearFill(int x, int y) {
        // ***Find Left Edge of Color Area
        int lFillLoc = x; // the location to check/fill on the left
        int pxIdx = (width * y) + x;

        while (true) {
            // **fill with the color
            pixels[pxIdx] = fillColor;

            // **indicate that this pixel has already been checked and filled
            pixelsChecked[pxIdx] = true;

            // **de-increment
            lFillLoc--; // de-increment counter
            pxIdx--; // de-increment pixel index

            // **exit loop if we're at edge of bitmap or color area
            if (lFillLoc < 0 || (pixelsChecked[pxIdx]) || !CheckPixel(pxIdx)) {
                break;
            }
        }

        lFillLoc++;

        // ***Find Right Edge of Color Area
        int rFillLoc = x; // the location to check/fill on the left

        pxIdx = (width * y) + x;

        while (true) {
            // **fill with the color
            pixels[pxIdx] = fillColor;

            // **indicate that this pixel has already been checked and filled
            pixelsChecked[pxIdx] = true;

            // **increment
            rFillLoc++; // increment counter
            pxIdx++; // increment pixel index

            // **exit loop if we're at edge of bitmap or color area
            if (rFillLoc >= width || pixelsChecked[pxIdx] || !CheckPixel(pxIdx)) {
                break;
            }
        }

        rFillLoc--;

        // add range to queue
        FloodFillRange r = new FloodFillRange(lFillLoc, rFillLoc, y);

        ranges.offer(r);
    }

    // Sees if a pixel is within the color tolerance range.
    protected boolean CheckPixel(int px) {
        int red = (pixels[px] >>> 16) & 0xff;
        int green = (pixels[px] >>> 8) & 0xff;
        int blue = pixels[px] & 0xff;

        return (red >= (startColor[0] - tolerance[0])
                && red <= (startColor[0] + tolerance[0])
                && green >= (startColor[1] - tolerance[1])
                && green <= (startColor[1] + tolerance[1])
                && blue >= (startColor[2] - tolerance[2]) && blue <= (startColor[2] + tolerance[2]));
    }

    // Represents a linear range to be filled and branched from.
    protected class FloodFillRange {
        public int startX;
        public int endX;
        public int Y;

        public FloodFillRange(int startX, int endX, int y) {
            this.startX = startX;
            this.endX = endX;
            this.Y = y;
        }
    }
}

你太厉害了,@Raghunandan!它完美地运行了... 你知道如何将图像居中显示在屏幕上吗?因为我执行应用程序时,它只显示其中的一部分,而不是完整的图像!我的意思是图像被裁剪了! - starscream
@user2349361,您需要正确地在画布上渲染图像,这与洪水填充无关。 - Raghunandan
@user2349361,请检查一下编辑。我尝试了狮子,它在画布上呈现得很好。我不确定为什么它的着色不正确。但对我来说肯定有效。 - Raghunandan
@NirmalShethwala 在食物填充算法的位置上,您将使用 QueueLinearFloodFiller 并将所需参数发送到构造函数。我不明白您所说的如何使用是什么意思? - Raghunandan
1
@NirmalShethwala,我调用了QueueLinearFloodFiller并传递了参数,但是图像没有填充任何颜色,我还想通过触摸区域来填充颜色,但是什么也没有发生。 Bitmap bmp = BitmapFactory.decodeResource(this.getResources(), R.drawable.animal_08); QueueLinearFloodFiller queueFloodFiller = new QueueLinearFloodFiller(bmp, Color.RED, Color.BLUE); - Zia Ur Rahman
显示剩余19条评论

6

感谢stackoverflow的用户,我找到了正确的解决方案!

我想知道如何使用泛洪算法,并将其集成到一个简单的Android项目中,这就是我所做的:

Java代码:

import java.util.LinkedList;
import java.util.Queue;
import android.app.Activity;
import android.app.ProgressDialog;
import android.content.Context;
import android.graphics.Bitmap;
import android.graphics.BitmapFactory;
import android.graphics.BitmapFactory.Options;
import android.graphics.Canvas;
import android.graphics.Color;
import android.graphics.Paint;
import android.graphics.Path;
import android.graphics.Point;
import android.os.AsyncTask;
import android.os.Bundle;
import android.view.MotionEvent;
import android.view.View;
import android.widget.Button;
import android.widget.ImageView;
import android.widget.RelativeLayout;

public class Main extends Activity {

private RelativeLayout dashBoard;
private MyView myView;
public ImageView image;

Button b_red, b_blue, b_green, b_orange, b_clear;

@Override
protected void onCreate(Bundle savedInstanceState) {
    super.onCreate(savedInstanceState);

    myView = new MyView(this);
    setContentView(R.layout.activity_main);
    findViewById(R.id.dashBoard);

    b_red = (Button) findViewById(R.id.b_red);
    b_blue = (Button) findViewById(R.id.b_blue);
    b_green = (Button) findViewById(R.id.b_green);
    b_orange = (Button) findViewById(R.id.b_orange);

    b_red.setOnClickListener(new View.OnClickListener() {
        @Override
        public void onClick(View v) {
            myView.changePaintColor(0xFFFF0000);
        }
    });

    b_blue.setOnClickListener(new View.OnClickListener() {
        @Override
        public void onClick(View v) {
            myView.changePaintColor(0xFF0000FF);
        }
    });

    b_green.setOnClickListener(new View.OnClickListener() {
        @Override
        public void onClick(View v) {
            myView.changePaintColor(0xFF00FF00);
        }
    });

    b_orange.setOnClickListener(new View.OnClickListener() {
        @Override
        public void onClick(View v) {
            myView.changePaintColor(0xFFFF9900);
        }
    });

    dashBoard = (RelativeLayout) findViewById(R.id.dashBoard);
    dashBoard.addView(myView);

}

public class MyView extends View {

    private Paint paint;
    private Path path;
    public Bitmap mBitmap;
    public ProgressDialog pd;
    final Point p1 = new Point();
    public Canvas canvas;

    //Bitmap mutableBitmap ;
    public MyView(Context context) {

        super(context);

        this.paint = new Paint();
        this.paint.setAntiAlias(true);
        pd = new ProgressDialog(context);
        this.paint.setStyle(Paint.Style.STROKE);
        paint.setStrokeJoin(Paint.Join.ROUND);
        paint.setStrokeWidth(5f);
        mBitmap = BitmapFactory.decodeResource(getResources(), R.drawable.forme).copy(Bitmap.Config.ARGB_8888, true);
        this.path = new Path();
    }

    @Override
    protected void onDraw(Canvas canvas) {
        this.canvas = canvas;
        this.paint.setColor(Color.RED);

        canvas.drawBitmap(mBitmap, 0, 0, paint);
    }

    @Override
    public boolean onTouchEvent(MotionEvent event) {

        float x = event.getX();
        float y = event.getY();

        switch (event.getAction()) {

            case MotionEvent.ACTION_DOWN:

                p1.x = (int) x;
                p1.y = (int) y;
                final int sourceColor = mBitmap.getPixel((int) x, (int) y);
                final int targetColor = paint.getColor();
                new TheTask(mBitmap, p1, sourceColor, targetColor).execute();
                invalidate();
        }
        return true;
    }

    public void clear() {
        path.reset();
        invalidate();
    }

    public int getCurrentPaintColor() {
        return paint.getColor();
    }

    public void changePaintColor(int color){
        this.paint.setColor(color);
    }

    class TheTask extends AsyncTask<Void, Integer, Void> {

        Bitmap bmp;
        Point pt;
        int replacementColor, targetColor;

        public TheTask(Bitmap bm, Point p, int sc, int tc) {
            this.bmp = bm;
            this.pt = p;
            this.replacementColor = tc;
            this.targetColor = sc;
            pd.setMessage("Filling....");
            pd.show();
        }

        @Override
        protected void onPreExecute() {
            pd.show();

        }

        @Override
        protected void onProgressUpdate(Integer... values) {

        }

        @Override
        protected Void doInBackground(Void... params) {
            FloodFill f = new FloodFill();
            f.floodFill(bmp, pt, targetColor, replacementColor);
            return null;
        }

        @Override
        protected void onPostExecute(Void result) {
            pd.dismiss();
            invalidate();
        }
    }
}

// flood fill
public class FloodFill {

    public void floodFill(Bitmap image, Point node, int targetColor, int replacementColor) {

        int width = image.getWidth();
        int height = image.getHeight();
        int target = targetColor;
        int replacement = replacementColor;

        if (target != replacement) {
            Queue<Point> queue = new LinkedList<Point>();
            do {

                int x = node.x;
                int y = node.y;
                while (x > 0 && image.getPixel(x - 1, y) == target) {
                    x--;
                }

                boolean spanUp = false;
                boolean spanDown = false;
                while (x < width && image.getPixel(x, y) == target) {
                    image.setPixel(x, y, replacement);
                    if (!spanUp && y > 0 && image.getPixel(x, y - 1) == target) {
                        queue.add(new Point(x, y - 1));
                        spanUp = true;
                    } else if (spanUp && y > 0 && image.getPixel(x, y - 1) != target) {
                        spanUp = false;
                    }
                    if (!spanDown && y < height - 1 && image.getPixel(x, y + 1) == target) {
                        queue.add(new Point(x, y + 1));
                        spanDown = true;
                    } else if (spanDown && y < (height - 1) && image.getPixel(x, y + 1) != target) {
                        spanDown = false;
                    }
                    x++;
                }

            } while ((node = queue.poll()) != null);
        }
    }
}
}

以下是XML代码:

<RelativeLayout xmlns:android="http://schemas.android.com/apk/res/android"
xmlns:tools="http://schemas.android.com/tools"
android:id="@+id/drawingLayout"
android:layout_width="match_parent"
android:layout_height="match_parent"
tools:context=".Main" >

<RelativeLayout
    android:id="@+id/dashBoard"
    android:layout_width="wrap_content"
    android:layout_height="wrap_content"
    android:layout_above="@+id/b_red"
    android:layout_alignParentLeft="true"
    android:layout_alignParentRight="true"
    android:layout_alignParentTop="true"
    android:layout_marginBottom="10dp" >

</RelativeLayout>

<Button
    android:id="@+id/b_red"
    android:layout_width="65dp"
    android:layout_height="40dp"
    android:layout_alignParentBottom="true"
    android:layout_alignParentLeft="true"
    android:background="#FF0000" />

<Button
    android:id="@+id/b_green"
    android:layout_width="65dp"
    android:layout_height="40dp"
    android:layout_alignParentBottom="true"
    android:layout_toRightOf="@+id/b_red"
    android:background="#00FF00" />

<Button
    android:id="@+id/b_blue"
    android:layout_width="65dp"
    android:layout_height="40dp"
    android:layout_alignParentBottom="true"
    android:layout_toRightOf="@+id/b_green"
    android:background="#0000FF" />

<Button
    android:id="@+id/b_orange"
    android:layout_width="65dp"
    android:layout_height="40dp"
    android:layout_alignParentBottom="true"
    android:layout_toRightOf="@+id/b_blue"
    android:background="#FF9900" />

<Button
    android:id="@+id/button5"
    android:layout_width="60dp"
    android:layout_height="40dp"
    android:layout_alignParentBottom="true"
    android:layout_alignParentRight="true"
    android:text="Clear" />

</RelativeLayout>

我希望你会觉得这对你有所帮助!!!
祝你拥有愉快的一天!!!

在Java源代码中,这个forme代表什么?mBitmap = BitmapFactory.decodeResource(getResources(), R.drawable.forme).copy(Bitmap.Config.ARGB_8888, true); - N.R
@starScream,这真是非常出色的努力。请在此代码中添加缩放功能,以便通过捏和平移来缩放图像。我在等待着。希望你能在这方面帮助我。谢谢。 - Zia Ur Rahman

网页内容由stack overflow 提供, 点击上面的
可以查看英文原文,
原文链接