简短的回答是将相机图像通道(Y,UV)加载到纹理中,并使用自定义片段着色器将这些纹理绘制到网格上,该着色器将为我们执行颜色空间转换。由于此着色器将在GPU上运行,因此速度比CPU快得多,肯定比Java代码快得多。由于此网格是GL的一部分,因此任何其他3D形状或精灵都可以安全地绘制在其上方或下方。
我从这个答案开始解决问题
https://dev59.com/fmct5IYBdhLWcg3wZMfn#17615696。 我使用以下链接了解了一般方法:
How to use camera view with OpenGL ES,它是为Bada编写的,但原则相同。那里的转换公式有点奇怪,所以我用维基百科文章
YUV Conversion to/from RGB 中的公式替换了它们。
以下是导致解决方案的步骤:
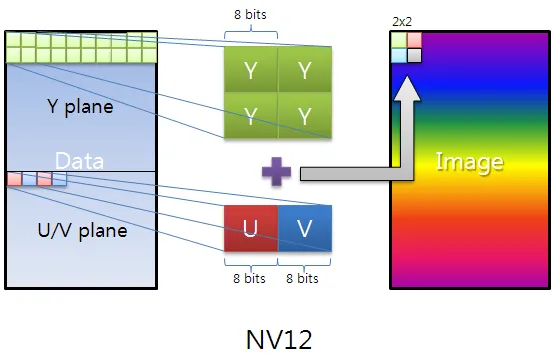
YUV-NV21解释
Live images from the Android camera are preview images. The default color space (and one of the two guaranteed color spaces) is YUV-NV21 for camera preview. The explanation of this format is very scattered, so I'll explain it here briefly:
The image data is made of (width x height) x 3/2 bytes. The first width x height bytes are the Y channel, 1 brightness byte for each pixel. The following (width / 2) x (height / 2) x 2 = width x height / 2 bytes are the UV plane. Each two consecutive bytes are the V,U (in that order according to the NV21 specification) chroma bytes for the 2 x 2 = 4 original pixels. In other words, the UV plane is (width / 2) x (height / 2) pixels in size and is downsampled by a factor of 2 in each dimension. In addition, the U,V chroma bytes are interleaved.
Here is a very nice image that explains the YUV-NV12, NV21 is just U,V bytes flipped:
如何将此格式转换为RGB?
正如问题所述,如果在Android代码中完成此转换,将需要太多时间。幸运的是,它可以在GL着色器中完成,这是在GPU上运行的。这将使其运行非常快。
一般的想法是将我们图像的通道作为纹理传递给着色器,并以能进行RGB转换的方式呈现它们。为此,我们必须先将图像中的通道复制到可以传递给纹理的缓冲区中:
byte[] image;
ByteBuffer yBuffer, uvBuffer;

...

yBuffer.put(image, 0, width*height);
yBuffer.position(0);

uvBuffer.put(image, width*height, width*height/2);
uvBuffer.position(0);
然后,我们将这些缓冲区传递给实际的GL纹理:
Gdx.gl.glActiveTexture(GL20.GL_TEXTURE0);
yTexture.bind();
Gdx.gl.glTexImage2D(GL20.GL_TEXTURE_2D, 0, GL20.GL_LUMINANCE,
width, height, 0, GL20.GL_LUMINANCE, GL20.GL_UNSIGNED_BYTE, yBuffer);
Gdx.gl.glTexParameterf(GL20.GL_TEXTURE_2D,
GL20.GL_TEXTURE_MIN_FILTER, GL20.GL_LINEAR);
Gdx.gl.glTexParameterf(GL20.GL_TEXTURE_2D,
GL20.GL_TEXTURE_MAG_FILTER, GL20.GL_LINEAR);
Gdx.gl.glTexParameterf(GL20.GL_TEXTURE_2D,
GL20.GL_TEXTURE_WRAP_S, GL20.GL_CLAMP_TO_EDGE);
Gdx.gl.glTexParameterf(GL20.GL_TEXTURE_2D,
GL20.GL_TEXTURE_WRAP_T, GL20.GL_CLAMP_TO_EDGE);
Gdx.gl.glActiveTexture(GL20.GL_TEXTURE1);
uvTexture.bind();
Gdx.gl.glTexImage2D(GL20.GL_TEXTURE_2D, 0, GL20.GL_LUMINANCE_ALPHA,
width/2, height/2, 0, GL20.GL_LUMINANCE_ALPHA, GL20.GL_UNSIGNED_BYTE,
uvBuffer);
Gdx.gl.glTexParameterf(GL20.GL_TEXTURE_2D,
GL20.GL_TEXTURE_MIN_FILTER, GL20.GL_LINEAR);
Gdx.gl.glTexParameterf(GL20.GL_TEXTURE_2D,
GL20.GL_TEXTURE_MAG_FILTER, GL20.GL_LINEAR);
Gdx.gl.glTexParameterf(GL20.GL_TEXTURE_2D,
GL20.GL_TEXTURE_WRAP_S, GL20.GL_CLAMP_TO_EDGE);
Gdx.gl.glTexParameterf(GL20.GL_TEXTURE_2D,
GL20.GL_TEXTURE_WRAP_T, GL20.GL_CLAMP_TO_EDGE);
接下来,我们渲染之前准备的网格(覆盖整个屏幕)。着色器将负责在网格上呈现绑定的纹理:
shader.begin();

//Set the uniform y_texture object to the texture at slot 0
shader.setUniformi("y_texture", 0);

//Set the uniform uv_texture object to the texture at slot 1
shader.setUniformi("uv_texture", 1);

mesh.render(shader, GL20.GL_TRIANGLES);
shader.end();
最后,着色器接管了将纹理渲染到网格的任务。实现实际转换的片段着色器如下:
String fragmentShader =
"#ifdef GL_ES\n" +
"precision highp float;\n" +
"#endif\n" +
"varying vec2 v_texCoord;\n" +
"uniform sampler2D y_texture;\n" +
"uniform sampler2D uv_texture;\n" +
"void main (void){\n" +
" float r, g, b, y, u, v;\n" +
" y = texture2D(y_texture, v_texCoord).r;\n" +
" u = texture2D(uv_texture, v_texCoord).a - 0.5;\n" +
" v = texture2D(uv_texture, v_texCoord).r - 0.5;\n" +
" r = y + 1.13983*v;\n" +
" g = y - 0.39465*u - 0.58060*v;\n" +
" b = y + 2.03211*u;\n" +
" gl_FragColor = vec4(r, g, b, 1.0);\n" +
"}\n";
请注意,我们使用相同的坐标变量
v_texCoord 访问 Y 和 UV 纹理,这是因为
v_texCoord 的值在
-1.0 到
1.0 之间,它会从纹理的一端缩放到另一端,而不是实际的纹理像素坐标。这是着色器最好的特性之一。
完整的源代码
由于 libgdx 是跨平台的,我们需要一个对象,在不同的平台上可以以不同的方式扩展,处理设备摄像头和渲染。例如,如果您可以获得 RGB 图像,则可能希望完全绕过 YUV-RGB 着色器转换。因此,我们需要一个设备摄像头控制器接口,每个不同的平台都将实现该接口:
public interface PlatformDependentCameraController {

    void init();

    void renderBackground();

    void destroy();
}
这个接口的安卓版本如下(假设实时相机图像为1280x720像素):
public class AndroidDependentCameraController implements PlatformDependentCameraController, Camera.PreviewCallback {
private static byte[] image;
private Camera camera;
private ByteBuffer yBuffer;
private ByteBuffer uvBuffer;
ShaderProgram shader;
Texture yTexture;
Texture uvTexture;
Mesh mesh;
public AndroidDependentCameraController(){
image = new byte[1280*720/8*12];
}
@Override
public void init(){
Texture.setEnforcePotImages(false);
yTexture = new Texture(1280,720,Format.Intensity);
uvTexture = new Texture(1280/2,720/2,Format.LuminanceAlpha);
yBuffer = ByteBuffer.allocateDirect(1280*720);
uvBuffer = ByteBuffer.allocateDirect(1280*720/2);
yBuffer.order(ByteOrder.nativeOrder());
uvBuffer.order(ByteOrder.nativeOrder());
String vertexShader =
"attribute vec4 a_position; \n" +
"attribute vec2 a_texCoord; \n" +
"varying vec2 v_texCoord; \n" +
"void main(){ \n" +
" gl_Position = a_position; \n" +
" v_texCoord = a_texCoord; \n" +
"} \n";
String fragmentShader =
"#ifdef GL_ES \n" +
"precision highp float; \n" +
"#endif \n" +
"varying vec2 v_texCoord; \n" +
"uniform sampler2D y_texture; \n" +
"uniform sampler2D uv_texture; \n" +
"void main (void){ \n" +
" float r, g, b, y, u, v; \n" +
" y = texture2D(y_texture, v_texCoord).r; \n" +
" u = texture2D(uv_texture, v_texCoord).a - 0.5; \n" +
" v = texture2D(uv_texture, v_texCoord).r - 0.5; \n" +
" r = y + 1.13983*v; \n" +
" g = y - 0.39465*u - 0.58060*v; \n" +
" b = y + 2.03211*u; \n" +
" gl_FragColor = vec4(r, g, b, 1.0); \n" +
"} \n";
shader = new ShaderProgram(vertexShader, fragmentShader);
mesh = new Mesh(true, 4, 6,
new VertexAttribute(Usage.Position, 2, "a_position"),
new VertexAttribute(Usage.TextureCoordinates, 2, "a_texCoord"));
float[] vertices = {
-1.0f, 1.0f,
0.0f, 0.0f,
-1.0f, -1.0f,
0.0f, 1.0f,
1.0f, -1.0f,
1.0f, 1.0f,
1.0f, 1.0f,
1.0f, 0.0f
};
short[] indices = {0, 1, 2, 0, 2, 3};
mesh.setVertices(vertices);
mesh.setIndices(indices);
camera = Camera.open(0);
camera.setPreviewCallbackWithBuffer(this);
Camera.Parameters params = camera.getParameters();
params.setFocusMode(Camera.Parameters.FOCUS_MODE_CONTINUOUS_VIDEO);
params.setPreviewSize(1280,720);
camera.setParameters(params);
camera.startPreview();
camera.addCallbackBuffer(image);
}
@Override
public void onPreviewFrame(byte[] data, Camera camera) {
camera.addCallbackBuffer(image);
}
@Override
public void renderBackground() {
yBuffer.put(image, 0, 1280*720);
yBuffer.position(0);
uvBuffer.put(image, 1280*720, 1280*720/2);
uvBuffer.position(0);
Gdx.gl.glActiveTexture(GL20.GL_TEXTURE0);
yTexture.bind();
Gdx.gl.glTexImage2D(GL20.GL_TEXTURE_2D, 0, GL20.GL_LUMINANCE, 1280, 720, 0, GL20.GL_LUMINANCE, GL20.GL_UNSIGNED_BYTE, yBuffer);
Gdx.gl.glTexParameterf(GL20.GL_TEXTURE_2D, GL20.GL_TEXTURE_MIN_FILTER, GL20.GL_LINEAR);
Gdx.gl.glTexParameterf(GL20.GL_TEXTURE_2D, GL20.GL_TEXTURE_MAG_FILTER, GL20.GL_LINEAR);
Gdx.gl.glTexParameterf(GL20.GL_TEXTURE_2D, GL20.GL_TEXTURE_WRAP_S, GL20.GL_CLAMP_TO_EDGE);
Gdx.gl.glTexParameterf(GL20.GL_TEXTURE_2D, GL20.GL_TEXTURE_WRAP_T, GL20.GL_CLAMP_TO_EDGE);
Gdx.gl.glActiveTexture(GL20.GL_TEXTURE1);
uvTexture.bind();
Gdx.gl.glTexImage2D(GL20.GL_TEXTURE_2D, 0, GL20.GL_LUMINANCE_ALPHA, 1280/2, 720/2, 0, GL20.GL_LUMINANCE_ALPHA, GL20.GL_UNSIGNED_BYTE, uvBuffer);
Gdx.gl.glTexParameterf(GL20.GL_TEXTURE_2D, GL20.GL_TEXTURE_MIN_FILTER, GL20.GL_LINEAR);
Gdx.gl.glTexParameterf(GL20.GL_TEXTURE_2D, GL20.GL_TEXTURE_MAG_FILTER, GL20.GL_LINEAR);
Gdx.gl.glTexParameterf(GL20.GL_TEXTURE_2D, GL20.GL_TEXTURE_WRAP_S, GL20.GL_CLAMP_TO_EDGE);
Gdx.gl.glTexParameterf(GL20.GL_TEXTURE_2D, GL20.GL_TEXTURE_WRAP_T, GL20.GL_CLAMP_TO_EDGE);
shader.begin();
shader.setUniformi("y_texture", 0);
shader.setUniformi("uv_texture", 1);
mesh.render(shader, GL20.GL_TRIANGLES);
shader.end();
}
@Override
public void destroy() {
camera.stopPreview();
camera.setPreviewCallbackWithBuffer(null);
camera.release();
}
}
主要应用程序部分只确保在开始时调用
init(),每个渲染周期调用
renderBackground(),并在结束时仅调用
destroy():
public class YourApplication implements ApplicationListener {
private final PlatformDependentCameraController deviceCameraControl;
public YourApplication(PlatformDependentCameraController cameraControl) {
this.deviceCameraControl = cameraControl;
}
@Override
public void create() {
deviceCameraControl.init();
}
@Override
public void render() {
Gdx.gl.glViewport(0, 0, Gdx.graphics.getWidth(), Gdx.graphics.getHeight());
Gdx.gl.glClear(GL20.GL_COLOR_BUFFER_BIT | GL20.GL_DEPTH_BUFFER_BIT);
deviceCameraControl.renderBackground();
}
@Override
public void dispose() {
deviceCameraControl.destroy();
}
@Override
public void resize(int width, int height) {
}
@Override
public void pause() {
}
@Override
public void resume() {
}
}
唯一其他与Android相关的部分是以下非常简短的主要Android代码,您只需创建一个新的Android特定设备相机处理程序并将其传递给主libgdx对象即可:
public class MainActivity extends AndroidApplication {
@Override
public void onCreate(Bundle savedInstanceState) {
super.onCreate(savedInstanceState);
AndroidApplicationConfiguration cfg = new AndroidApplicationConfiguration();
cfg.useGL20 = true;
cfg.a = 8;
cfg.b = 8;
cfg.g = 8;
cfg.r = 8;
PlatformDependentCameraController cameraControl = new AndroidDependentCameraController();
initialize(new YourApplication(cameraControl), cfg);
graphics.getView().setKeepScreenOn(true);
}
}
它有多快?
我在两台设备上测试了这个程序。虽然测量结果在帧之间不是恒定的,但可以观察到一个一般的轮廓:
Samsung Galaxy Note II LTE - (GT-N7105):配备ARM Mali-400 MP4 GPU。
- 渲染一帧大约需要5-6毫秒,偶尔会在几秒钟内跳到约15毫秒
- 实际渲染行(
mesh.render(shader, GL20.GL_TRIANGLES);)始终需要0-1毫秒
- 两个纹理的创建和绑定总共需要1-3毫秒
- ByteBuffer拷贝通常总共需要1-3毫秒,但偶尔会跳到约7毫秒,可能是由于图像缓冲区在JVM堆中移动导致的
Samsung Galaxy Note 10.1 2014 - (SM-P600):配备ARM Mali-T628 GPU。
- 渲染一帧大约需要2-4毫秒,很少跳到约6-10毫秒
- 实际渲染行(
mesh.render(shader, GL20.GL_TRIANGLES);)始终需要0-1毫秒
- 两个纹理的创建和绑定总共需要1-3毫秒,但偶尔会在几秒钟内跳到约6-9毫秒
- ByteBuffer拷贝通常总共需要0-2毫秒,但极少跳到约6毫秒
请不要犹豫,如果您认为这些配置文件可以通过其他方法更快地实现,请分享。希望这个小教程能够帮助到您。