反锯齿弧形 Pygame

8
我正在尝试使用Pygame在Python中编写一个简单的圆形计时器。目前看起来像这样:Timer 
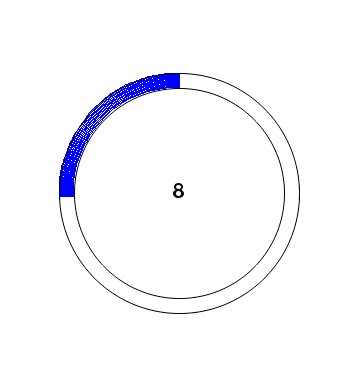
正如您所看到的,蓝线非常波浪,并有白色点。我是通过使用pygame.draw.arc()函数实现这个蓝线的,但它没有反锯齿处理,看起来很糟糕。我想要它进行反锯齿处理,但gfxdraw模块不支持弧线宽度选择。以下是代码片段:
pygame.draw.arc(screen, blue, [center[0] - 120, center[1] - 120, 240, 240], pi/2, pi/2+pi*i*koef, 15)
pygame.gfxdraw.aacircle(screen, center[0], center[1], 105, black)
pygame.gfxdraw.aacircle(screen, center[0], center[1], 120, black)
6个回答

2
我用多边形创建了这个弧形。最初的回答中提到了这一点。
def drawArc(surface, x, y, r, th, start, stop, color):
    points_outer = []
    points_inner = []
    n = round(r*abs(stop-start)/20)
    if n<2:
        n = 2
    for i in range(n):
        delta = i/(n-1)
        phi0 = start + (stop-start)*delta
        x0 = round(x+r*math.cos(phi0))
        y0 = round(y+r*math.sin(phi0))
        points_outer.append([x0,y0])
        phi1 = stop + (start-stop)*delta
        x1 = round(x+(r-th)*math.cos(phi1))
        y1 = round(y+(r-th)*math.sin(phi1))
        points_inner.append([x1,y1])
    points = points_outer + points_inner        
    pygame.gfxdraw.aapolygon(surface, points, color)
    pygame.gfxdraw.filled_polygon(surface, points, color)

使用生成器可以更优雅地创建for循环,但我对Python并不是很精通。

虽然弧线确实比pygame.draw.arc好看,但与我的Mac屏幕渲染相比,还有改进的空间。

"Original Answer"的翻译是"最初的回答"。


1
我不知道是否有任何pygame函数可以解决这个问题,这意味着你基本上需要自己编写一个解决方案(或使用其他东西而不是pygame),因为如你所指出的,draw是有问题的,而gfxdraw不会给你厚度。
一个非常丑陋但简单的解决方案是在弧段上多次绘制,总是稍微移动一下以“填补”缺失的间隙。这仍然会在计时器弧的前端留下一些锯齿,但其余部分将被填充。
import pygame
from pygame.locals import *
import pygame.gfxdraw
import math

# Screen size
SCREEN_HEIGHT = 350
SCREEN_WIDTH = 500

# Colors
BLACK = (0, 0, 0)
WHITE = (255, 255, 255)
GREY = (150, 150, 150)
RED = (255,0,0)


 # initialisation
pygame.init()
screen = pygame.display.set_mode((SCREEN_WIDTH, SCREEN_HEIGHT))
done = False
clock = pygame.time.Clock()

# We need this if we want to be able to specify our
#  arc in degrees instead of radians
def degreesToRadians(deg):
    return deg/180.0 * math.pi

# Draw an arc that is a portion of a circle.
# We pass in screen and color,
# followed by a tuple (x,y) that is the center of the circle, and the radius.
# Next comes the start and ending angle on the "unit circle" (0 to 360)
#  of the circle we want to draw, and finally the thickness in pixels
def drawCircleArc(screen,color,center,radius,startDeg,endDeg,thickness):
    (x,y) = center
    rect = (x-radius,y-radius,radius*2,radius*2)
    startRad = degreesToRadians(startDeg)
    endRad = degreesToRadians(endDeg)

    pygame.draw.arc(screen,color,rect,startRad,endRad,thickness)


# fill screen with background
screen.fill(WHITE)
center = [150, 200]
pygame.gfxdraw.aacircle(screen, center[0], center[1], 105, BLACK)
pygame.gfxdraw.aacircle(screen, center[0], center[1], 120, BLACK)

pygame.display.update()

step = 10
maxdeg = 0

while not done:
    for event in pygame.event.get():
        if event.type == pygame.QUIT:
            done = True

    maxdeg = maxdeg + step
    for i in range(min(0,maxdeg-30),maxdeg):
        drawCircleArc(screen,RED,(150,200),119,i+90,max(i+10,maxdeg)+90,14)  
        #+90 will shift it from starting at the right to starting (roughly) at the top
    pygame.display.flip()

    clock.tick(2)  # ensures a maximum of 60 frames per second

pygame.quit()

请注意,我从https://www.cs.ucsb.edu/~pconrad/cs5nm/08F/ex/ex09/drawCircleArcExample.py中复制了degreesToRadiansdrawCircleArc
我一般不建议这种解决方案,但在紧急情况下可能可行。

看起来好多了,但还不完美。我会尝试谷歌或思考其他可能的解决方案。 - Justas Sam
1
如果你需要使用pygame,更简单的方法是在图形程序中完成,并从精灵表中blit计数器步骤。如果你只需要在少数几个地方使用它,手写的hack可能不值得一试。 - Isa
1
为什么不先绘制下一个线段,然后再进行泛洪填充呢? - Jean-François Fabre
@Jean-FrançoisFabre,你会怎样实现泛洪填充?据我所知,pygame中没有内置的此类函数。你可以使用pygame.gfxdraw.filled_polygon(),但这意味着需要预先计算多边形弧段的点,这看起来很麻烦。 - Isa
在这种情况下,我会使用森林火灾算法进行泛洪填充,但这可能会消耗大量CPU资源,除非像您之前建议的那样进行预计算。 - Jean-François Fabre
你有什么推荐的图形库可以替代pygame吗? - user76284

1

你说得对,一些pygame渲染函数确实很糟糕,所以你可以使用PIL来实现类似的效果。

pie_size = (40, 40)  # defining constants
pil_img = PIL.Image.new("RGBA", pie_size)  # PIL template image
pil_draw = PIL.ImageDraw.Draw(pil_img)  # drawable image
pil_draw.pieslice((0, 0, *[ps - 1 for ps in pie_size]), -90, 180, fill=(0, 0, 0))  # args: (x0, y0, x1, y1), start, end, fill

这将创建一个PIL形状。现在我们可以将其转换为pygame。
data = pil_img.tobytes()
size = pil_img.size
mode = pil_img.mode
pygame_img = pygame.image.fromstring(data, size, mode).convert_alpha()

但不要忘记 pip install pillow
import PIL.Image
import PIL.ImageDraw

0

好的,这个方法很老了,但为什么不尝试画饼图呢?例如,先画一个饼图,然后在外部环上画一个未填充的圆圈,再在内部画一个填充的圆圈,最后再在内部环上画一个未填充的圆圈。

所以,饼图 -> 未填充的圆圈 -> 填充的圆圈 -> 未填充的圆圈

顺序有些随意,但如果您仍然遇到此问题,请尝试一下。(顺便说一句,我没有尝试过,但我认为它会起作用)


0

如果起点和终点并不是很重要,可以沿着弧线轨迹创建许多圆圈,当完成小圆圈绘制360次后,最终得到一个没有波浪效果的大圆:

最小工作示例(MWE):

#!/usr/bin/env python3
import pygame
import math

# Initialize pygame
pygame.init()

# Set the screen size
screen = pygame.display.set_mode((400, 300))

# Set the center point of the arc
center_x = 200
center_y = 150
arc_radius = 100
circle_radius = 6

# Set the start and stop angles of the arc
start_angle = 0
stop_angle = 360
angle_step = 1

running = True
while running:
    for event in pygame.event.get():
        if event.type == pygame.QUIT:
            running = False

    # Clear the screen
    screen.fill((0, 0, 0))

    # Draw the overlapping circles
    for i in range(start_angle, stop_angle, angle_step):
        angle = math.radians(i)
        x = center_x + arc_radius * math.cos(angle)
        y = center_y + arc_radius * math.sin(angle)
        pygame.draw.circle(screen, "red", (int(x), int(y)), circle_radius)
    
    # Update the display
    pygame.display.flip()
    
pygame.quit()

具有起始角度和终止角度为0至360的 start_anglestop_angle 分别产生一个填充圆,输出如下:

enter image description here

为了将其更改为1/3圆,需要将stop_angle从360更改为120(1/3 x 360 = 120),然后会得到:

enter image description here


0
为了我的个人使用,我编写了一个简单的包装函数,并使用一个丑陋的循环来多次绘制相同的弧以处理不连续的弧形绘制。
def DrawArc(surface, color, center, radius, startAngle, stopAngle, width=1):
    width -= 2
    for i in range(-2, 3):
        # (2pi rad) / (360 deg)
        deg2Rad = 0.01745329251
        rect = pygame.Rect(
            center[0] - radius + i,
            center[1] - radius,
            radius * 2,
            radius * 2
        )

        pygame.draw.arc(
            surface,
            color,
            rect,
            startAngle * deg2Rad,
            stopAngle * deg2Rad,
            width
        )

我知道这不是一个很好的解决方案,但对于我的用途来说还算可以。

重要的一点是,我添加了 "width -= 2",希望至少能更准确地保留弧线的预期大小,但这会增加最小宽度2个单位。

在您的情况下,您可能需要考虑采取更多措施来解决这些问题。


1
你应该使用 math.degreesmath.radians,这样可以提高可读性和精度。 - Hacker

网页内容由stack overflow 提供, 点击上面的
可以查看英文原文,
原文链接