旋转后,在正确位置绘制图像。

5
如您所见,我试图在画布中旋转一张图片:enter image description herehttps://jsfiddle.net/1a7wpsp8/4/ 由于我将图像围绕[0,image_height]旋转,因此丢失了图像信息。 头部的某些部分丢失了,画布的高度现在太小,无法显示整个旋转后的图像。 为解决这个问题,我认为我需要将旋转原点向右移动并增加画布高度。
我添加了一个方法来获取特定角度下围绕原点旋转的点:
function rotate(x, y, a) {
 var cos = Math.cos,
    sin = Math.sin,

    a = a * Math.PI / 180, 
    xr =  x * cos(a) - y * sin(a);
    yr =  x * sin(a) + y * cos(a);

 return [xr, yr];
}

我试图计算新的旋转原点,但失败了。

您希望使用哪种方法旋转图片? 如何在画布上显示完整的图像而没有红色边框? 谢谢 https://jsfiddle.net/1a7wpsp8/4/


但是你没有使用这个 rotate() 函数。你正在使用的是 ctx.rotate() - John Bupit
1
只要您在画布背景中填充了红色,旋转图像时,红色三角形将始终是副产品。您是否想知道如何缩小旋转后的图像以适合画布元素的原始边界? - markE
5个回答

15

要旋转图像并缩放它,使得图像的边缘在画布范围内任何位置都不会超出边界,您需要计算从画布中心到一个角的距离。

// assuming canvas is the canvas and image is the image.
var dist = Math.sqrt(Math.pow(canvas.width/2,2)+Math.pow(canvas.height/2,2));

现在您需要找到图像中心点到其最近边缘的距离。
var imgDist = Math.min(image.width,image.height)/2

现在我们有了所需的信息,可以确定图像的最小比例,以便在绘制在画布中心时始终适合画布。

var minScale = dist / imgDist;

现在需要以图像中心为轴心进行旋转、缩放并将其定位于画布中心。

首先计算一个像素顶部边缘(X轴)的方向和大小。

// ang is the rotation in radians
var dx = Math.cos(ang) * minScale;
var dy = Math.sin(ang) * minScale; 

创建转换矩阵,其中前两个数字是X轴,后两个数字是Y轴,这是从X轴顺时针旋转90度的,最后两个数字是画布像素坐标系中距离画布原点(左上角)的原点。

// ctx is the canvas 2D context
ctx.setTransform(dx, dy, -dy, dx, canvas.width / 2, canvas.height / 2);

现在将图像偏移其高度和宽度的一半。

ctx.drawImage(image,-image.width / 2, - image.height / 2);

最后一件事就是恢复默认变换。

ctx.setTransform(1,0,0,1,0,0);

完成了。

作为一个函数

// ctx is canvas 2D context
// angle is rotation in radians
// image is the image to draw
function drawToFitRotated(ctx, angle, image){
    var dist = Math.sqrt(Math.pow(ctx.canvas.width /2, 2 ) + Math.pow(ctx.canvas.height / 2, 2));
    var imgDist = Math.min(image.width, image.height) / 2;
    var minScale = dist / imgDist;
    var dx = Math.cos(angle) * minScale;
    var dy = Math.sin(angle) * minScale; 
    ctx.setTransform(dx, dy, -dy, dx, ctx.canvas.width / 2, ctx.canvas.height / 2);
    ctx.drawImage(image, -image.width / 2, - image.height / 2);
    ctx.setTransform(1, 0, 0, 1, 0, 0);
}

更新 由于这是一个有趣的问题,我看了看是否能够找出如何最好地适应旋转图像,以确保图像始终填充画布,同时尽可能多地显示图像。解决方案意味着随着图像旋转,比例会改变,因为边缘会到角落,比例在4个点上突然停止缩小并重新开始增长。尽管如此,这对于需要填充画布但又需要旋转的静态图像是很有用的。

最好的方法是用图片来描述 enter image description here 
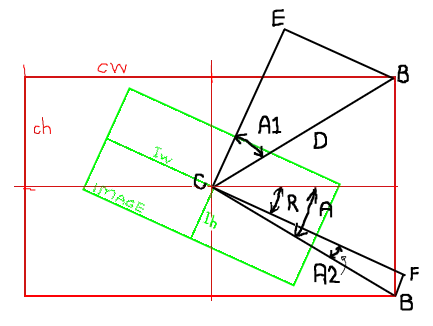
图像是绿色的,画布是红色的,图像的旋转角度是R。我们需要找到线段CE和CF的长度。Ih和Iw分别是图像高度和宽度的一半。

从画布中,我们计算出线段CB的长度,即画布高度(ch)和宽度(cw)的一半平方根之和。

然后我们需要角度A,它是C-B直线长度的acos (ch) / length line C-B

现在我们有了角度A,可以计算出角度A1和A2。现在我们有了长度C-B和角度A1,A2,我们可以解决直角三角形CEB和CFB,以获得CE和CF的长度。 即C-E =线段C-B * cos(A1)和C-F =线段C-B * cos(A2)

然后得到图像高度的比例,即长度C-E除以Ih,以及C-E除以Iw的比例。由于图像纵横比可能与需要适应的矩形不匹配,因此我们需要保持两个比例中较大的那个。

所以最终得到了一个符合要求的比例。

还有一个问题。该数学公式适用于0-90度之间的角度,但对其它角度无效。幸运的是,每个象限的问题都是对称的。对于大于180度的角度,我们进行镜像并旋转回来180度;对于90度至180度之间的角度,我们进行反转并旋转回90度。在演示中,我使用弧度值。我们还确保给定的角度始终在0-360范围内(即0到Math.PI * 2)。

接下来只需创建矩阵并绘制图像。

在演示中,我添加了两个方框。蓝色的是画布轮廓的一半大小副本,红色的是图像的半大小副本。我这样做是为了让您看到图像旋转时比例不平滑的原因。

我也会保留这个函数,因为它很方便。

请查看演示代码以获取新函数。

demo = function(){
    /** fullScreenCanvas.js begin **/
    var canvas = (function(){
        var canvas = document.getElementById("canv");
        if(canvas !== null){
            document.body.removeChild(canvas);
        }
        // creates a blank image with 2d context
        canvas = document.createElement("canvas"); 
        canvas.id = "canv";    
        canvas.width = window.innerWidth;
        canvas.height = window.innerHeight; 
        canvas.style.position = "absolute";
        canvas.style.top = "0px";
        canvas.style.left = "0px";
        canvas.style.zIndex = 1000;
        canvas.ctx = canvas.getContext("2d"); 
        document.body.appendChild(canvas);
        return canvas;
    })();
    var ctx = canvas.ctx;
    var image = new Image();
    image.src = "http://i.imgur.com/gwlPu.jpg";

    var w = canvas.width;
    var h = canvas.height;
    var cw = w / 2;  // half canvas width and height
    var ch = h / 2;
    // Refer to diagram in answer 
    function drawBestFit(ctx, angle, image){
        var iw = image.width / 2;  // half image width and height
        var ih = image.height / 2;
        // get the length C-B
        var dist = Math.sqrt(Math.pow(cw,2) + Math.pow(ch,2));
        // get the angle A
        var diagAngle = Math.asin(ch/dist);

        // Do the symmetry on the angle
        a1 = ((angle % (Math.PI *2))+ Math.PI*4) % (Math.PI * 2);
        if(a1 > Math.PI){
            a1 -= Math.PI;
        }
        if(a1 > Math.PI/2 && a1 <= Math.PI){
            a1 = (Math.PI/2) - (a1-(Math.PI/2));
        }
        // get angles A1, A2
        var ang1 = Math.PI/2 - diagAngle - Math.abs(a1);
        var ang2 = Math.abs(diagAngle - Math.abs(a1));
        // get lenghts C-E and C-F
        var dist1 = Math.cos(ang1) * dist;
        var dist2 = Math.cos(ang2) * dist;
        // get the max scale
        var scale = Math.max(dist2/(iw),dist1/(ih));
        // create the transform
        var dx = Math.cos(angle) * scale;
        var dy = Math.sin(angle) * scale; 
        ctx.setTransform(dx, dy, -dy, dx, cw, ch);
        ctx.drawImage(image, -iw, - ih);


        // draw outline of image half size
        ctx.strokeStyle = "red";
        ctx.lineWidth = 2 * (1/scale);
        ctx.strokeRect(-iw / 2, -ih / 2, iw, ih) 

        // reset the transform
        ctx.setTransform(1, 0, 0, 1, 0, 0);

        // draw outline of canvas half size
        ctx.strokeStyle = "blue";
        ctx.lineWidth = 2;
        ctx.strokeRect(cw - cw / 2, ch - ch / 2, cw, ch) 

    }

    // Old function
    function drawToFitRotated(ctx, angle, image){
        var dist = Math.sqrt(Math.pow(cw,2) + Math.pow(ch,2));
        var imgDist = Math.min(image.width, image.height) / 2;
        var minScale = dist / imgDist;

        var dx = Math.cos(angle) * minScale;
        var dy = Math.sin(angle) * minScale; 
        ctx.setTransform(dx, dy, -dy, dx, cw, ch);
        ctx.drawImage(image, -image.width / 2, - image.height / 2);
        ctx.setTransform(1, 0, 0, 1, 0, 0);
    }      

    var angle = 0;
    function update(){  // animate the image
        if(image.complete){
            angle += 0.01;
            drawBestFit(ctx,angle,image);
        }
        
        // animate until resize then stop remove canvas and flag that it has stopped
        if(!STOP){
            requestAnimationFrame(update);
        }else{
           STOP = false;
           var canv = document.getElementById("canv");
           if(canv !== null){
              document.body.removeChild(canv);
           }
            
        }
        
    }
    update();
}
/** FrameUpdate.js end **/
var STOP = false;  // flag to tell demo app to stop 
// resize Tell demo to stop then wait for it to stop and start it again
function resizeEvent(){
    var waitForStopped = function(){
        if(!STOP){  // wait for stop to return to false
            demo();
            return;
        }
        setTimeout(waitForStopped,200);
    }
    STOP = true;
    setTimeout(waitForStopped,100);
}
// if resize stop demo and restart
window.addEventListener("resize",resizeEvent);
 // start demo
demo();


感谢您的帮助!(http://stackoverflow.com/questions/35346296/scale-rotated-image-to-fill-html5-canvas-using-javascript-trigonometry) - 700 Software
@GeorgeBailey 不用谢,也谢谢你的点赞。 - Blindman67
你知道如何让图片在画布上移动但保持填充吗?我的意思是,拖动图像以更改其位置。 - 0xlkda
@0xlkda 将角度带入规范化范围。转换会给出相同结果的角度。 - Blindman67

6

这里有一个旋转图片的代码,可以在 fiddle 上查看: ) http://jsfiddle.net/6ZsCz/1911/

HTML:

canvas id="canvas" width=300 height=300></canvas><br>
<button id="clockwise">Rotate right</button>
<button id="counterclockwise">Rotate left</button>

JS:

var canvas=document.getElementById("canvas");
var ctx=canvas.getContext("2d");
var width=0;
var height=0;
var diagonal = 0;
var angleInDegrees=0;
var image=document.createElement("img");
image.onload=function(){
    width = image.naturalWidth;
  height = image.naturalHeight;
 diagonal=Math.sqrt(Math.pow(width,2)+Math.pow(height,2));
   ctx.canvas.height = diagonal;
  ctx.canvas.width = diagonal;
  ctx.clearRect(0,0,canvas.width,canvas.height);
    ctx.save();
    ctx.translate(diagonal/2,diagonal/2);
    ctx.rotate(0);
    ctx.drawImage(image,-width/2,-height/2);
    ctx.restore();
}
image.src="http://i.imgur.com/gwlPu.jpg";

$("#clockwise").click(function(){ 
    angleInDegrees+=45;
    drawRotated(angleInDegrees);
});

$("#counterclockwise").click(function(){ 
    angleInDegrees-=45;
    drawRotated(angleInDegrees);
});

function drawRotated(degrees){
    ctx.clearRect(0,0,canvas.width,canvas.height);
    ctx.save();
    ctx.translate(diagonal/2,diagonal/2);
    ctx.rotate(degrees*Math.PI/180);
    ctx.drawImage(image,-width/2,-height/2);
    ctx.restore();
}

CSS(用于画布背景):

canvas{border:1px solid red;
background:red;border-radius:50%} // to see exectly centered :)

1

您的首选方法是如何旋转图像?

将上下文坐标转换为中心,旋转,然后使用负偏移量进行绘制。

ctx.save();
ctx.translate(width/2, height/2);
ctx.rotate(-40*Math.PI/180);
ctx.drawImage(img, -width/2, -height/2);
ctx.restore();

如何在画布上显示完整的图像,而不带红色边框?

为了使图像适合任意旋转的画布,您需要将宽度和高度(至少)设置为 C=sqrt(width^2 + height^2)。在两个方向上翻译为 C/2


1
我开始觉得提问者想要将图像缩小以适应原始画布的尺寸 - 请参见提问者对John Bupit的评论中的线索。但我不是很确定... :-// - markE
@markE 哦,你可能是对的。我想 Blindman67 解决了那个问题。 - jamieguinan

0

要围绕中心旋转,您可以先将其平移到中心点,然后旋转,最后再平移回来。就像这样:

ctx.translate(width/2, height/2);
ctx.rotate(-40*Math.PI/180);
ctx.translate(-width/2, -height/2);

// Grab the Canvas and Drawing Context
var canvas = $('#c');
var ctx = canvas.get(0).getContext('2d');

//rotate point x,y around origin with angle a, get back new point 
function rotate(x, y, a) {
  var cos = Math.cos,
    sin = Math.sin,

    a = a * Math.PI / 180,
    xr = x * cos(a) - y * sin(a);
  yr = x * sin(a) + y * cos(a);

  return [xr, yr];
}

// Create an image element
var img = document.createElement('IMG');

// When the image is loaded, draw it
img.onload = function() {
  var width = img.naturalWidth;
  var height = img.naturalHeight;

  canvas.attr('width', width);
  canvas.attr('height', height);

  //only to show that borders of canvas
  ctx.rect(0, 0, width, height);
  ctx.fillStyle = "red";
  ctx.fill();

  ctx.save();
  ctx.translate(width / 2, height / 2);
  ctx.rotate(-40 * Math.PI / 180); //comment this line out to see orign image
  ctx.translate(-width / 2, -height / 2);
  ctx.drawImage(img, 0, 0);
  ctx.restore();

}

// Specify the src to load the image
img.src = "http://i.imgur.com/gwlPu.jpg";
body {
  background: #CEF;
}
<script src="https://ajax.googleapis.com/ajax/libs/jquery/1.9.0/jquery.min.js"></script>
<canvas id="c"></canvas>


谢谢您的回答。但是我正在寻找一种解决方案,使图像的边界点位于画布的边界上。正如您所看到的,画布必须被扩大。 - John Smith

-2

你应该在回答中发布相关的代码,而不是仅发布链接。 - service-paradis

网页内容由stack overflow 提供, 点击上面的
可以查看英文原文,
原文链接