Android带有圆角的AlertDialog

38

我一直在试图制作具有圆角的警报对话框,但不知何故无法实现。我尝试过了但失败了。我试图遵循这篇博客http://blog.stylingandroid.com/archives/271并根据它来制作我的样式。

顺便提一下,补充我的问题。我的一些新发现。上面链接中的代码在2.3.3(GB)上运行得很好,但在ICS上根本不起作用。某些更改使代码崩溃。

我想避免创建9 patch图像,因此我正在使用形状。 9 patch图像是我将要尝试的最后一件事情。我知道android警报对话框样式正在使用9 patch图片,我在提问之前已经查过了。

/res/values/themes.xml

<?xml version="1.0" encoding="utf-8"?>
<resources>

    <style name="MyTheme" parent="@android:style/Theme.Dialog">
        <item name="android:alertDialogStyle">@style/dialog</item>
    </style>


</resources>

/res/values/styles.xml

<resources xmlns:android="http://schemas.android.com/apk/res/android">

    <style name="AppTheme" parent="android:Theme.Light" />

    <style name="myImageView">

        <!-- 3dp so the background border to be visible -->
        <item name="android:padding">3dp</item>
        <item name="android:background">@drawable/image_drawable</item>
        <item name="android:scaleType">fitCenter</item>
    </style>

    <style name="dialog">
        <item name="android:fullDark">@drawable/dialog_body</item>
        <item name="android:topDark">@drawable/dialog_title</item>
        <item name="android:centerDark">@drawable/dialog_body</item>
        <item name="android:bottomDark">@drawable/dialog_footer</item>
        <item name="android:fullBright">@drawable/dialog_body</item>
        <item name="android:centerBright">@drawable/dialog_body</item>
        <item name="android:topBright">@drawable/dialog_title</item>
        <item name="android:bottomBright">@drawable/dialog_footer</item>
        <item name="android:bottomMedium">@drawable/dialog_footer</item>
        <item name="android:centerMedium">@drawable/dialog_body</item>
    </style>

</resources>

/res/drawable/dialog_title.xml

<inset xmlns:android="http://schemas.android.com/apk/res/android"
    android:insetBottom="-1dp">
    <shape android:shape="rectangle">
        <solid android:color="#FFFFFF" />
        <corners android:topLeftRadius="5dp" android:topRightRadius="5dp" />
        <stroke android:color="#FFFFFF" android:width="1dp" />
    </shape>
</inset>

/res/drawable/dialog_body.xml

<?xml version="1.0" encoding="utf-8"?>
<shape xmlns:android="http://schemas.android.com/apk/res/android"
    android:shape="rectangle">
    <gradient android:startColor="#FFFFFFFF" android:endColor="#FFFFFFFF"
        android:angle="270" />
</shape>

/res/drawable/dialog_footer.xml

<?xml version="1.0" encoding="utf-8"?>
<shape xmlns:android="http://schemas.android.com/apk/res/android"
    android:shape="rectangle" >

    <solid android:color="#FFFFFF" />

    <corners
        android:bottomLeftRadius="5dp"
        android:bottomRightRadius="5dp" />

    <stroke
        android:width="1dp"
        android:color="#FFFFFF" />

</shape>

res/layout/dialog_layout.xml

<?xml version="1.0" encoding="utf-8"?>
<RelativeLayout xmlns:android="http://schemas.android.com/apk/res/android"
    android:layout_width="match_parent"
    android:layout_height="match_parent"
    >

    <TextView
        android:id="@+id/textView1"
        android:layout_width="wrap_content"
        android:layout_height="wrap_content"
        android:layout_alignParentTop="true"
        android:layout_centerHorizontal="true"
        android:layout_marginTop="45dp"
        android:text="Large Text"
        android:textAppearance="?android:attr/textAppearanceLarge" />

    <Button
        android:id="@+id/button1"
        style="?android:attr/buttonStyleSmall"
        android:layout_width="wrap_content"
        android:layout_height="wrap_content"
        android:layout_below="@+id/textView1"
        android:layout_marginTop="90dp"
        android:layout_toLeftOf="@+id/textView1"
        android:background="@drawable/button_selector"
        android:text="Ok"
        android:textColor="@android:color/white"
        android:textStyle="bold" />

    <Button
        android:id="@+id/button2"
        style="?android:attr/buttonStyleSmall"
        android:layout_width="wrap_content"
        android:layout_height="wrap_content"
        android:layout_alignParentRight="true"
        android:layout_alignTop="@+id/button1"
        android:layout_marginRight="48dp"
        android:background="@drawable/button_selector"
        android:text="More"
        android:textColor="@android:color/white"
        android:textStyle="bold" />

    <LinearLayout
        android:layout_width="fill_parent"
        android:layout_height="wrap_content"
        android:layout_alignParentLeft="true"
        android:layout_below="@+id/button1"
        android:layout_marginTop="41dp"
        android:orientation="vertical" >
    </LinearLayout>

</RelativeLayout>

我的AlertDialog代码:

public static void createYesNoDialog(final Context context, String positivebuttonname,
            String negativebuttonname, String message, int messagedrawable, String headermessage,
            final DialogResponse dr) {
        final DialogResponse dialogResponse = dr;
        ContextThemeWrapper ctw = new ContextThemeWrapper(context,
                com.gp4ever.worldlogo.quiz.R.style.MyTheme);

        AlertDialog.Builder builder = new AlertDialog.Builder(ctw);
        LayoutInflater inflater = (LayoutInflater)context
                .getSystemService(Context.LAYOUT_INFLATER_SERVICE);
        View layout = inflater.inflate(com.gp4ever.worldlogo.quiz.R.layout.dialog_layout, null);
        TextView text = (TextView)layout.findViewById(com.gp4ever.worldlogo.quiz.R.id.textView1);
        Button buttonOk = (Button)layout.findViewById(com.gp4ever.worldlogo.quiz.R.id.button1);
        Button buttonMore = (Button)layout.findViewById(com.gp4ever.worldlogo.quiz.R.id.button2);
        text.setText(message);
        if (messagedrawable > 0) {
            text.setCompoundDrawablesWithIntrinsicBounds(messagedrawable, 0, 0, 0);
        } else if (messagedrawable == 0)
            text.setCompoundDrawablesWithIntrinsicBounds(0, 0, 0, 0);
        builder.setView(layout);
        builder.setCancelable(false);
        builder.setTitle(headermessage);
        builder.setIcon(android.R.drawable.ic_dialog_alert);
        final AlertDialog dialog = builder.create();

        buttonOk.setOnClickListener(new OnClickListener() {

            @Override
            public void onClick(View v) {
                // TODO Auto-generated method stub
                dialog.cancel();
            }
        });
        buttonMore.setOnClickListener(new OnClickListener() {

            @Override
            public void onClick(View v) {
                // TODO Auto-generated method stub
                dialog.cancel();
            }
        });

当前输出:

我没有得到任何圆角。我可以看到它与通常的样式不同。即使我在我的可绘制对象上改变了半径,角落也不能反映出这些变化。
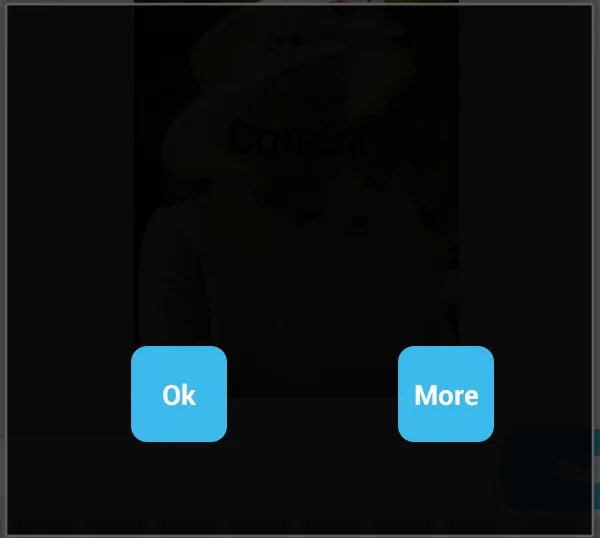
输入图像描述


你不能使用带有圆角的九宫格图片作为背景吗? - IAmGroot
不,我想避免创建9宫格图片,而是使用形状。9宫格图片是我最后尝试的事情。让我在问题中澄清一下。 - VendettaDroid
我知道Android警告对话框风格使用9宫格图片。在提出这个问题之前,我已经查过了。 - VendettaDroid
8个回答

39
你可以使用以下代码来实现:
CustomDialog.java:
public class MainActivity extends Activity{

    private static final int ALERT_DIALOG = 1;

    @Override
    public void onCreate( Bundle savedInstanceState )
    {
        super.onCreate( savedInstanceState );
        setContentView( R.layout.main );

        ( (Button) findViewById( R.id.button1 ) )
            .setOnClickListener( new OnClickListener()
                {
                    public void onClick( View v )
                    {
                        showDialog( ALERT_DIALOG );
                    }
                }
            );
    }

    @Override
    protected Dialog onCreateDialog( int id ){
        Dialog dialog = null;
        if ( id == ALERT_DIALOG )
        {
            ContextThemeWrapper ctw = new ContextThemeWrapper( this, R.style.MyTheme );
            AlertDialog.Builder builder = new AlertDialog.Builder( ctw );
            builder.setMessage( "Hello World" )
                .setTitle( "Alert Dialog" )
                .setIcon( android.R.drawable.ic_dialog_alert )
                .setCancelable( false )
                .setPositiveButton( "Close", new DialogInterface.OnClickListener()
                    {
                        public void onClick( DialogInterface dialog, int which )
                           {
                                dialog.dismiss();
                           }
                        } 
                    );
            dialog = builder.create();
        }
        if ( dialog == null )
        {
            dialog = super.onCreateDialog( id );
        }
        return dialog;
     }
 }

dialog_title.xml

<?xml version="1.0" encoding="utf-8"?>
<inset xmlns:android="http://schemas.android.com/apk/res/android" android:insetBottom="-1dp">
    <shape android:shape="rectangle">
        <solid android:color="#000000" />
        <corners android:topLeftRadius="20dp" android:topRightRadius="20dp" />
        <stroke android:color="#7F7F7F" android:width="1dp" />
    </shape>
</inset>

dialog_footer.xml

<?xml version="1.0" encoding="utf-8"?>
<shape xmlns:android="http://schemas.android.com/apk/res/android"
    android:shape="rectangle">
    <solid android:color="#7F7F7F" />
    <corners android:bottomLeftRadius="20dp" android:bottomRightRadius="20dp" />
    <stroke android:color="#7F7F7F" android:width="1dp" />
</shape>

只需更改以下文件中的半径值:

dialog_title.xml

dialog_footer.xml

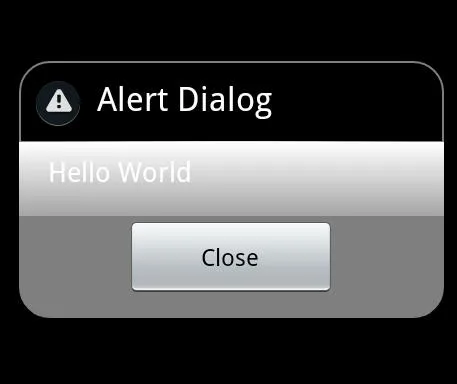
那么就会生成以下输出:

enter image description here

希望这可以帮到您。


更新:
我不是专家,但这是我发现的。可能对也可能错。 经过多次尝试,我最终得出以下结论:

1- ContextThemeWrapper 不适用于 API 14,它在 Gingerbread 及早期版本上运行良好,但在 API > 10 上不起作用。

2- 为了克服上述问题,并使其在 API > 10 上正常工作,我替换了这行代码:

ContextThemeWrapper ctw = new ContextThemeWrapper( this, R.style.MyTheme );
AlertDialog.Builder builder= new AlertDialog.Builder( ctw );

使用这个:

AlertDialog.Builder builder= new AlertDialog.Builder( this,R.style.MyTheme );

但你需要进行更改:

android:minSdkVersion="8"  

to

android:minSdkVersion="11" 

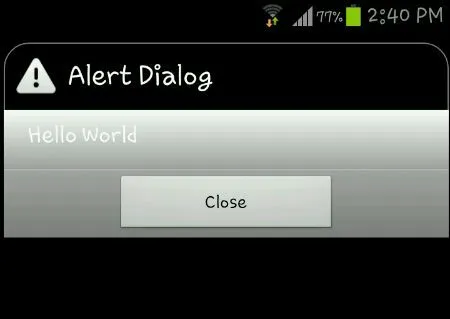
在 ICS (API 14) 上,结果将如下图所示:

enter image description here

此图片来自运行 ICS 的 Samsung Galaxy S3。

注意:使用 API 14 SO 清单 SDK 启动的修改后的项目将如下:

<uses-sdk
  android:minSdkVersion="11"
  android:targetSdkVersion="15" />

最终结论: 虽然我对Android开发有一定了解(但并不是专家),

1- 使用相同的Java代码,自定义警告对话框在API < 10上运行顺利,但在API > 10上却不能正常运行。

如果我们希望在ICS上以与API < 10相同的效果运行该对话框,我们需要修改代码,这样它就可以在ICS上运行,但不能在任何API 11及以下的版本上运行。

2- 即使在ICS中的结果也不尽如人意,圆角只适用于标题而不是页脚。


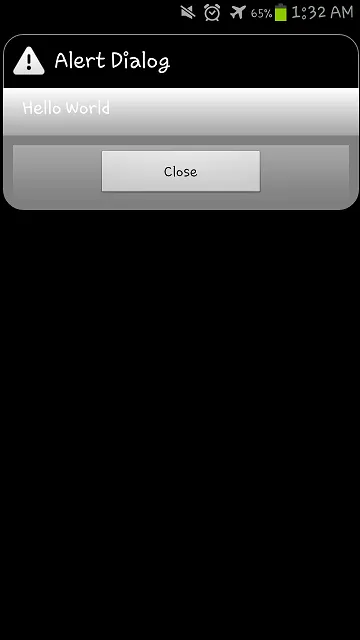
第二次更新: 最终我得到了所有角都是圆的效果,

只需为dialog_footer.xml应用padding,如下所示:

<?xml version="1.0" encoding="utf-8"?>
<shape xmlns:android="http://schemas.android.com/apk/res/android"
android:shape="rectangle">
    <solid android:color="#7F7F7F" />
    <corners android:bottomLeftRadius="20dp" android:bottomRightRadius="20dp" />
    <stroke android:color="#7F7F7F" android:width="1dp" />
    <padding android:left="10dp" android:top="10dp" android:right="10dp"
android:bottom="10dp" /> 
</shape>

输出图像:

在此输入图片描述

这张图片来自一个运行ICS的三星Galaxy S3。


我已经知道我需要改变我的可绘制形状中的半径以获得更圆润的效果。我已经尝试过更改这些半径,但对我来说没有起作用。 - VendettaDroid
我正在尝试完全使用链接中给出的代码,并将半径更改为15dp。如果我在2.3.3(GB)设备上运行代码,则代码可以很好地工作,但是在ICS上无法工作。您是否尝试在ICS上运行代码? - VendettaDroid
我在ICS设备上进行测试,不仅没有显示圆角,而且也没有应用整个主题。我正在研究这个问题,有任何发现我会告诉你的。 - androidqq6
谢谢。我会随时向您报告最新情况。 - VendettaDroid
太棒了,它按预期工作。感谢您花费宝贵的时间。我非常非常感激。 - VendettaDroid
显示剩余11条评论

22

从 @iDroid Explorer 的回答中,只需再进行一步操作。

在构建对话框时添加此行。

dialog.getWindow().setBackgroundDrawable(new ColorDrawable(android.graphics.Color.TRANSPARENT));

这样做将使矩形消失(实际上是透明的),并获得一个完美的圆角对话框。


2
不错!由于语法错误,请稍作编辑: dialog.getWindow().setBackgroundDrawable(new ColorDrawable(android.graphics.Color.TRANSPARENT)); - VAdaihiep
只需将对话框背景设置为圆形可绘制项,而不是视图,您就不需要两个调用。 - enl8enmentnow

15

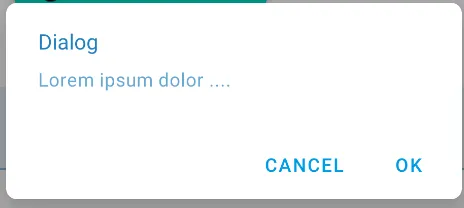
只需使用官方 Material Components 库中包含的 MaterialAlertDialogBuilder 即可。

new MaterialAlertDialogBuilder(MainActivity.this,R.style.MyThemeOverlay_MaterialComponents_MaterialAlertDialog)
            .setTitle("Dialog")
            .setMessage("Lorem ipsum dolor ....")
            .setPositiveButton("Ok", /* listener = */ null)
            .setNegativeButton("Cancel", /* listener = */ null)
            .show();

然后使用 shapeAppearanceOverlay 属性定义样式。

 <style name="MyThemeOverlay.MaterialComponents.MaterialAlertDialog" parent="@style/ThemeOverlay.MaterialComponents.MaterialAlertDialog">
    <item name="shapeAppearanceOverlay">@style/ShapeAppearanceOverlay.MyApp.Dialog.Rounded</item>
  </style>

  <style name="ShapeAppearanceOverlay.MyApp.Dialog.Rounded" parent="">
    <item name="cornerFamily">rounded</item>
    <item name="cornerSize">8dp</item>
  </style>

在此输入图片描述


3
非常好的解释。谢谢先生。 - Rahul Kushwaha
1
不错的简单解决方案!但是,我不得不在"MyThemeOverlay.MaterialComponents.MaterialAlertDialog"中添加'<item name="colorSurface">@color/<your resource></item>',否则我的应用程序会崩溃。 - Danny E.K. van der Kolk

5

最简单的方法:

dialog_card.xml

<?xml version="1.0" encoding="utf-8"?>
<shape xmlns:android="http://schemas.android.com/apk/res/android">
    <solid android:color="@android:color/white"/>
    <corners android:radius="8dp"/>
</shape>

themes.xml

<!--    ... your other style codes -->

<style name="MyAlertTheme" parent="@style/Theme.AppCompat.Light.Dialog.Alert">
    <item name="android:windowBackground">@drawable/dialog_card</item>
</style>

在您的活动中

AlertDialog.Builder alert = new AlertDialog.Builder(MainActivity.this, R.style.MyAlertTheme);
alert.setTitle("<Your Title>");
alert.setMessage("<Your Message>");
// ...

奖励:

如果您想在应用程序的任何地方使用这个 AlertDialog
只需在您的 AppTheme 中添加 <item name="alertDialogTheme">@style/MyAlertTheme</item>

这样,您就不必在 AlertDialog.Builder 的第二个参数中传递 R.style.MyAlertTheme

themes.xml

<style name="AppTheme" parent="Theme.AppCompat.Light.NoActionBar">
    <item name="colorPrimary">@color/colorPrimary</item>
    <item name="colorPrimaryDark">@color/colorPrimaryDark</item>
    <item name="colorAccent">@color/colorAccent</item>
<!-- here -->
    <item name="alertDialogTheme">@style/MyAlertTheme</item>
</style>

我不得不使用 android:background 而不是 android:windowBackground - arlomedia

5
我已经尝试了下面的方法,它对我有效。即使在ICS上也有效。
1.首先,我将主题应用于我的AlertDialog。
final Dialog  nag = new Dialog(this,android.R.style.Theme_Translucent_NoTitleBar_Fullscreen);
        nag.requestWindowFeature(Window.FEATURE_NO_TITLE);
        nag.setCancelable(true);
        nag.setContentView(R.layout.pop_exit);  
        Button btnNO = (Button)nag.findViewById(R.id.btn_popup_NO);
        Button btnYES = (Button)nag.findViewById(R.id.btn_popup_YES);


        btnNO.setOnClickListener(new OnClickListener() {

            @Override
            public void onClick(View v) {

            nag.cancel();


            }
        });

        btnYES.setOnClickListener(new OnClickListener() {

            @Override
            public void onClick(View v) {

                System.exit(0);

            }
        });

        nag.show();

2. 然后实现了Dialog视图的自定义布局

pop_exit.xml

    <?xml version="1.0" encoding="utf-8"?>
<LinearLayout xmlns:android="http://schemas.android.com/apk/res/android"
    android:orientation="vertical" android:layout_width="fill_parent"
    android:gravity="center" android:layout_height="fill_parent">

    <!-- <LinearLayout android:orientation="vertical" android:layout_marginLeft="20dp" 
        android:layout_marginRight="20dp" android:background="#95000056" android:layout_width="fill_parent" 
        android:layout_height="wrap_content"> -->

    <LinearLayout android:orientation="vertical"
        android:layout_marginLeft="20dp" android:layout_marginRight="20dp"
        android:background="@drawable/round" android:layout_width="fill_parent"
        android:layout_height="wrap_content">


        <TextView android:text="Exit Application"
            android:layout_width="wrap_content" android:layout_height="wrap_content"
            android:layout_gravity="center_horizontal" android:textStyle="bold"
            android:textColor="#fff" android:textSize="20dp"
            android:layout_marginTop="5dp" />


        <LinearLayout android:layout_width="fill_parent"
            android:layout_height="wrap_content" android:orientation="horizontal"
            android:layout_marginTop="5dp" android:weightSum="2"
            android:layout_marginLeft="10dp" android:layout_marginRight="10dp"
            android:gravity="center">

            <Button android:text="No" android:layout_weight="1"
                android:gravity="center" android:layout_width="wrap_content"
                android:layout_height="wrap_content" android:id="@+id/btn_popup_NO" />

            <Button android:text="Ok" android:layout_weight="1"
                android:layout_width="wrap_content" android:layout_height="wrap_content"
                android:id="@+id/btn_popup_YES" />
        </LinearLayout>


    </LinearLayout>

</LinearLayout>

3. 现在为pop_exit.xml的父布局添加背景形状

round.xml // 形状文件

    <?xml version="1.0" encoding="utf-8"?>
<shape xmlns:android="http://schemas.android.com/apk/res/android">
    <solid android:color="#99000056" />
    <corners android:radius="35px" />
    <padding android:left="0dp" android:top="0dp" android:right="0dp"
        android:bottom="0dp" />
</shape>

我只是这么做。它也适用于ICS。

希望能帮到你。如果不行,请告诉我。

享受编程的乐趣...

:)


谢谢你抽出时间来回答。如果你看一下上面的评论以及android116的回答的修订历史,他基本上和你说的一样。我再次向你重申,我知道我可以通过这种方法实现圆角,但我正在使用的是AlertDialog.Builder。我编写的代码对于GB来说是正常的,但对于ICS来说却不起作用。我想知道原因是什么。 - VendettaDroid
它的工作正常,但是在警告框外面会出现圆角矩形。这意味着它会给出一个带有圆角矩形的外层和矩形的内层,请帮我。我只想要一个圆角矩形层。 - Satheesh

4

我尝试过这样做,但是我的对话框布局有圆角,然后外部矩形默认是 Android 对话框主题的一部分。因此,可以想象一个圆角布局在矩形内部,这就是我得到的结果。 - VendettaDroid
可以考虑放弃使用警告对话框,改用自定义对话框。 - IAmGroot
那不是问题。我知道如果我选择对话框活动和其他选项,我可以很容易地做到这一点。但是我想确保我可以按照自己的方式更改AlertDialog样式。 - VendettaDroid

3
  1. 在drawable文件夹中创建一个带有dialog_corner的xml文档。
<?xml version="1.0" encoding="utf-8"?>
<shape xmlns:android="http://schemas.android.com/apk/res/android">
  <solid android:color="@color/main_background"/>
  <corners
    android:topLeftRadius="@dimen/margin_10" 
    android:topRightRadius="@dimen/margin_10"
    android:bottomRightRadius="@dimen/margin_10" 
    android:bottomLeftRadius="@dimen/margin_10" />
</shape>

2. 放置布局

android:background="@drawable/dialog_corner"

3. 在您的Java文件中保留以下代码

View mView = LayoutInflater.from(mContext).inflate(R.layout.layout_pob,null); 
alertDialog.getWindow().setBackgroundDrawable(new ColorDrawable(Color.TRANSPARENT));

0

这对我有效:

<style name="AppTheme.AlertDialog" parent="Theme.AppCompat.Light.Dialog.Alert">
        <item name="android:colorBackground">@android:color/transparent</item>
        <item name="android:background">@drawable/dialog_bg</item>
</style>

dialog_bg.xml

<?xml version="1.0" encoding="utf-8"?>
<shape xmlns:android="http://schemas.android.com/apk/res/android">
    <solid android:color="@color/white"/>
    <corners android:radius="12dp"/>
</shape>

网页内容由stack overflow 提供, 点击上面的
可以查看英文原文,
原文链接