我该如何简单地设置Flutter中AppBar的高度?
AppBar的标题应该保持垂直居中。
我该如何简单地设置Flutter中AppBar的高度?
AppBar的标题应该保持垂直居中。
class MyApp extends StatelessWidget {
  @override
  Widget build(BuildContext context) {
    return MaterialApp(
      title: 'Example',
      home: Scaffold(
        appBar: PreferredSize(
          preferredSize: Size.fromHeight(50.0), // here the desired height
          child: AppBar(
            // ...
          )
        ),
        body: // ...
      )
    );
  }
}
centerTitle属性将其居中显示。 - CopsOnRoadtoolbarHeight: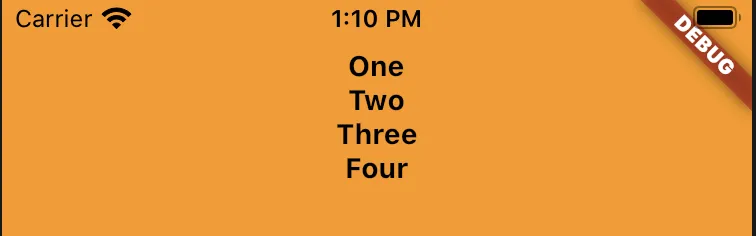
不再需要使用PreferredSize。现在可以使用toolbarHeight和flexibleSpace。
AppBar(
  toolbarHeight: 120, // Set this height
  flexibleSpace: Container(
    color: Colors.orange,
    child: Column(
      children: [
        Text('1'),
        Text('2'),
        Text('3'),
        Text('4'),
      ],
    ),
  ),
)
你可以使用PreferredSize和flexibleSpace来实现:
appBar: PreferredSize(
  preferredSize: Size.fromHeight(100.0),
  child: AppBar(
    automaticallyImplyLeading: false, // hides leading widget
    flexibleSpace: SomeWidget(),
  )
),
通过这种方式,您可以保持AppBar的elevation以使其阴影可见,并具有自定义高度,这正是我正在寻找的。不过,您确实需要在SomeWidget中设置间距。
最简单的方法是在您的AppBar中使用toolbarHeight属性
示例:
AppBar(
   title: Text('Flutter is great'),
   toolbarHeight: 100,
  ),
flexibleSpace 属性以提供更多的灵活性。

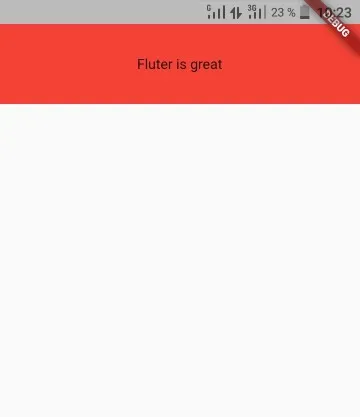
示例::
appBar: PreferredSize(
     preferredSize: Size(100, 80), //width and height
          // The size the AppBar would prefer if there were no other constraints.
     child: SafeArea(
       child: Container(
         height: 100,
         color: Colors.red,
         child: Center(child: Text('Fluter is great')),
       ),
     ),
),
SafeArea 小部件。
toolBarHeight 的解决方案,第二个建议 "对于更多的控件,请使用 PreferedSize" -- 不一定需要,toolbarHeight 已经很好地完成了任务。 - CopsOnRoad在我撰写此文时,并不知晓PreferredSize。Cinn的答案更好地实现了这一点。
您可以创建自己的自定义小部件并设置自定义高度:
import "package:flutter/material.dart";

class Page extends StatelessWidget {
  @override
  Widget build(BuildContext context) {
    return new Column(children : <Widget>[new CustomAppBar("Custom App Bar"), new Container()],);
  }
}


class CustomAppBar extends StatelessWidget {

  final String title;
  final double barHeight = 50.0; // change this for different heights

  CustomAppBar(this.title);

  @override
  Widget build(BuildContext context) {
    final double statusbarHeight = MediaQuery
        .of(context)
        .padding
        .top;

    return new Container(
      padding: new EdgeInsets.only(top: statusbarHeight),
      height: statusbarHeight + barHeight,
      child: new Center(
        child: new Text(
          title,
          style: new TextStyle(fontSize: 20.0, fontWeight: FontWeight.bold),
        ),
      ),
    );
  }
}
class MyAppBar extends AppBar with PreferredSizeWidget {
  @override
  get preferredSize => Size.fromHeight(50);

  MyAppBar({Key key, Widget title}) : super(
    key: key,
    title: title,
    // maybe other AppBar properties
  );
}
或者这样做
class MyAppBar extends PreferredSize {
  MyAppBar({Key key, Widget title}) : super(
    key: key,
    preferredSize: Size.fromHeight(50),
    child: AppBar(
      title: title,
      // maybe other AppBar properties
    ),
  );
}
然后使用它来替代标准的那个
你可以简单地使用toolbarHeight,如下所示:
        appBar: AppBar(
        toolbarHeight: 70.0, // add this line
        centerTitle: true,   // add this line
        title: Text('your title'),
        ),
但如果您有任何操作,上面的代码不按照您的要求工作 您可以使用这段代码
AppBar(
    centerTitle: true,
    title: Padding(
      padding: const EdgeInsets.all(16.0),
      child: Stack(
        alignment: Alignment.center,
        children: [
          Row(
            mainAxisSize: MainAxisSize.max,
            mainAxisAlignment: MainAxisAlignment.center,
            children: [
              Text('Chats', style: TextStyle(color:Colors.black),),
              Icon(Icons.add, color: Colors.black,),
            ],
          ),
          Align(
            alignment: Alignment.centerRight,
            child: Icon(Icons.add, color: Colors.black,),
          ),
        ],
      ),
    ),
  )
只需使用工具栏的高度即可轻松实现顶部停靠效果。
AppBar(
 title: Text("NASHIR'S APP"),
 toolbarHeight: 100,
),
Cinn的答案非常好,但是有一个问题。
PreferredSize小部件将立即从屏幕顶部开始,而不考虑状态栏,因此它的高度的一部分将被状态栏的高度阴影化。这也适用于侧面凹口。
解决方案:使用SafeArea包装preferredSize的子项。
appBar: PreferredSize(
  //Here is the preferred height.
  preferredSize: Size.fromHeight(50.0),
  child: SafeArea(
    child: AppBar(
      flexibleSpace: ...
    ),
  ),
),
SafeArea 是为了减少状态栏的高度,你却用 MediaQuery.of(context).padding.top 再次添加了它?我认为这里不需要使用 SafeArea。 - RydeSafeArea很重要,这样应用程序栏就不会与状态栏重叠,但实际上并不需要MediaQuery.of(context).padding.top。我已经编辑了答案,谢谢。 - Tayan您可以使用Appbar的toolbarHeight属性,它可以实现您想要的效果。
AppBar高度的问题,而不是“设置”它。 - Buğra Ekuklu