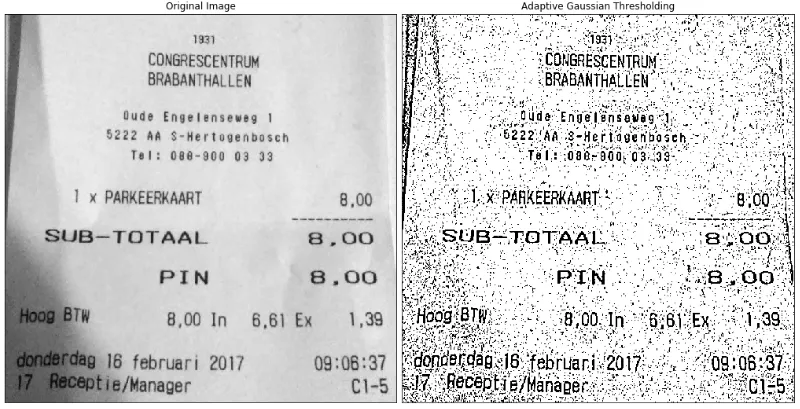
这种任务也可以使用GraphCuts来完成。为了运行代码,您需要安装maxflow库。我从他们的教程中快速复制并修改了代码,以便您更容易地运行它。只需调整平滑参数以增加或减少图像的去噪程度即可。
import cv2
import numpy as np
import matplotlib.pyplot as plt
import maxflow
# Important parameter
# Higher values means making the image smoother
smoothing = 110
# Load the image and convert it to grayscale image
image_path = 'your_image.png'
img = cv2.imread('image_path')
img = cv2.cvtColor(img, cv2.COLOR_BGR2GRAY)
img = 255 * (img > 128).astype(np.uint8)
# Create the graph.
g = maxflow.Graph[int]()
# Add the nodes. nodeids has the identifiers of the nodes in the grid.
nodeids = g.add_grid_nodes(img.shape)
# Add non-terminal edges with the same capacity.
g.add_grid_edges(nodeids, smoothing)
# Add the terminal edges. The image pixels are the capacities
# of the edges from the source node. The inverted image pixels
# are the capacities of the edges to the sink node.
g.add_grid_tedges(nodeids, img, 255-img)
# Find the maximum flow.
g.maxflow()
# Get the segments of the nodes in the grid.
sgm = g.get_grid_segments(nodeids)
# The labels should be 1 where sgm is False and 0 otherwise.
img_denoised = np.logical_not(sgm).astype(np.uint8) * 255
# Show the result.
plt.subplot(121)
plt.imshow(img, cmap='gray')
plt.title('Binary image')
plt.subplot(122)
plt.title('Denoised binary image')
plt.imshow(img_denoised, cmap='gray')
plt.show()
# Save denoised image
cv2.imwrite('img_denoised.png', img_denoised)
kernel = np.ones((5,5),np.uint8)
然后使用内核运行 morphologyEx。
denoised = cv2.morphologyEx(image, cv2.MORPH_CLOSE, kernel)
如果文本被删除,您可以尝试侵蚀图像,这将“增加”黑色像素。如果噪声与数据一样大,这种方法将无法帮助。
erosion = cv2.erode(img,kernel,iterations = 1)