Android:如何将按钮对齐到底部并在其上方显示列表视图?

79

我想在ListView底部放置一个按钮。

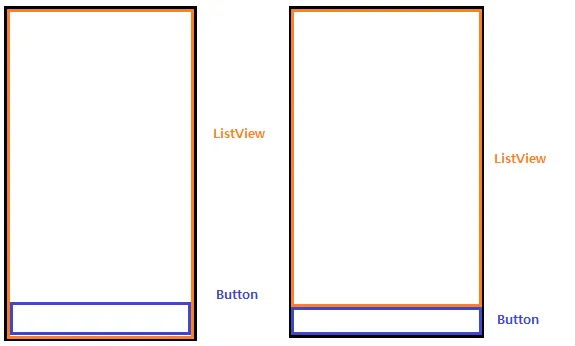
如果我使用RelativeLayout/FrameLayout,它会对齐,但是ListView会滚动到非常底部。

(在底部的按钮后面)

图片描述

FrameLayout:

<?xml version="1.0" encoding="utf-8"?>
<FrameLayout
    xmlns:android="http://schemas.android.com/apk/res/android"
    android:orientation="vertical"
    android:layout_width="fill_parent"
    android:layout_height="fill_parent">
    <ListView
        android:id="@+id/listview"
        android:layout_width="match_parent"
        android:layout_height="wrap_content"
        />
    <FrameLayout
        android:layout_width="wrap_content"
        android:layout_height="match_parent"
        android:layout_alignParentBottom="true">
        <Button
            android:id="@+id/btnButton"
            android:text="Hello"
            android:layout_width="match_parent"
            android:layout_height="wrap_content"
            android:layout_gravity="bottom" />
    </FrameLayout>
</FrameLayout>

相对布局:

<?xml version="1.0" encoding="utf-8"?>
<RelativeLayout
    xmlns:android="http://schemas.android.com/apk/res/android"
    android:orientation="vertical"
    android:layout_width="fill_parent"
    android:layout_height="fill_parent">
    <ListView
        android:id="@+id/listview"
        android:layout_width="match_parent"
        android:layout_height="match_parent"
        />
    <RelativeLayout
        android:layout_width="wrap_content"
        android:layout_height="wrap_content"
        android:layout_alignParentBottom="true">
        <Button
            android:id="@+id/btnButton"
            android:text="Hello"
            android:layout_width="match_parent"
            android:layout_height="wrap_content"
            android:layout_gravity="bottom" />
    </RelativeLayout>
</RelativeLayout>

上面两段代码只能像第一张图片那样工作。我想要的是第二张图片。

有人能帮忙吗?

谢谢。

8个回答

188

FrameLayout 的目的是将东西叠加在一起。这不是你想要的。

在你的 RelativeLayout 示例中,你将 ListView 的高度和宽度设置为 MATCH_PARENT,这将使其占用与其父元素相同的空间,从而占用页面上的所有空间(并覆盖按钮)。

尝试使用以下代码:

<LinearLayout 
   android:layout_width="match_parent" 
   android:layout_height="match_parent" 
   android:orientation="vertical">
  <ListView 
     android:layout_width="match_parent" 
     android:layout_height="0dip" 
     android:layout_weight="1"/>
  <Button 
     android:layout_width="match_parent" 
     android:layout_height="wrap_content" 
     android:layout_weight="0"/>
</LinearLayout>

layout_weight 属性决定了额外空间的使用方式。由于 Button 不想超出它所需的空间,所以它的权重为0。而 ListView 则希望占用所有额外的空间,所以它的权重为1。

你也可以使用 RelativeLayout 实现类似的效果,但如果仅涉及这两个元素,那么使用 LinearLayout 更简单。


5
问题已解决,但android:weight应更改为android:layout_weight - NFC guy
3
但是这个解决方案不能处理列表视图不足以填满整个屏幕垂直空间的情况。如果列表视图只填满了屏幕的一半,那么按钮将出现在列表视图正下方,因此会出现在屏幕中间的某个位置。在这种情况下,我们该如何让按钮始终出现在底部? - MediumOne
1
android:layout_weight="0dip" 不正确,应该是 android:layout_weight="0",不过这种方法还是很好的。 - Illegal Argument
2
这个回答比我在官方文档中遇到的任何东西都要更好地解释了问题,因为官方文档似乎只是为那些已经了解问题的人解释一些东西。 - user1725145
如果有三个元素,一个标题、一个页脚和一个列表视图,我该如何解决它? - Stefanija
显示剩余4条评论

4
  <?xml version="1.0" encoding="utf-8"?>
  <LinearLayout xmlns:android="http://schemas.android.com/apk/res/android"
      android:orientation="vertical"
      android:layout_width="fill_parent"
      android:layout_height="fill_parent"
      android:background="#ffffff"
  >

    <ListView android:id="@+id/ListView01" 
      android:layout_width="wrap_content" 
      android:layout_height="wrap_content" 
      android:layout_weight="1">
    </ListView>

    <FrameLayout android:id="@+id/FrameLayout01" 
      android:layout_width="fill_parent" 
      android:layout_height="wrap_content">
         <Button android:id="@+id/Button01" 
              android:layout_width="wrap_content" 
              android:layout_height="wrap_content" 
              android:text="button" 
              android:layout_gravity="center_horizontal">
        </Button>
    </FrameLayout>

  </LinearLayout>

这是您正在寻找的设计。试试看。


4

我需要在底部放置两个并排的按钮。 我使用了水平线性布局,但是为按钮的线性布局分配 android:layout_height="0dp"android:layout_weight="0" 并没有起作用。 只为按钮的线性布局分配 android:layout_height="wrap_content" 就可以了。 这是我的有效布局:

<LinearLayout xmlns:android="http://schemas.android.com/apk/res/android"
    android:layout_width="match_parent"
    android:layout_height="match_parent"
    android:orientation="vertical" >

    <ListView
        android:id="@+id/listView1"
        android:layout_width="match_parent"
        android:layout_height="0dp" 
        android:layout_weight="1" />

    <LinearLayout 
        android:layout_width="match_parent"
        android:layout_height="wrap_content" 
        android:orientation="horizontal">

        <Button
            android:id="@+id/new_button"
            android:layout_width="0dp"
            android:layout_height="wrap_content"
            android:layout_weight="1"
            android:text="New" />

        <Button
            android:id="@+id/suggest_button"
            android:layout_width="0dp"
            android:layout_height="wrap_content"
            android:layout_weight="1"
            android:text="Suggest" />

    </LinearLayout>

</LinearLayout>

2
我正在使用Xamarin Android,我的要求与上面的William T. Mallard完全相同,即在ListView下方有2个并排的按钮。 然而,这个答案的解决方案在Xamarin Studio中不起作用 - 当我将ListView的高度设置为“0dp”时,ListView就会消失。
我的Xamarin Android代码如下:
<?xml version="1.0" encoding="utf-8"?>
<RelativeLayout xmlns:android="http://schemas.android.com/apk/res/android"
android:orientation="vertical"
android:layout_width="fill_parent"
android:layout_height="fill_parent">

<ListView
    android:id="@+id/ListView1"
    android:layout_width="fill_parent"
    android:layout_height="wrap_content"
    android:layout_weight="1"
    android:layout_above="@+id/ButtonsLinearLayout" />
<LinearLayout
    android:id="@id/ButtonsLinearLayout"
    android:layout_height="wrap_content"
    android:layout_width="fill_parent"
    android:orientation="horizontal"
    android:layout_alignParentBottom="true">
    <Button
        android:id="@+id/Button1"
        android:layout_width="wrap_content"
        android:layout_height="wrap_content"
        android:layout_weight="1" />
    <Button
        android:id="@+id/Button2"
        android:layout_width="wrap_content"
        android:layout_height="wrap_content"
        android:layout_weight="1" />
</LinearLayout>
</RelativeLayout>

我将ButtonsLinearLayout对齐到屏幕底部,并将ListView设置为在ButtonsLinearLayout上方。

2

RelativeLayout 会忽略其子视图的 android:layout_widthandroid:layout_height 属性,如果这些子视图有适当定义它们的 leftrighttopbottom 值的属性。

为了实现右侧图像上显示列表在按钮之上的效果,您的布局应该如下所示:

<RelativeLayout
    xmlns:android="http://schemas.android.com/apk/res/android"
    android:layout_width="match_parent"
    android:layout_height="match_parent">

    <android.support.v7.widget.RecyclerView
        android:id="@android:id/list"
        android:layout_width="match_parent"
        android:layout_height="match_parent"
        android:layout_above="@android:id/button1"
        android:layout_alignParentTop="true"/>

    <Button
        android:id="@android:id/button1"
        android:layout_width="match_parent"
        android:layout_height="wrap_content"
        android:layout_alignParentBottom="true"
        android:text="@android:string/ok"/>

</RelativeLayout>

关键是要在你的RecyclerView中定义android:layout_alignParentTop(定义top值)和android:layout_above(定义bottom值)。这样,RelativeLayout将忽略android:layout_height="match_parent",并且RecyclerView将被放置在Button上方。
另外,如果您有更复杂的布局并且仍然需要定义这些值,请确保查看android:layout_alignWithParentIfMissing

0
在你的相对布局中,listview 的高度是 match_parent,这在2.1及更早版本中是fill_parent,所以最好的解决方案是,如果你想使用相对布局,那么首先声明你的按钮,然后再声明你的list view,将 list view 的位置设置为在你的按钮 id 上方。如果你想让按钮始终位于底部,则将其设置为 alignParentBottom。 代码片段如下:
<RelativeLayout 
android:layout_width="fill_parent" android:layout_height="fill_parent"
android:id="@+id/rl1"><Button 
 android:layout_width="MATCH_PARENT" 
 android:layout_height="WRAP_CONTENT" 
 /><ListView 
 android:layout_width="MATCH_PARENT" 
 android:layout_height="0" 
 android:layout_above="@id/listview"/></RelativeLayout>

这可以防止您的列表视图占据整个空间并使您的按钮出现..


过时的术语是“fill_parent”,而不是“match_parent”。这对我来说很有意义,因为“fill”意味着两个维度,而“match”则暗示“与之相同”。 - William T. Mallard

0

@jclova 还有一个你可以做的事情是在相对布局中使用 layout-below=@+id/listviewid


0

这将是问题的最佳和最简单的解决方案。只需在您想要移动到该布局上方的布局中添加 android:layout_above="@id/nameOfId"

<?xml version="1.0" encoding="utf-8"?>
<RelativeLayout xmlns:android="http://schemas.android.com/apk/res/android"
    xmlns:app="http://schemas.android.com/apk/res-auto"
    xmlns:tools="http://schemas.android.com/tools"
    android:layout_width="match_parent"
    android:layout_height="match_parent"
    tools:context="com.sumeru.commons.activity.CommonDocumentUploadActivity">

    <ListView

        android:id="@+id/documentList"
        android:layout_width="match_parent"
        android:layout_height="wrap_content"
        android:layout_above="@id/verifyOtp" />


    <com.sumeru.commons.helper.CustomButton
        android:id="@+id/verifyOtp"
        android:layout_width="match_parent"
        android:layout_height="wrap_content"
        android:layout_alignParentBottom="true"
        android:text="@string/otp_verification" />
</RelativeLayout>

网页内容由stack overflow 提供, 点击上面的
可以查看英文原文,
原文链接