有没有Android的LinearLayout属性可以使其正确地包裹子控件?
意思是:我有可变数量的子控件,希望将它们水平排列,如下所示:
例如:控件1,控件2,控件3,...
我通过设置以下方式实现:
ll.setOrientation(LinearLayout.HORIZONTAL);
foreach (Child c in children)
  ll.addView(c);
但是,如果我有很多子控件,则最后一个会被截断,而不是转到下一行。
有什么办法可以解决这个问题吗?
有没有Android的LinearLayout属性可以使其正确地包裹子控件?
意思是:我有可变数量的子控件,希望将它们水平排列,如下所示:
例如:控件1,控件2,控件3,...
我通过设置以下方式实现:
ll.setOrientation(LinearLayout.HORIZONTAL); foreach (Child c in children) ll.addView(c);
但是,如果我有很多子控件,则最后一个会被截断,而不是转到下一行。
有什么办法可以解决这个问题吗?
 - Rana Ranvijay Singh
import android.content.Context;
import android.util.AttributeSet;
import android.view.View;
import android.view.ViewGroup;

/**
 *
 * @author RAW
 */
public class FlowLayout extends ViewGroup {

    private int line_height;

    public static class LayoutParams extends ViewGroup.LayoutParams {

        public final int horizontal_spacing;
        public final int vertical_spacing;

        /**
         * @param horizontal_spacing Pixels between items, horizontally
         * @param vertical_spacing Pixels between items, vertically
         */
        public LayoutParams(int horizontal_spacing, int vertical_spacing) {
            super(0, 0);
            this.horizontal_spacing = horizontal_spacing;
            this.vertical_spacing = vertical_spacing;
        }
    }

    public FlowLayout(Context context) {
        super(context);
    }

    public FlowLayout(Context context, AttributeSet attrs) {
        super(context, attrs);
    }

    @Override
    protected void onMeasure(int widthMeasureSpec, int heightMeasureSpec) {
        assert (MeasureSpec.getMode(widthMeasureSpec) != MeasureSpec.UNSPECIFIED);

        final int width = MeasureSpec.getSize(widthMeasureSpec) - getPaddingLeft() - getPaddingRight();
        int height = MeasureSpec.getSize(heightMeasureSpec) - getPaddingTop() - getPaddingBottom();
        final int count = getChildCount();
        int line_height = 0;

        int xpos = getPaddingLeft();
        int ypos = getPaddingTop();

        int childHeightMeasureSpec;
        if (MeasureSpec.getMode(heightMeasureSpec) == MeasureSpec.AT_MOST) {
            childHeightMeasureSpec = MeasureSpec.makeMeasureSpec(height, MeasureSpec.AT_MOST);
        } else {
            childHeightMeasureSpec = MeasureSpec.makeMeasureSpec(0, MeasureSpec.UNSPECIFIED);
        }


        for (int i = 0; i < count; i++) {
            final View child = getChildAt(i);
            if (child.getVisibility() != GONE) {
                final LayoutParams lp = (LayoutParams) child.getLayoutParams();
                child.measure(MeasureSpec.makeMeasureSpec(width, MeasureSpec.AT_MOST), childHeightMeasureSpec);
                final int childw = child.getMeasuredWidth();
                line_height = Math.max(line_height, child.getMeasuredHeight() + lp.vertical_spacing);

                if (xpos + childw > width) {
                    xpos = getPaddingLeft();
                    ypos += line_height;
                }

                xpos += childw + lp.horizontal_spacing;
            }
        }
        this.line_height = line_height;

        if (MeasureSpec.getMode(heightMeasureSpec) == MeasureSpec.UNSPECIFIED) {
            height = ypos + line_height;

        } else if (MeasureSpec.getMode(heightMeasureSpec) == MeasureSpec.AT_MOST) {
            if (ypos + line_height < height) {
                height = ypos + line_height;
            }
        }
        setMeasuredDimension(width, height);
    }

    @Override
    protected ViewGroup.LayoutParams generateDefaultLayoutParams() {
        return new LayoutParams(1, 1); // default of 1px spacing
    }

    @Override
    protected android.view.ViewGroup.LayoutParams generateLayoutParams(
        android.view.ViewGroup.LayoutParams p) {
        return new LayoutParams(1, 1, p);
    }

    @Override
    protected boolean checkLayoutParams(ViewGroup.LayoutParams p) {
        if (p instanceof LayoutParams) {
            return true;
        }
        return false;
    }

    @Override
    protected void onLayout(boolean changed, int l, int t, int r, int b) {
        final int count = getChildCount();
        final int width = r - l;
        int xpos = getPaddingLeft();
        int ypos = getPaddingTop();

        for (int i = 0; i < count; i++) {
            final View child = getChildAt(i);
            if (child.getVisibility() != GONE) {
                final int childw = child.getMeasuredWidth();
                final int childh = child.getMeasuredHeight();
                final LayoutParams lp = (LayoutParams) child.getLayoutParams();
                if (xpos + childw > width) {
                    xpos = getPaddingLeft();
                    ypos += line_height;
                }
                child.layout(xpos, ypos, xpos + childw, ypos + childh);
                xpos += childw + lp.horizontal_spacing;
            }
        }
    }
}
以及XML文件
/* you must write your package name and class name */
<org.android.FlowLayout
                android:id="@+id/flow_layout"
                android:layout_marginLeft="5dip"
                android:layout_width="fill_parent"
                android:layout_height="wrap_content"/>
new LayoutParams(1, 1, p) 的构造函数,不知道为什么有人在没有尝试代码的情况下点赞。 - Faisal Naseerreturn new LayoutParams(1, 1, p);到return new LayoutParams(1, 1);//我的这个间距可以很好地工作//return new LayoutParams(10, 30); - RicNjesh对于任何需要此类行为的人:
private void populateLinks(LinearLayout ll, ArrayList<Sample> collection, String header) {

    Display display = getWindowManager().getDefaultDisplay();
    int maxWidth = display.getWidth() - 10;

    if (collection.size() > 0) {
        LinearLayout llAlso = new LinearLayout(this);
        llAlso.setLayoutParams(new LayoutParams(LayoutParams.FILL_PARENT,
                LayoutParams.WRAP_CONTENT));
        llAlso.setOrientation(LinearLayout.HORIZONTAL);

        TextView txtSample = new TextView(this);
        txtSample.setText(header);

        llAlso.addView(txtSample);
        txtSample.measure(0, 0);

        int widthSoFar = txtSample.getMeasuredWidth();
        for (Sample samItem : collection) {
            TextView txtSamItem = new TextView(this, null,
                    android.R.attr.textColorLink);
            txtSamItem.setText(samItem.Sample);
            txtSamItem.setPadding(10, 0, 0, 0);
            txtSamItem.setTag(samItem);
            txtSamItem.setOnClickListener(new OnClickListener() {
                @Override
                public void onClick(View v) {
                    TextView self = (TextView) v;
                    Sample ds = (Sample) self.getTag();

                    Intent myIntent = new Intent();
                    myIntent.putExtra("link_info", ds.Sample);
                    setResult("link_clicked", myIntent);
                    finish();
                }
            });

            txtSamItem.measure(0, 0);
            widthSoFar += txtSamItem.getMeasuredWidth();

            if (widthSoFar >= maxWidth) {
                ll.addView(llAlso);

                llAlso = new LinearLayout(this);
                llAlso.setLayoutParams(new LayoutParams(
                        LayoutParams.FILL_PARENT,
                        LayoutParams.WRAP_CONTENT));
                llAlso.setOrientation(LinearLayout.HORIZONTAL);

                llAlso.addView(txtSamItem);
                widthSoFar = txtSamItem.getMeasuredWidth();
            } else {
                llAlso.addView(txtSamItem);
            }
        }

        ll.addView(llAlso);
    }
}
在过去,许多定制的解决方案和库都尝试并确实解决了这个问题。
从Constraint Layout 2.0开始,我们现在可以使用Flow
Flow是一种新的虚拟布局,用于构建链式布局,当它们用完空间时,它们可以换到下一行,甚至换到屏幕的另一部分。 当您正在布置多个项目,并且不确定容器在运行时会有多大时,这非常有用。 您可以使用此功能基于应用程序中的动态大小(例如旋转时的屏幕宽度)构建布局。
以下是xml的外观:
<androidx.constraintlayout.helper.widget.Flow
   android:layout_width="0dp"
   android:layout_height="wrap_content"
   app:layout_constraintStart_toStartOf="parent"
   app:layout_constraintEnd_toEndOf="parent"
   app:layout_constraintTop_toTopOf="parent"
   app:flow_wrapMode="chain"
   app:constraint_referenced_ids="card1, card2, card3"
   />
注意 app:constraint_referenced_ids 和 app:flow_wrapMode 属性。
我们使用第一个属性来传递视图,并使用第二个属性选择如何包装它们。
app:flow_wrapMode 有三个不同的选项:
none: 创建一个单一的链,如果内容不适合则溢出
chain: 在溢出时,为溢出元素添加另一个链
align: 类似于chain,但将行对齐为列
更多详情请查看Android Developers帖子和官方文档
寻找类似但更简单的问题解决方案,即在水平布局中包装子文本内容。 kape123的解决方案很好。但是为这个问题找到一个更简单的解决方案,使用ClickableSpan。 也许对于某些简单情况会有用。 片段:
        String[] stringSource = new String[sourceList.size()];
        for (int i = 0; c < sourceList.size(); i++) {
            String text = sourceList.get(i);
            stringSource[i] = text;
        }

        SpannableString totalContent = new SpannableString(TextUtils.join(",", stringSource));
        int start = 0;
        for (int j = 0; j < stringSource.length(); j++) {
            final String text = stringSource[j];
            ClickableSpan span = new ClickableSpan() {

        @Override
                public void updateDrawState(TextPaint ds) {
                    ds.setUnderlineText(true);
                    ds.setColor(getResources().getColor(R.color.green));
                }
                @Override
                public void onClick(View widget) {
                    // the text clicked
                }
            };
    int end = (start += text.length());
            totalContent.setSpan(span, start, end, 0);
            star = end + 1;
        }

        TextView wrapperView = (TextView) findViewById(horizontal_container_id);
        wrapperView.setMovementMethod(LinkMovementMethod.getInstance());

        wrapperView.setText(totalContent, BufferType.SPANNABLE);
    }
我最终采用了 Randy Sugianto 'Yuku的答案 中修改后的代码:
import android.content.Context
import android.util.AttributeSet
import android.view.View
import android.view.View.MeasureSpec.*
import android.view.ViewGroup
import androidx.core.content.withStyledAttributes
import androidx.core.view.children
import *.*.*.R


class FlowLayout(context: Context, attributeSet: AttributeSet) : ViewGroup(context, attributeSet) {

    private var lineHeight: Int = 0

    private var horizontalSpacing = 0F
    private var verticalSpacing = 0F

    init {
        context.withStyledAttributes(attributeSet, R.styleable.FlowLayout) {
            horizontalSpacing = getDimension(R.styleable.FlowLayout_horizontalSpacing, 0F)
            verticalSpacing = getDimension(R.styleable.FlowLayout_verticalSpacing, 0F)
        }
    }

    override fun onMeasure(widthMeasureSpec: Int, heightMeasureSpec: Int) {

        val width = getSize(widthMeasureSpec) - paddingLeft - paddingRight
        var height = getSize(heightMeasureSpec) - paddingTop - paddingBottom

        var xPosition = paddingLeft
        var yPosition = paddingTop

        val childHeightMeasureSpec = makeMeasureSpec(
            height, if (getMode(heightMeasureSpec) == AT_MOST) AT_MOST else UNSPECIFIED
        )

        children.forEach { child ->
            if (child.visibility != GONE) {
                val layoutParams = child.layoutParams as LayoutParamsWithSpacing
                child.measure(makeMeasureSpec(width, AT_MOST), childHeightMeasureSpec)
                val childWidth = child.measuredWidth
                lineHeight =
                        Math.max(lineHeight, child.measuredHeight + layoutParams.verticalSpacing)

                if (xPosition + childWidth > width) {
                    xPosition = paddingLeft
                    yPosition += lineHeight
                }

                xPosition += childWidth + layoutParams.horizontalSpacing
            }
        }

        if (getMode(heightMeasureSpec) == UNSPECIFIED ||
            getMode(heightMeasureSpec) == AT_MOST && yPosition + lineHeight < height
        ) {
            height = yPosition + lineHeight
        }

        setMeasuredDimension(width, height)
    }

    override fun onLayout(changed: Boolean, left: Int, top: Int, right: Int, bottom: Int) {
        val width = right - left
        var xPosition = paddingLeft
        var yPosition = paddingTop

        children.forEach { child ->
            if (child.visibility != View.GONE) {
                val layoutParams = child.layoutParams as LayoutParamsWithSpacing
                val childWidth = child.measuredWidth
                if (xPosition + childWidth > width) {
                    xPosition = paddingLeft
                    yPosition += lineHeight
                }
                child.layout(
                    xPosition, yPosition, xPosition + childWidth,
                    yPosition + child.measuredHeight
                )
                xPosition += layoutParams.horizontalSpacing
                xPosition += childWidth
            }
        }
    }

    override fun generateDefaultLayoutParams(): ViewGroup.LayoutParams =
        LayoutParamsWithSpacing(1, 1)

    override fun generateLayoutParams(layoutParams: LayoutParams) =
        LayoutParamsWithSpacing(horizontalSpacing.toInt(), verticalSpacing.toInt())

    override fun checkLayoutParams(layoutParams: LayoutParams) =
        layoutParams is LayoutParamsWithSpacing

    class LayoutParamsWithSpacing(val horizontalSpacing: Int, val verticalSpacing: Int) :
        ViewGroup.LayoutParams(0, 0)
}
<resources>
    <declare-styleable name="FlowLayout">
        <attr name="horizontalSpacing" format="dimension" />
        <attr name="verticalSpacing" format="dimension" />
    </declare-styleable>
</resources>
使用方法:
<*.*.*.*.FlowLayout
    android:layout_width="match_parent"
    android:layout_height="wrap_content"
    app:horizontalSpacing="8dp"
    app:verticalSpacing="8dp">

    <!-- ... -->

</*.*.*.*.FlowLayout>
我希望找到一个非常简单的解决方案,同时也要灵活(这就是为什么我使用LinearLayout的原因)。以下是我想出来的内容。
https://github.com/ShalakoSnell/Wrapping_Linear_Layout
注意:我已经包含了一个使用TextView的示例方法(请参见textViewArrayListForExample())。XML只是一个父视图LinearLayout,具有id和垂直方向,不需要其他内容。使用时,传入一个被包装在LinearLayout中的视图数组,以及父视图和上下文。(请参见viewAdapterArrayList(ArrayList textViews))。MainActivity.java
    @Override
    protected void onCreate(Bundle savedInstanceState) {
        super.onCreate(savedInstanceState);
        setContentView(R.layout.activity_main);

        new WrappingLinearLayout(
                viewAdapterArrayList(textViewArrayListForExample()), // <-- replace this with you own array of LinearLayouts
                (LinearLayout) findViewById(R.id.verticalLinearLayout),
                this);
    }
activity_main.xml
<?xml version="1.0" encoding="utf-8"?>
<LinearLayout xmlns:android="http://schemas.android.com/apk/res/android"
    xmlns:app="http://schemas.android.com/apk/res-auto"
    xmlns:tools="http://schemas.android.com/tools"
    android:id="@+id/verticalLinearLayout"
    android:orientation="vertical"
    android:layout_width="match_parent"
    android:layout_height="match_parent"
    tools:context=".MainActivity">

</LinearLayout>
WrappingLinearLayout.Java
package com.example.wrapping_linear_layout;

import android.content.Context;
import android.widget.LinearLayout;

import org.jetbrains.annotations.NotNull;

import java.util.ArrayList;

public class WrappingLinearLayout {

    public WrappingLinearLayout(@NotNull final ArrayList<LinearLayout> views, @NotNull final LinearLayout verticalLinearLayout, @NotNull final Context context) {
        verticalLinearLayout.post(new Runnable() {
            @Override
            public void run() {
                execute(views, verticalLinearLayout, context);
            }
        });

    }

    private void execute(@NotNull ArrayList<LinearLayout> views, @NotNull final LinearLayout verticalLinearLayout, @NotNull final Context context) {

        ArrayList<LinearLayout> horizontalLinearLayouts = new ArrayList<>();
        LinearLayout horizontalLinearLayout = new LinearLayout(context);
        horizontalLinearLayouts.add(horizontalLinearLayout);
        int verticalLinearLayoutWidth = verticalLinearLayout.getMeasuredWidth()
                - (verticalLinearLayout.getPaddingLeft()
                        + verticalLinearLayout.getPaddingRight());

        int totalWidthOfViews = 0;

        for (LinearLayout view : views) {

            view.measure(0, 0);
            int currentViewWidth = view.getMeasuredWidth();
            if (totalWidthOfViews + view.getMeasuredWidth() > verticalLinearLayoutWidth) {
                horizontalLinearLayout = new LinearLayout(context);
                horizontalLinearLayouts.add(horizontalLinearLayout);
                totalWidthOfViews = 0;
            }

            totalWidthOfViews += currentViewWidth;

            horizontalLinearLayout.addView(view);
        }

        for (LinearLayout linearLayout : horizontalLinearLayouts) {
            verticalLinearLayout.addView(linearLayout);
        }
    }

}
    private ArrayList<LinearLayout> viewAdapterArrayList(ArrayList<TextView> textViews) {
        ArrayList<LinearLayout> views = new ArrayList<>();
        for (TextView textView : textViews) {
            LinearLayout linearLayout = new LinearLayout(this);
            linearLayout.addView(textView);
            views.add(linearLayout);
        }
        return views;
    }

    private ArrayList<TextView> textViewArrayListForExample() {
        ArrayList<TextView> textViews = new ArrayList<>();
        LinearLayout.LayoutParams layoutParams = new LinearLayout.LayoutParams(
                ViewGroup.LayoutParams.WRAP_CONTENT,
                ViewGroup.LayoutParams.WRAP_CONTENT
        );
        for (int i = 0; i < 40; i++) {
            TextView textView = new TextView(this);
            textView.setText("View " + i + " |");
            if (i < 20) {
                if (i % 5 == 0) {
                    textView.setText("View longer view " + i + " |");
                } else if (i % 7 == 0) {
                    textView.setText("View different length view " + i + " |");
                } else if (i % 9 == 0) {
                    textView.setText("View very long view that is so long it's really long " + i + " |");
                }
            }
            textView.setMaxLines(1);
            textView.setBackground(new ColorDrawable(Color.BLUE));
            textView.setTextColor(Color.WHITE);
            textView.setLayoutParams(layoutParams);
            textView.setPadding(20, 2, 20, 2);
            layoutParams.setMargins(10, 2, 10, 2);
            textViews.add(textView);
        }
        return textViews;
    }
}
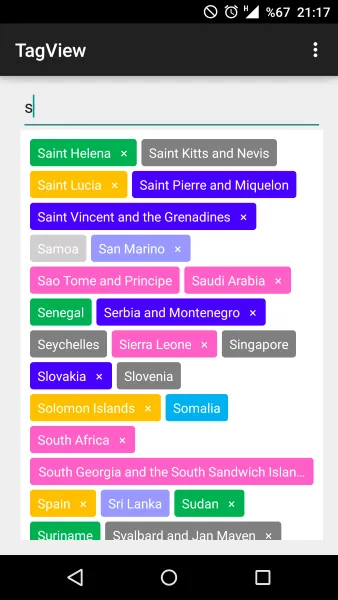
<com.cunoraz.tagview.TagView
        android:id="@+id/tag_group"
        android:layout_width="match_parent"
        android:layout_height="match_parent"
        android:layout_margin="10dp" />


  TagView tagGroup = (TagView)findviewById(R.id.tag_view);
 //You can add one tag
 tagGroup.addTag(Tag tag);
 //You can add multiple tag via ArrayList
 tagGroup.addTags(ArrayList<Tag> tags);
 //Via string array
 addTags(String[] tags);


   //set click listener
      tagGroup.setOnTagClickListener(new OnTagClickListener() {
            @Override
            public void onTagClick(Tag tag, int position) {
            }
        });

   //set delete listener
            tagGroup.setOnTagDeleteListener(new OnTagDeleteListener() {
            @Override
            public void onTagDeleted(final TagView view, final Tag tag, final int position) {
            }
        });
<androidx.constraintlayout.helper.widget.Flow
    android:layout_width="0dp"
    android:layout_height="wrap_content"
    app:constraint_referenced_ids="process_type1, process_type2, process_type3, process_type4, process_type5"
    app:flow_horizontalAlign="start"
    app:flow_wrapMode="chain"
    app:flow_verticalGap="10dp"
    app:flow_horizontalGap="10dp"
    app:flow_horizontalBias="0"
    app:flow_horizontalStyle="packed"
    app:flow_maxElementsWrap="2"
    app:layout_constraintEnd_toEndOf="parent"
    app:layout_constraintHorizontal_bias="0.0"
    app:layout_constraintStart_toStartOf="parent"
    app:layout_constraintTop_toTopOf="parent" />
    <ToggleButton
        android:id="@+id/process_type1"
        android:layout_width="wrap_content"
        android:layout_height="32dp"
        android:paddingHorizontal="10dp"
        android:checked="false"
        style="@style/BlueGrayRoundCheckButton"
        android:textSize="16sp"
        android:textOff="@string/process_type1"
        android:textOn="@string/process_type1"/>
    <ToggleButton
        android:id="@+id/process_type2"
        android:layout_width="wrap_content"
        android:layout_height="32dp"
        android:layout_marginLeft="@dimen/dim10"
        android:paddingHorizontal="10dp"
        android:checked="false"
        style="@style/BlueGrayRoundCheckButton"
        android:textSize="16sp"
        android:textOff="@string/process_type2"
        android:textOn="@string/process_type2"/>
    <ToggleButton
        android:id="@+id/process_type3"
        android:layout_width="wrap_content"
        android:layout_height="32dp"
        android:paddingHorizontal="10dp"
        android:checked="false"
        style="@style/BlueGrayRoundCheckButton"
        android:textSize="16sp"
        android:textOff="@string/process_type3"
        android:textOn="@string/process_type3"/>
    <ToggleButton
        android:id="@+id/process_type4"
        android:layout_width="wrap_content"
        android:layout_height="32dp"
        android:layout_marginLeft="@dimen/dim10"
        android:paddingHorizontal="10dp"
        android:checked="false"
        style="@style/BlueGrayRoundCheckButton"
        android:textSize="16sp"
        android:textOff="@string/process_type4"
        android:textOn="@string/process_type4"/>
    <ToggleButton
        android:id="@+id/process_type5"
        android:layout_width="wrap_content"
        android:layout_height="32dp"
        android:layout_marginLeft="@dimen/dim10"
        android:paddingHorizontal="10dp"
        android:checked="false"
        style="@style/BlueGrayRoundCheckButton"
        android:textSize="16sp"
        android:textOff="@string/process_type5"
        android:textOn="@string/process_type5"/>

</androidx.constraintlayout.widget.ConstraintLayout>